Ninja AutoBarista Pro AE1051 Review

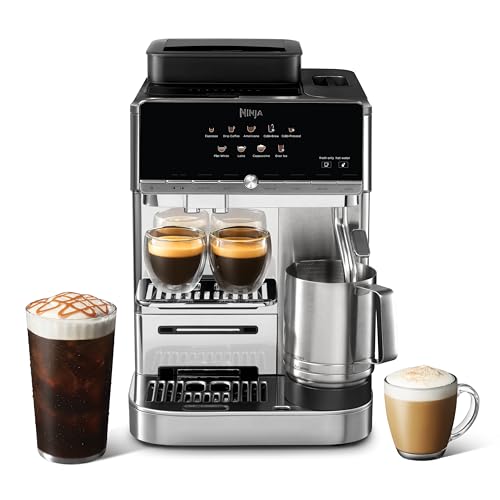
Introducing the Ninja AutoBarista Pro Fully Automatic Espresso Machine
I told my wife 2 years ago, when Ninja released (and crushed it with) their Luxe Cafe, that if they ever made a superautomatic espresso machine, they’d crush it. Because what does Ninja do? They look at the competition, see what can be improved upon, make those improvements, and then release a machine with an even lower price than their competitors can touch.
So, in a nutshell, what’s so impressive about the AutoBarista Pro? Well, it comes with some new features I have never seen on a superautomatic, namely:
1) Swappable hoppers with bean metering
2) 53mm brew group for single/double/triple shots
3) GrindIQ, where the grinder adjusts automatically
4) Exhaust fan out the back, to reduce moisture in the machine
5) Auto milk frother that repeatedly reincorporates the milk foam
AutoBarista AE1001 vs AutoBarista Pro AE1051
It’s really important to make the distinction between the AutoBarista and AutoBarista Pro. I tested the Pro model, which comes with several more drinks, and one more froth level. BUT, the main advantage of the pro version is that it has swappable hoppers. So, you can have a hopper for regular espresso, and one for decaf, for example.
The Pro version also has the following drinks, that the AE1001 does not have: Lungo, Cortado and Iced Latte.
| AE1001 AutoBarista | AE1051 AutoBarista Pro | |
|---|---|---|
| Espresso | ✅ | ✅ |
| Lungo | ❌ | ✅ |
| Drip Coffee | ✅ | ✅ |
| Americano | ✅ | ✅ |
| Cold-pressed | ✅ | ✅ |
| Over Ice | ✅ | ✅ |
| Cortado | ❌ | ✅ |
| Flat White | ✅ | ✅ |
| Latte Macchiato | ✅ | ✅ |
| Cappuccino | ✅ | ✅ |
| Iced Latte | ❌ | ✅ |
| Cold Brew | ✅ | ✅ |
| Extra thick froth | ❌ | ✅ |
Drink selection on the AutoBarista Pro
What I like about the AutoBarista is that it tries to not make the drink selection too complicated, and it only has 12 drinks to choose from. It has black drinks on the top, and milky drinks on the bottom.
Therefore, on the top we have espresso, lungo (long espresso), drip coffee (like American filter), americano (hot water, then espresso on top), cold-pressed (ambient temperature espresso) and over ice (hot extraction over ice).
On the bottom we have: cortado (short espresso with frothed milk), flat white (strong espresso and thinly foamted milk), latte (lots of foamed milk with espresso poured on top), cappuccino (espresso with steamed and frothed milk on top), iced latte, and cold brew.
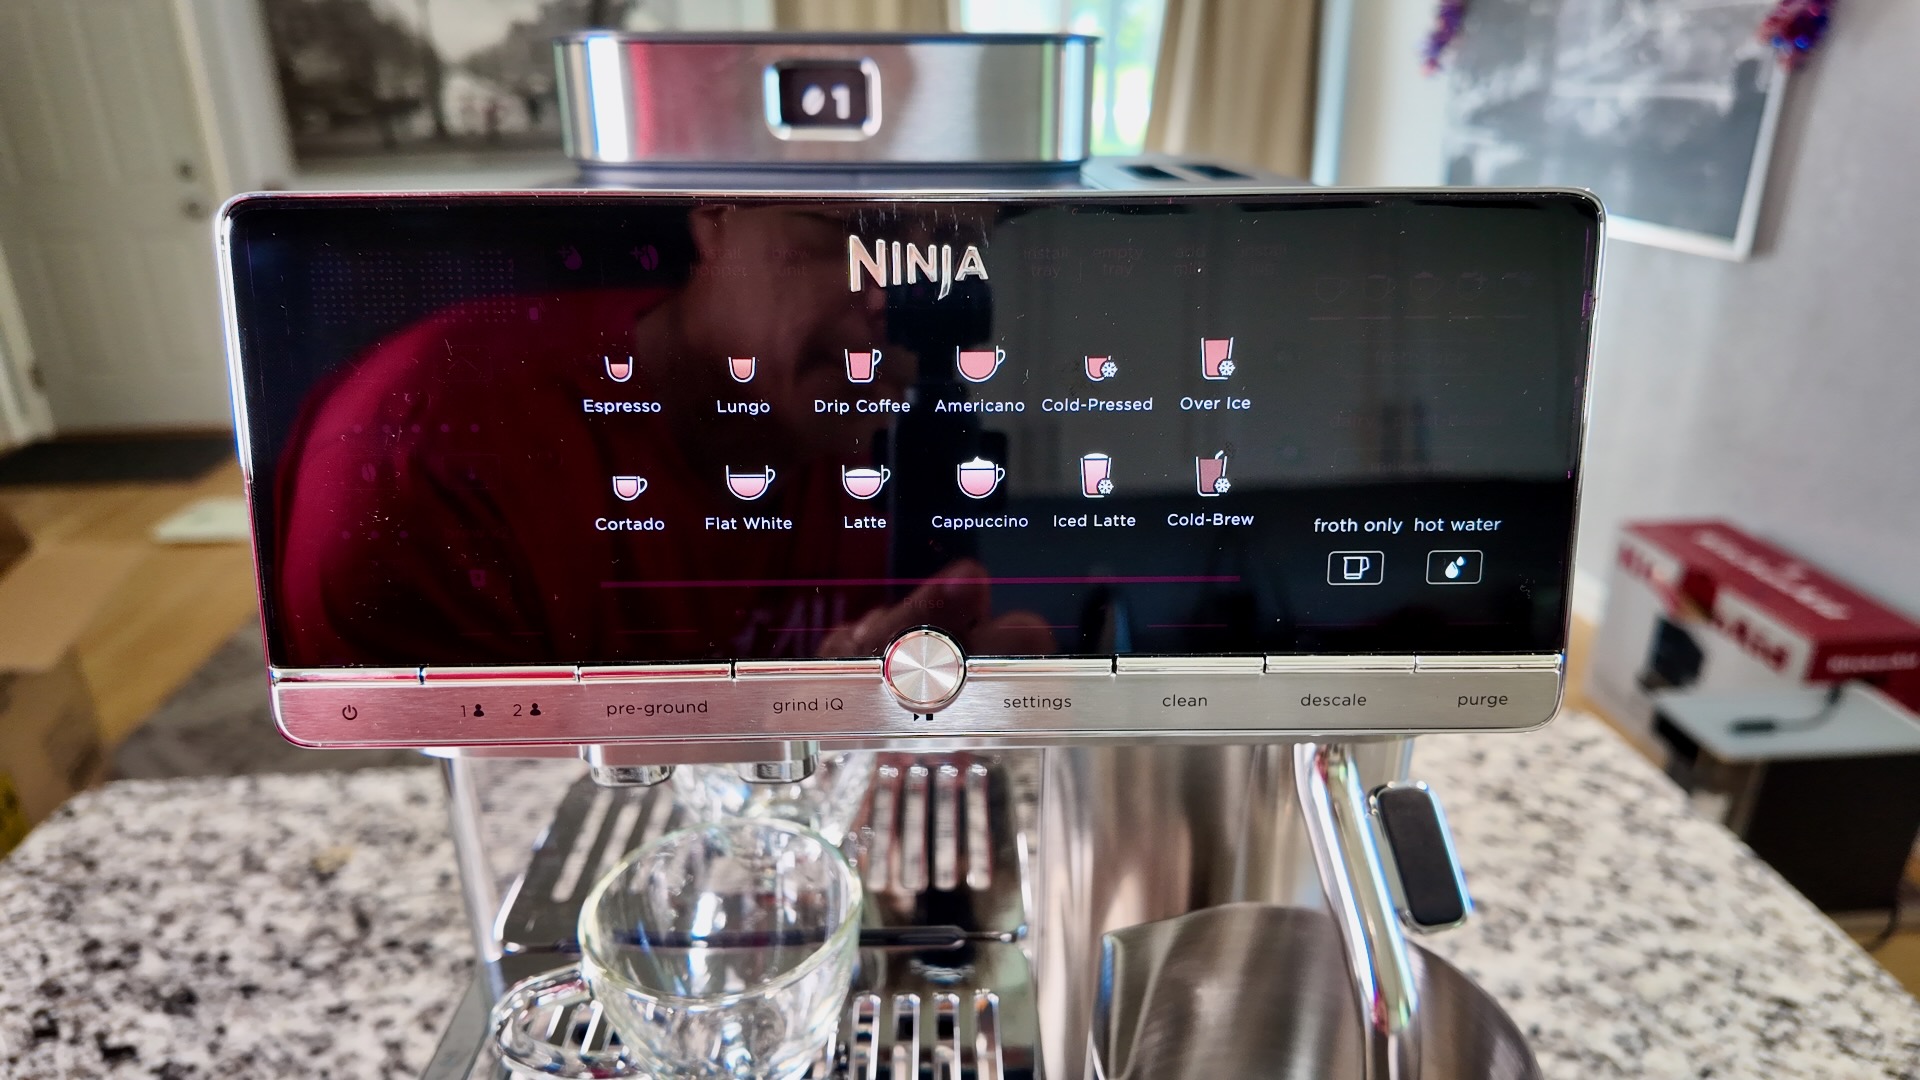
Ninja AutoBarista Pro – 12 Drinks
FYI – these buttons are capacitive touch symbols on the panel. The symbols are static and do not change, but the active drink gets illuminated, as shown below, where latte is selected.
Once a drink is selected, then you can parameterize the drink. For example, you can choose the bean amount on the left, and the number of shots. Then on the right, you choose the froth type and milk type. Notice that all the other drinks are grayed out, and just the Latte in this case is illuminated.
Ninja AutoBarista Pro – Drink Menu
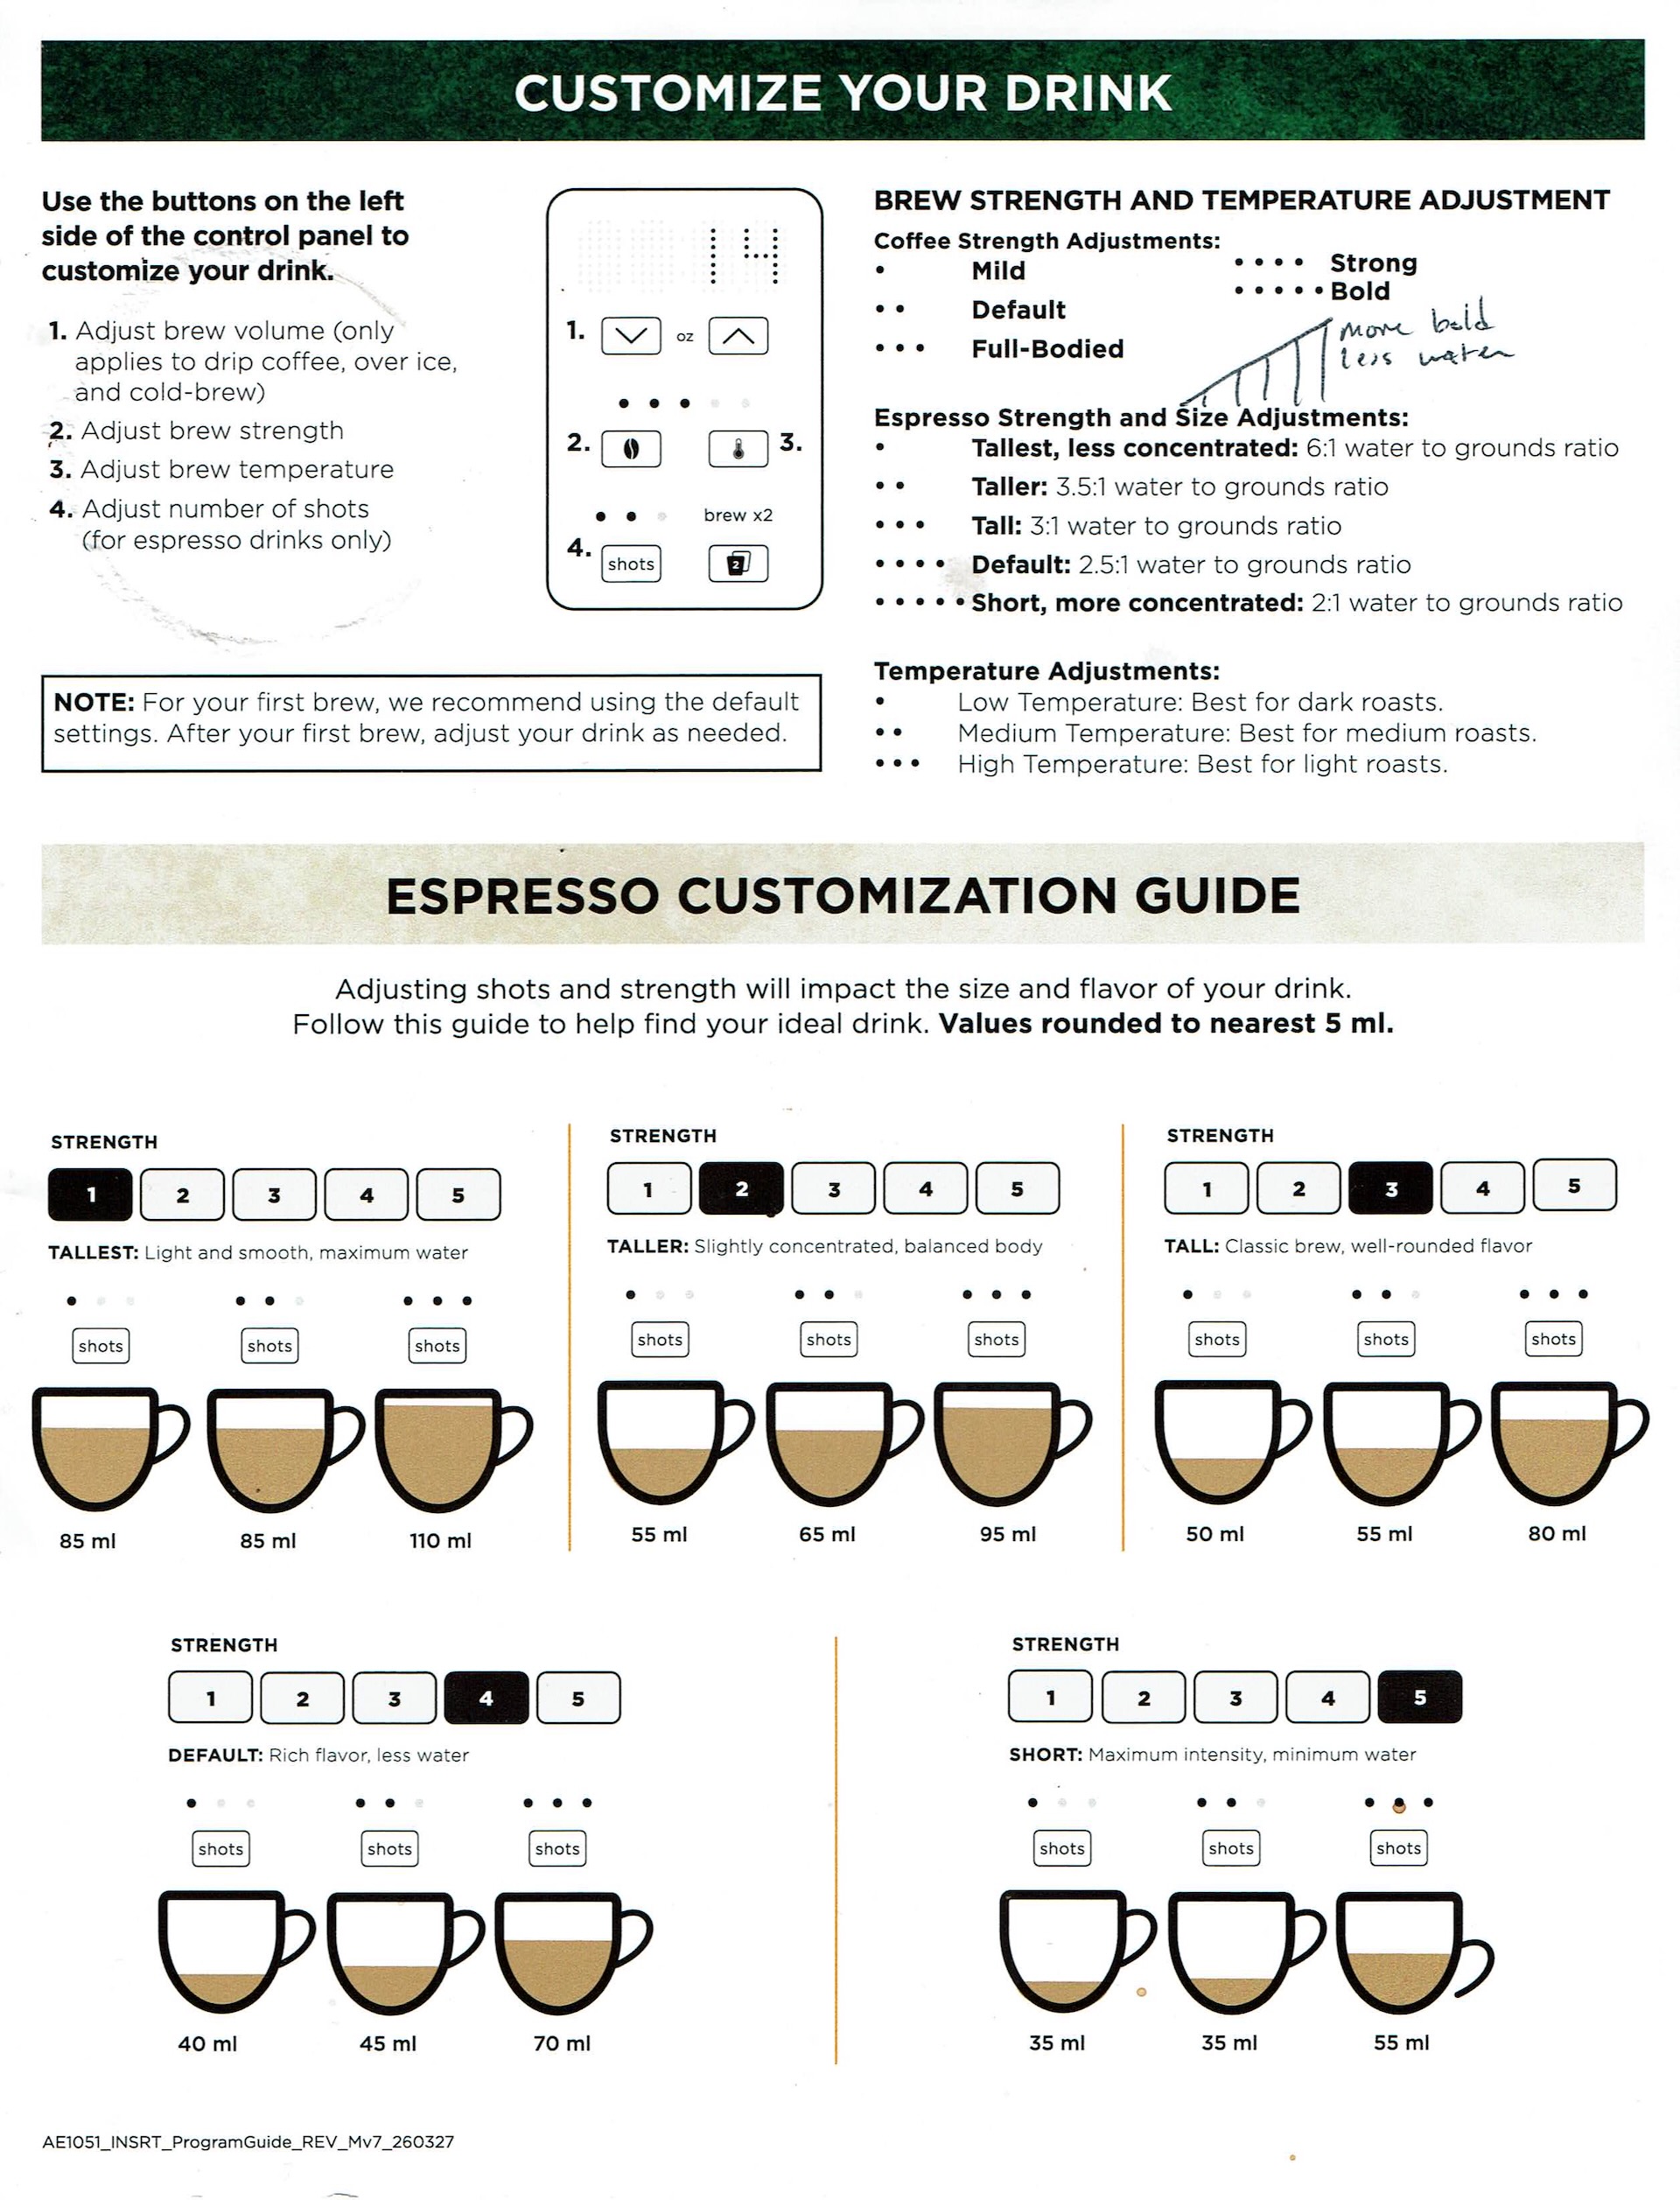
We should talk further about the parameters. The ‘Strength’ from 1 to 5 beans is actually the drink intensity, or how much water will be put through the puck. Therefore, 1 bean will put the most water through, while 5 will push the least water through, so that a ‘5 Bean’ drink will taste stronger.
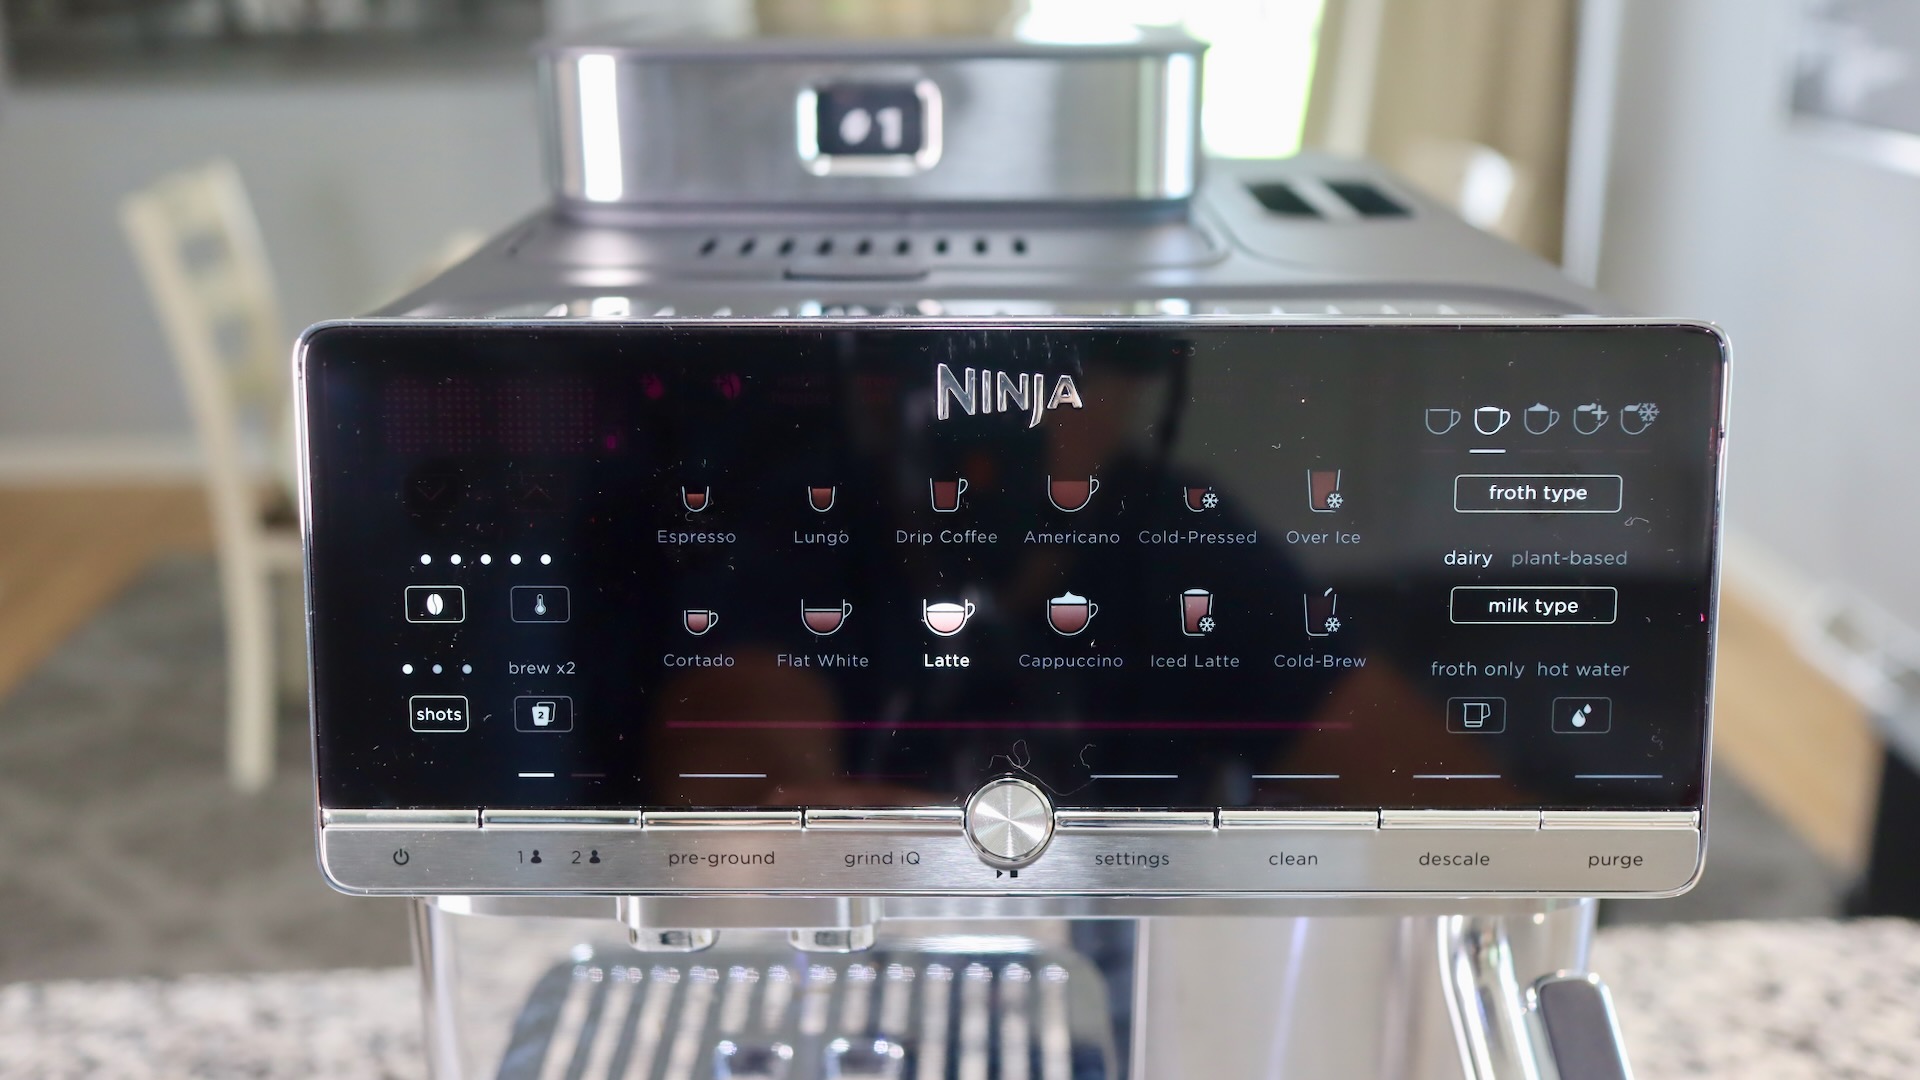
Also, below the bean amount, you have the ‘shots.’ Here you choose between 1, 2 and 3 shots. This directly affects puck size, so that a double grinds more than a single, and a triple more than a double. I wouldn’t recommend the single, as it results in a really watery drink. The double and triple shots are great, though. Check out the pucks below, that I pulled out of the machine. The front puck is a single, the upper right a double, and the upper left a triple!
AutoBarista Pro – Single, Double and Triple Pucks
Pictured below is the drink volume guide that comes with the machine. I honestly find it a little confusing. It’s important to know that the higher the ‘Strength’, graphically indicated by the number of beans, is the less water volume you’ll get in the cup, leading to a bolder drink.
Also, the number of shots is super important! The default number is 2, which results in about a 17-18 gram coffee puck. That’s a good dose amount, and it’s what I’d recommend. Try a triple if you need extra caffeine, but the single is too weak in my honest opinion.
Ninja AutoBarista Pro – Drink Volumes
I have experimented a lot with the ABP, and I actually find it’s default settings to be the best, therefore a strength of 4, and 2 shots is what I’d recommend. Also, it’s easier to just use the machine’s default settings for each drink, at least to get started, and then you can tweak them later.
Below is a table to represent about how much you get in your puck if you choose: single, double or triple shot.
| 1 Shot | 2 Shots | 3 Shots | |
|---|---|---|---|
| AutoBarista Pro | 9 grams | 18 grams | 27 grams |
So how does the AutoBarista Pro perform for Espresso and Coffee?
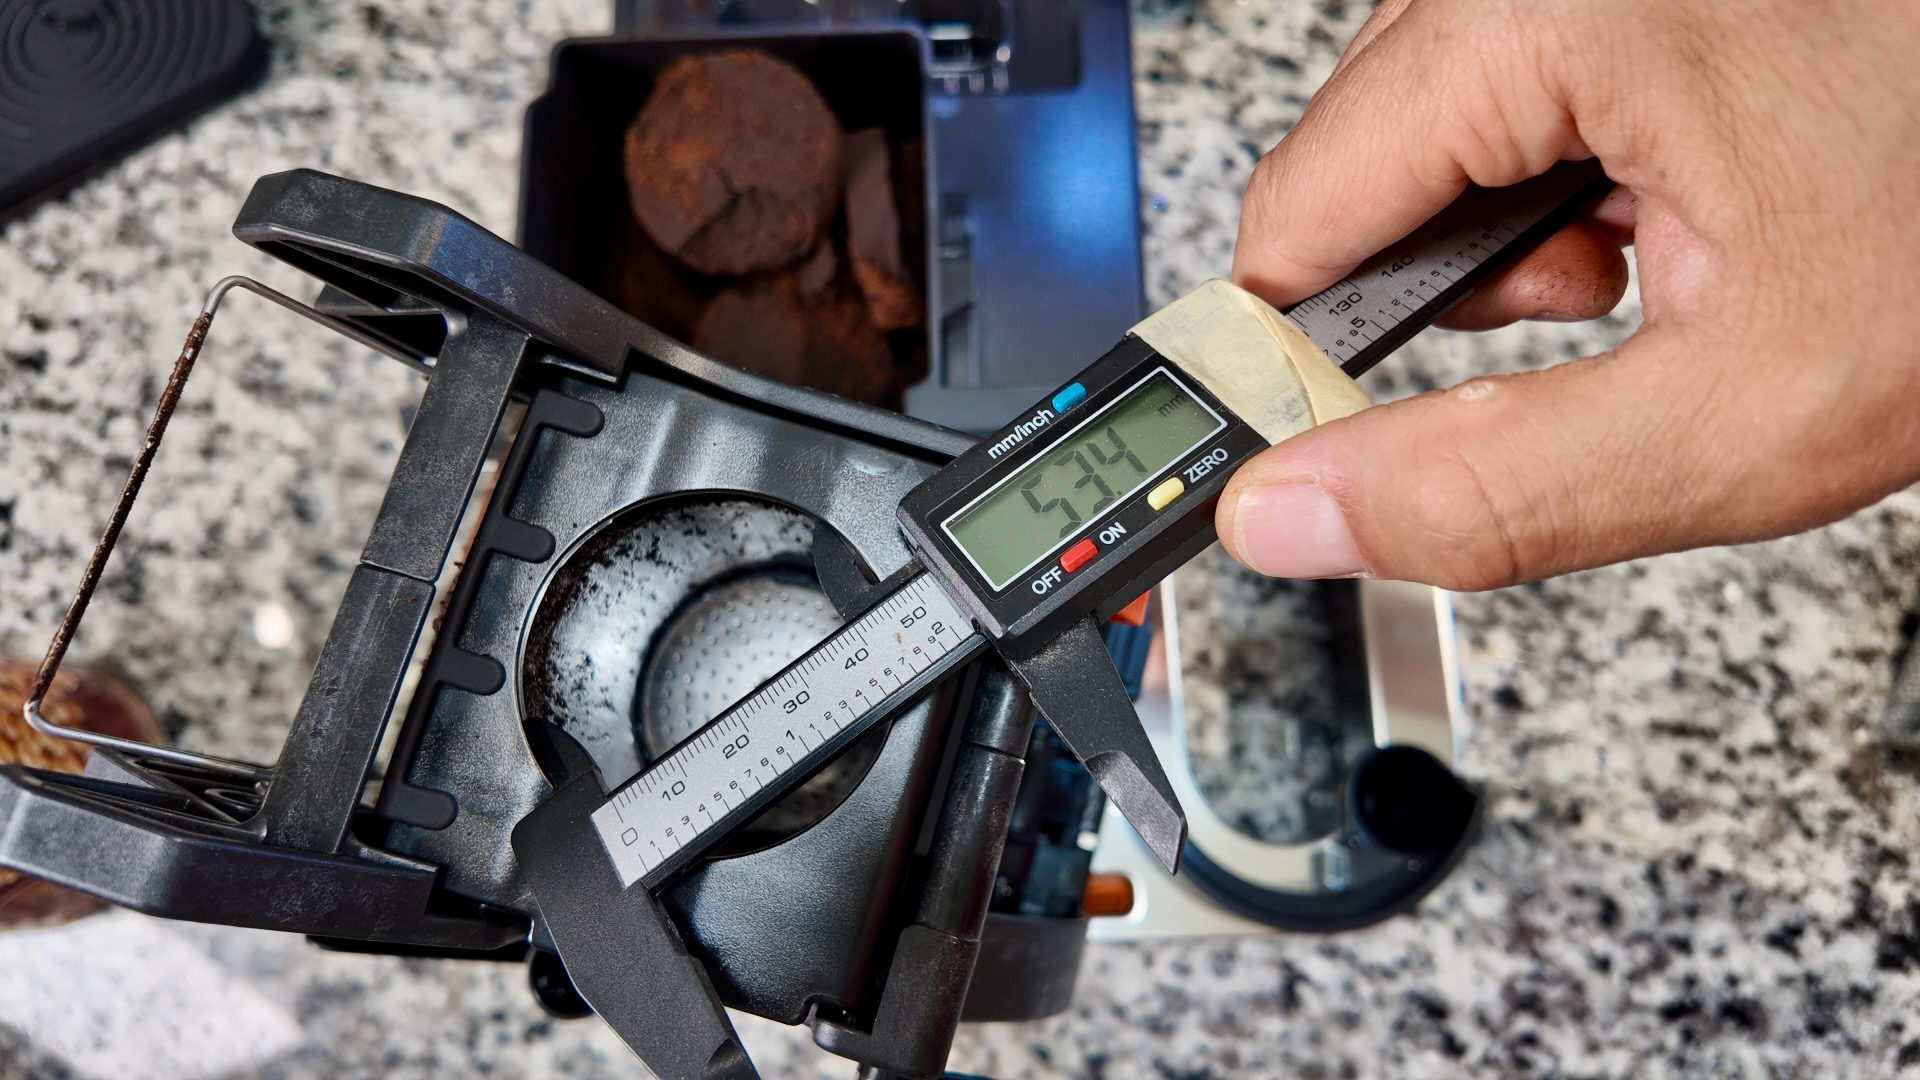
This is the salient question – how does the AutoBarista do for coffee and espresso? Before we answer that, let’s look at the brew group. It’s a brand new design, with a MUCH larger basket for pucks. It has a 53mm diameter, much bigger than the standard 45mm or so on other machines. It’s also much, much deeper. This allows for the double and triple pucks to be made. The brew group was also designed to allow normal American drip coffee, which is super nice.
Ninja AutoBarista Pro – 53mm Brew Group
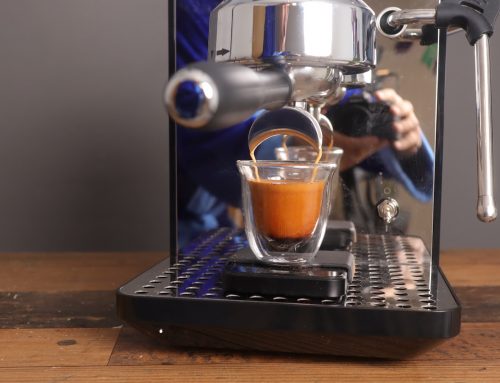
With all that being said, the machine makes a nice creamy, well textured espresso shot, as shown below. In my tests, I got shots with good body, and super chocolatey notes with a tinge of sweetness. I used multiple beans in my tests, but I got the tastiest results from these. But if you want some beans that’ll give you more caffeine and amazing crema, try Borbone Espresso Intenso.
I also got a tasty and hot(!) drip coffee, which I prefer in the mornings. The drip coffee is nice and bold in flavor, and I think drip coffee fans will like it. To me, it’s slightly better than the drip coffee made by their Luxe Cafe. As for the cold brew drinks, those are fine, but I’m really not a cold brew guy, so I can’t comment much on that.
BUT, you have to use good quality, ideally freshly roasted beans. Apparently, this brew group is not pressurized (unlike all other machines I know). This means that the bean itself, and the grind is responsible for the back-pressure to the incoming water. Summary: use good beans, and you’ll get a good result. I’d recommend however using the GrindIQ feature too, when putting in new beans.
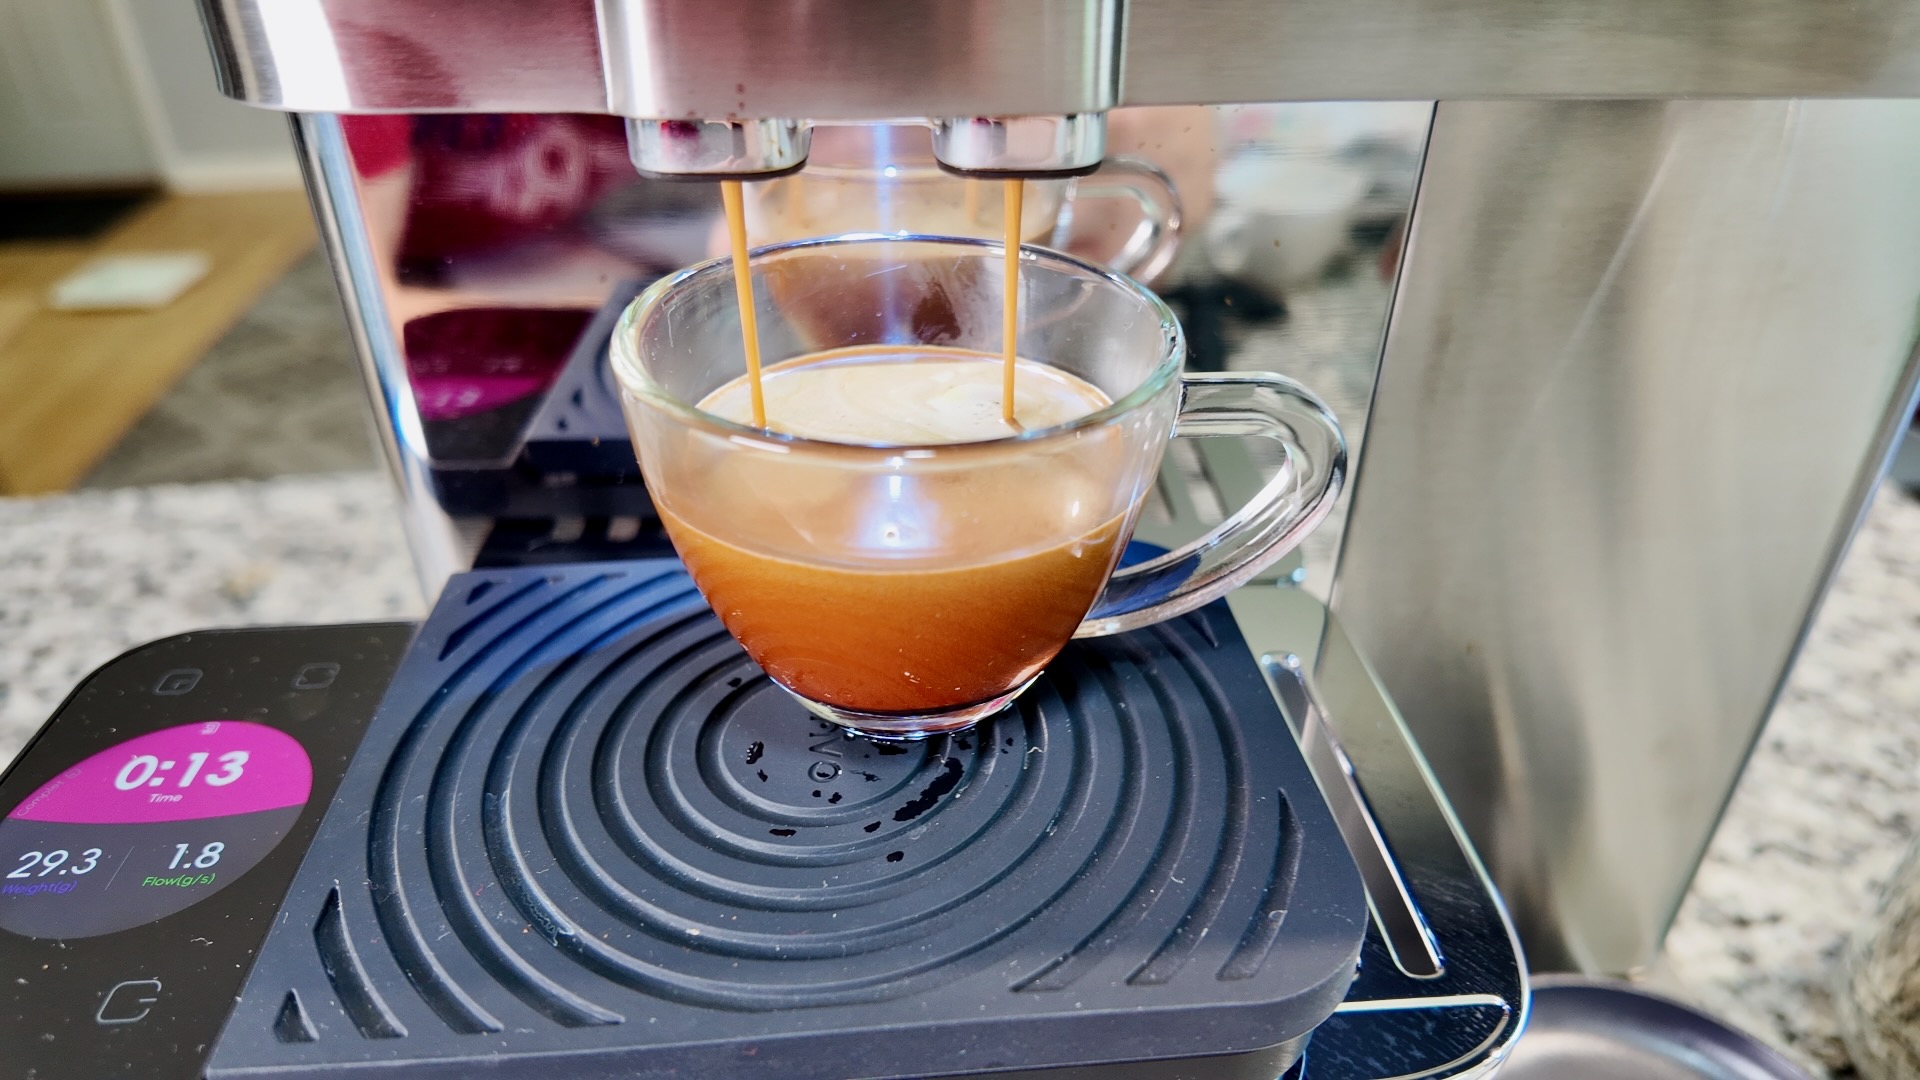
Ninja AutoBarista Pro – Pulling a shot
Looking at the scale above, you can see that the flow rate is 1.8 grams per second – an ideal flow rate for a double espresso. As you can see, the AutoBarista Pro is capable of grinding fine enough to create a shot with really nice crema.
Auto GrindIQ
So what the heck is GrindIQ, anyway? Well, since the AutoBarista Pro has swappable hoppers, you’ll probably be trying different beans. Every time you switch beans, you should perform a GrindIQ sequence. The machine will run 2-3 shots, and calibrate its grinder automatically.
What this means is that you don’t actually adjust the grinder yourself. The GrindIQ feature will run a shot, and monitor the flow rate and pressure. If these are off, it will adjust the grind on the next shot, until it’s satisfied. Therefore, don’t be surprised that you don’t see the grind size adjustment anywhere – it’s internal to the machine.
What you can adjust however is an offset on the grinder. So, if you want to grind finer than the machine suggests, you can go to Setting Number 11, and adjust down or up by 2 steps. More on the settings later.
So how does the ABP perform for Milk Foam?
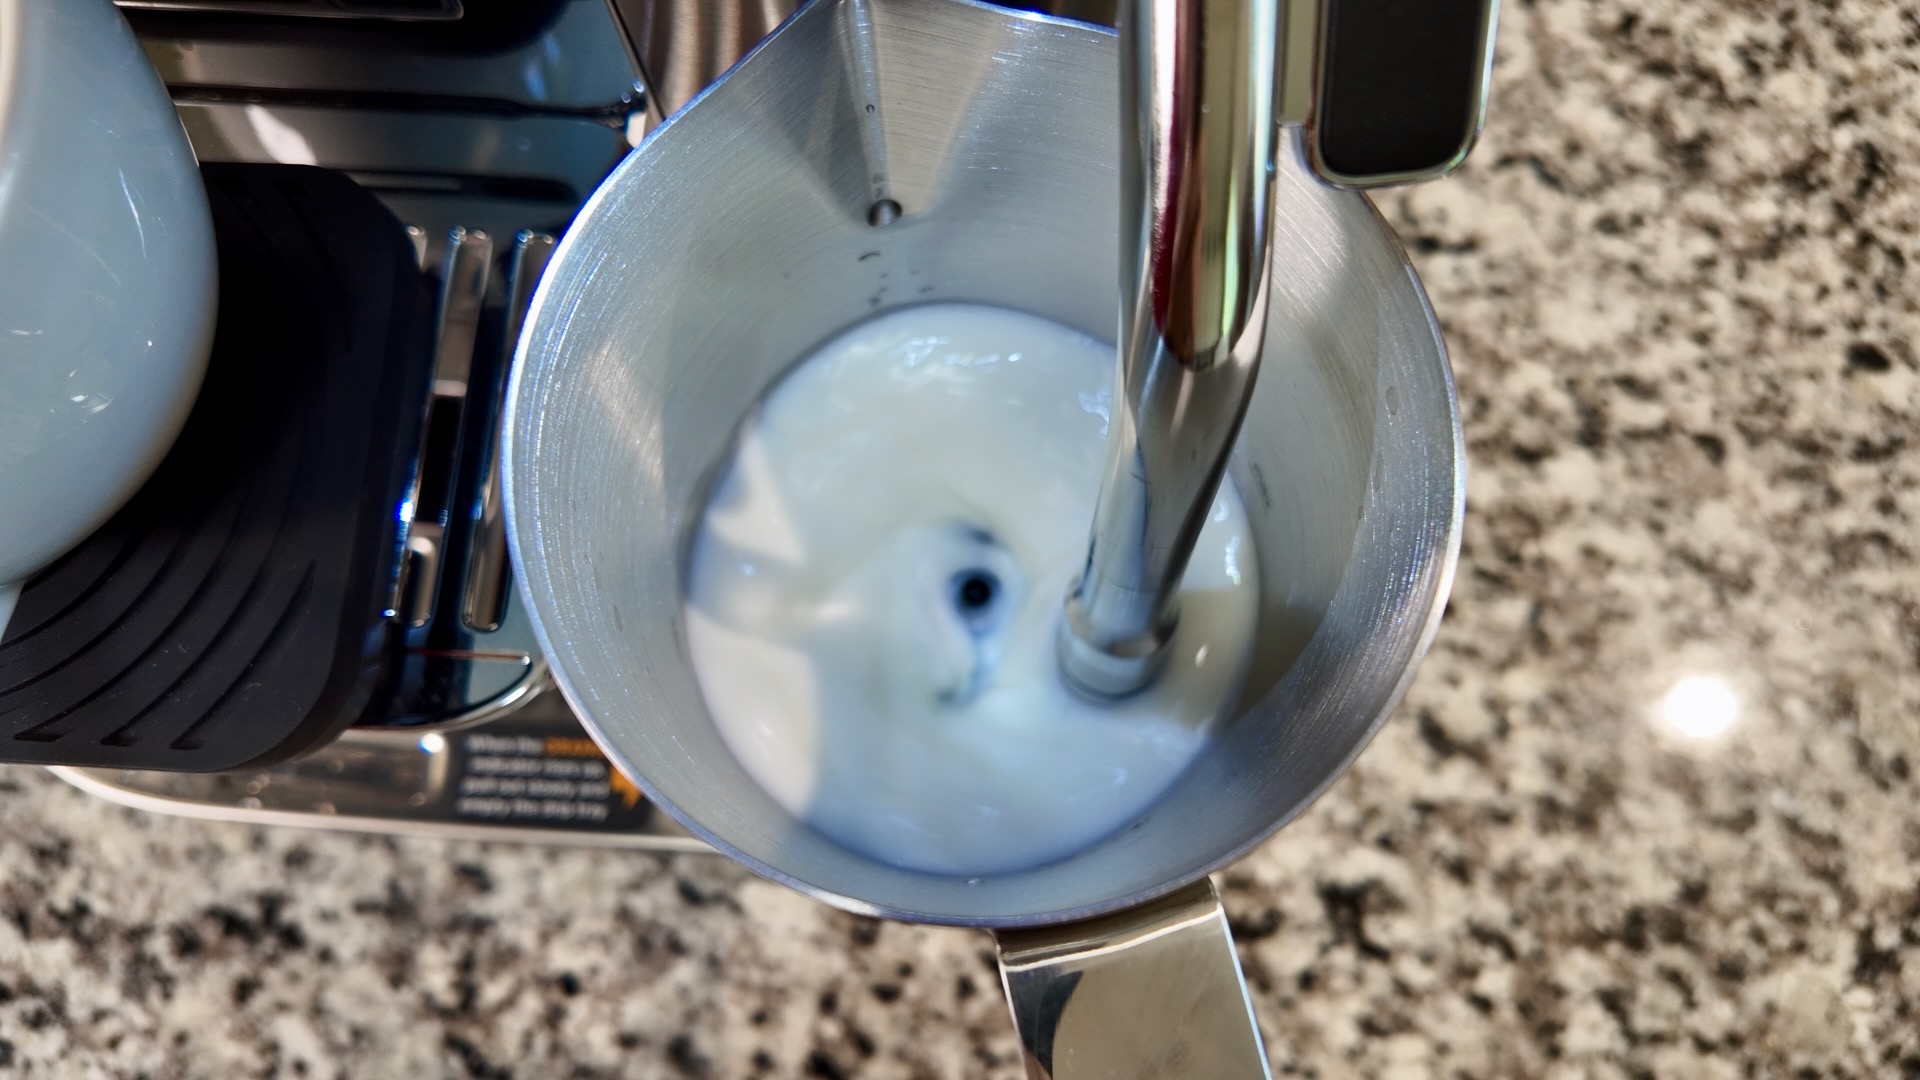
Unlike most superautomatics, the AutoBarista Pro includes a steam wand. This steam wand has a thermoprobe inside, so that it knows when it’s reaching temperature. You can chose low, medium and high on the temperature settings of the milk.
Anyway, this steam wand injects steam and air into the milk, to warm it up and add texture. There’s also a spinning whisk in the bottom, that incorporates the textured milk. The combination of an actual steam wand and a spinning whisk does lead to nice milk foam for cappuccino and lattes.
CAUTION: don’t make the same mistake I did. I pulled the milk carafe out after it was done steaming, and this stopped the drink. You have to leave the milk sit, while the machine pulls the espresso. Then, the machine will automatically re-engage the milk whisk now and again, to keep the milk incorporated. This is a very good feature, but it’s not obvious that you must leave the milk carafe there until the espresso is done.
Ninja AutoBarista Pro – Auto Milk Frothing
When the milk and espresso are done, then you just pour the milk into your cup or glass. If you see the picture below, this is the best latte art I got, with the included pitcher. The said pitcher is nice enough quality, but it lacks a proper pouring spout. I’d suggest getting a milk pitcher designed for latte art, if you want to practice your pours.
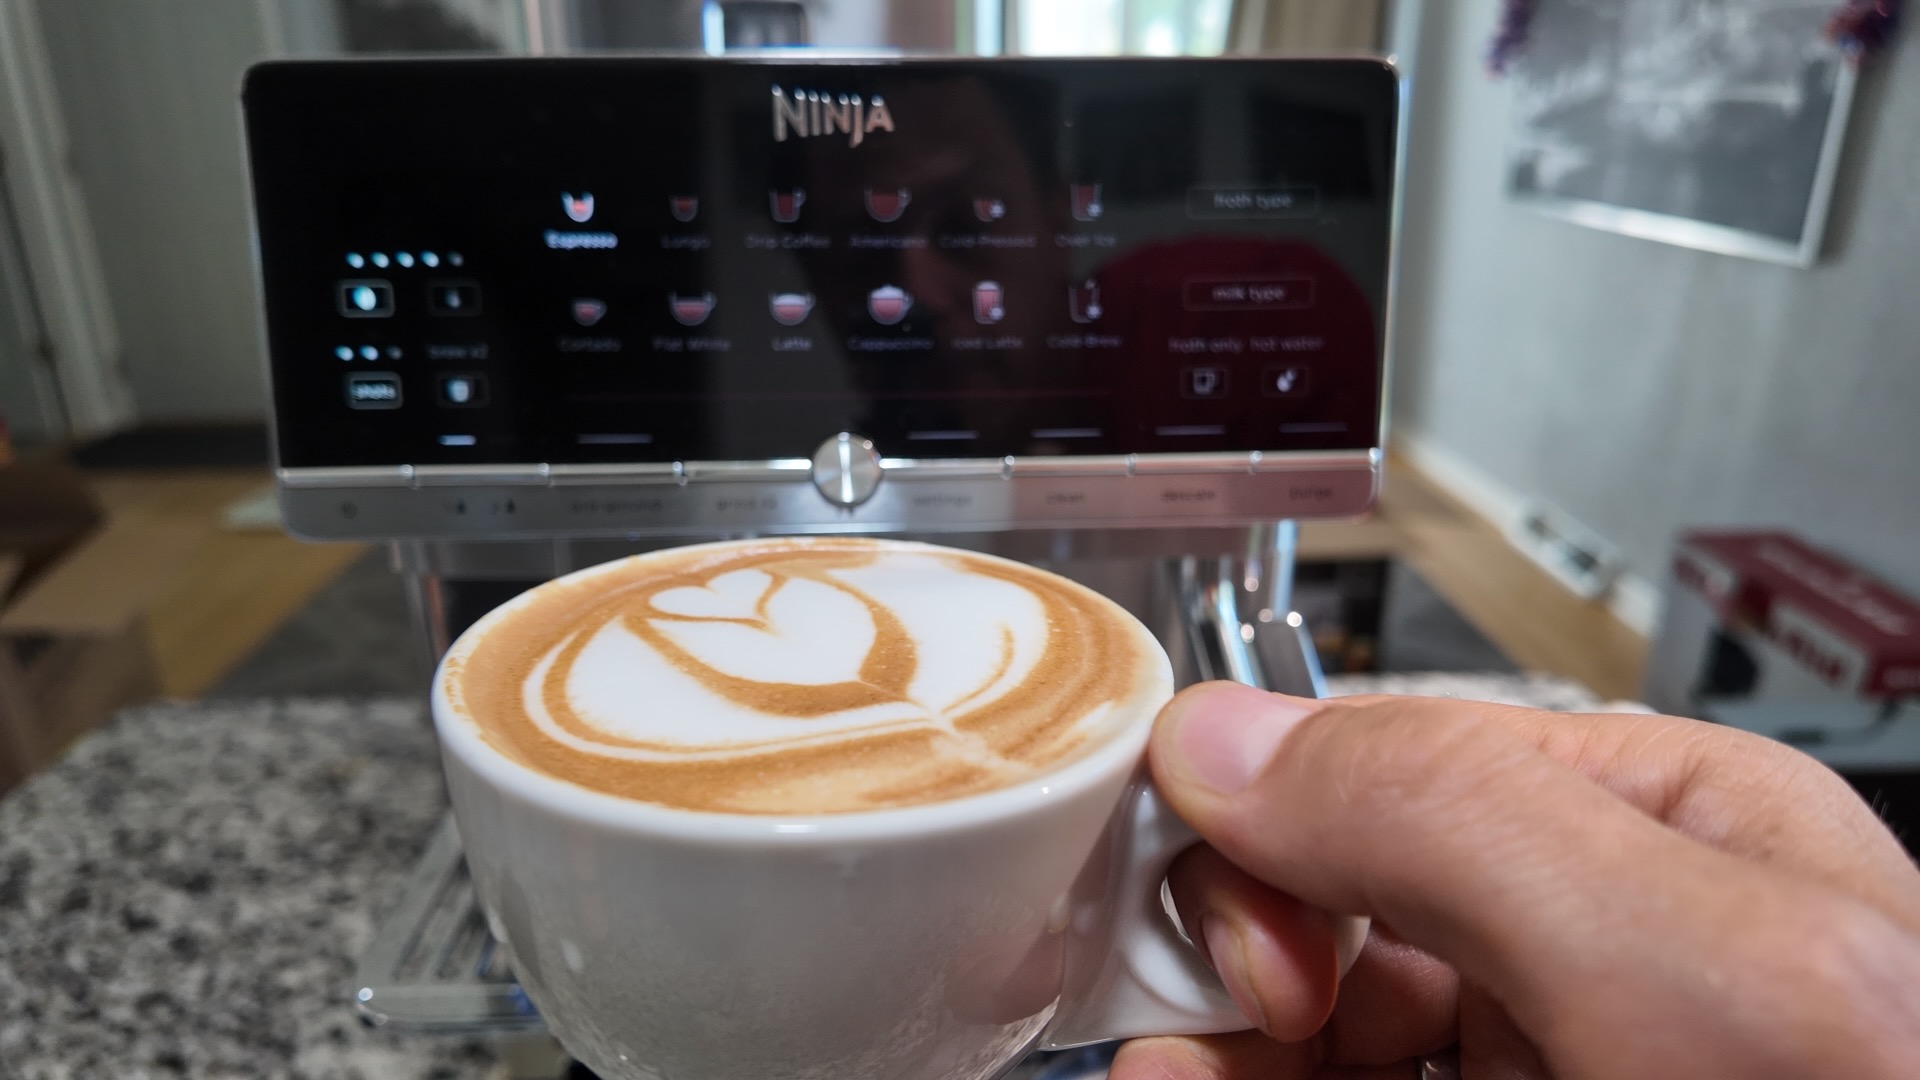
Ninja AutoBarista Pro – Latte Art
The Looks and Features of the AutoBarista Pro
Did I mention that Ninja always includes a few Easter eggs in their machines? If you look below, you’ll see that the side panel can be removed to access the brew group for cleaning. Ok, this is normal. But look at the panel, and you’ll see that they include grease and a cleaning brush, so that you always remember to maintain your brew group, and keep it clean. Nice! Also, with these designated spots, the grease and brush shouldn’t get lost.
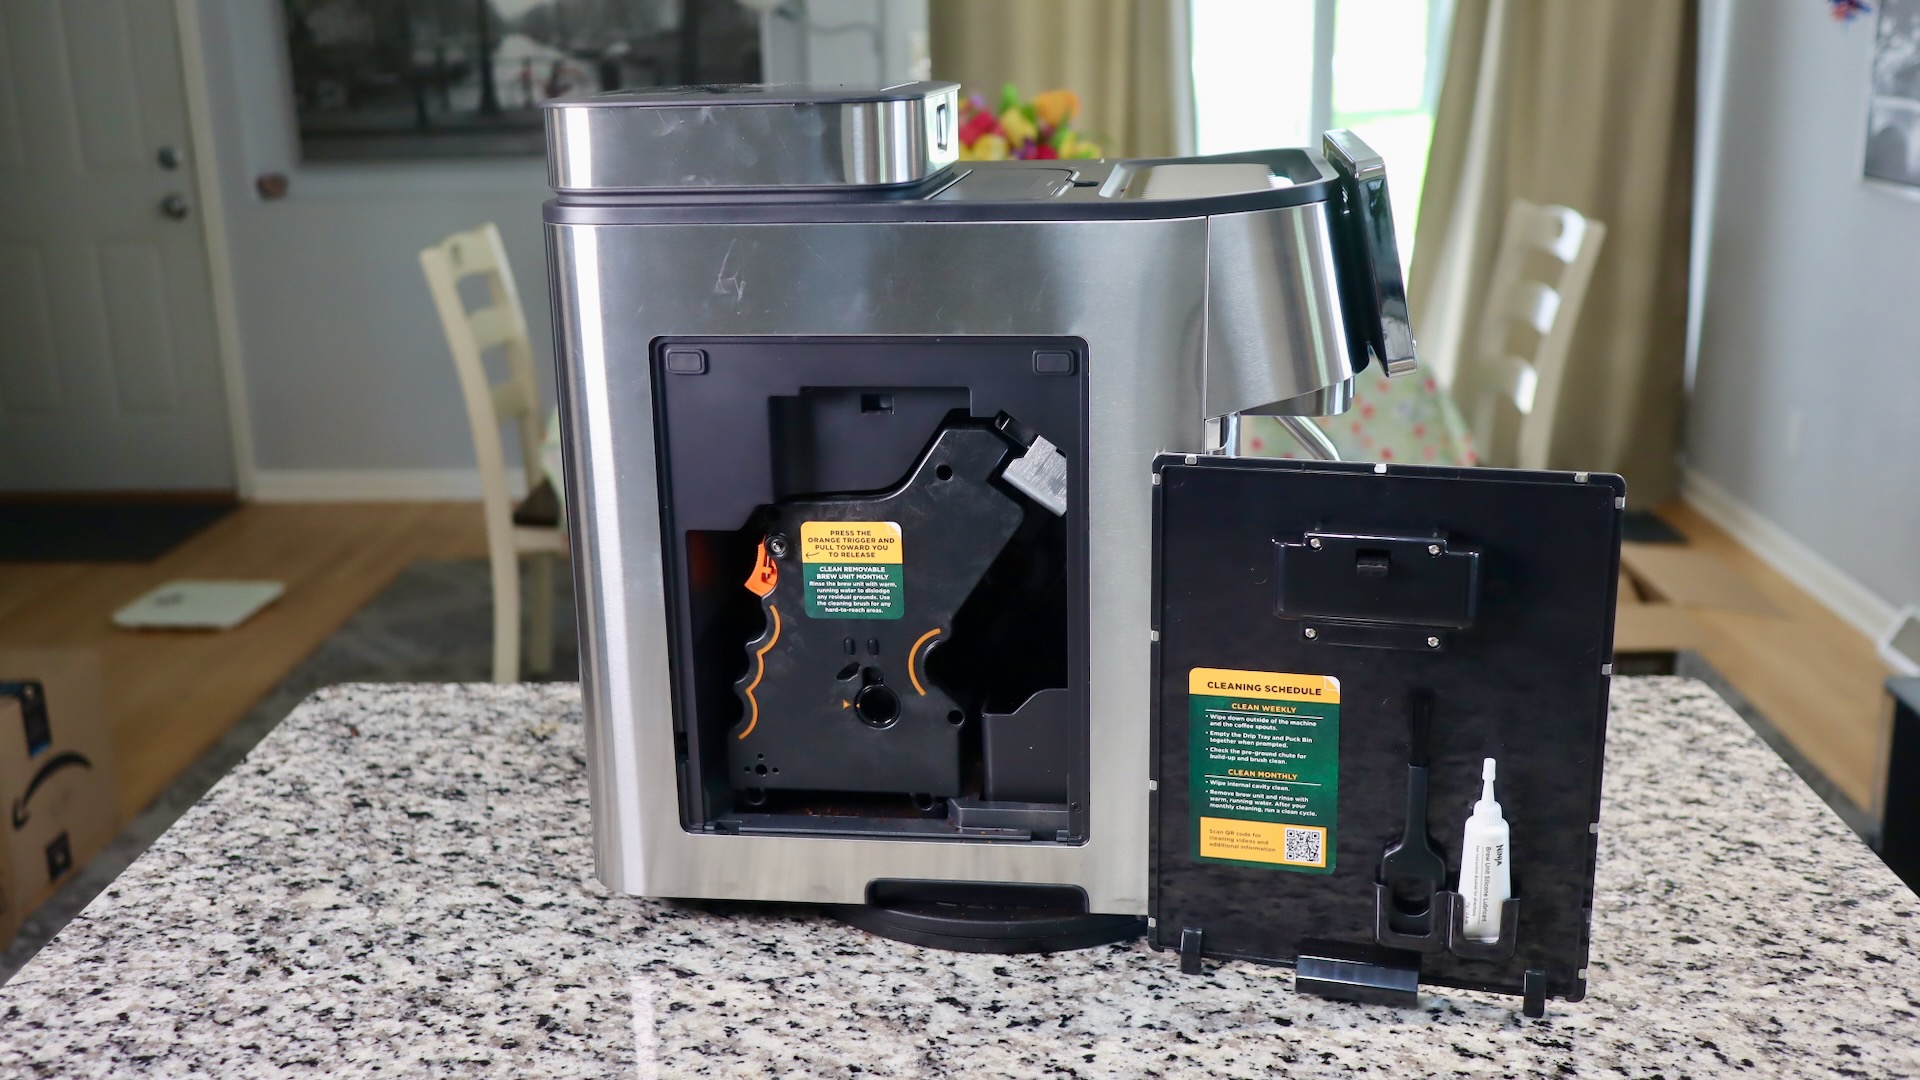
Ninja AutoBarista Pro – Panel removed
Look closely at the back…there are slits there for an exhaust fan. If you listen closely while the machine is on, you’ll hear a light fan noise. This is great, because Ninja included an exhaust fan to reduce moisture in the machine! This is a common complaint on most superautomatics, as moisture can lead to mold. The fan will help battle that.
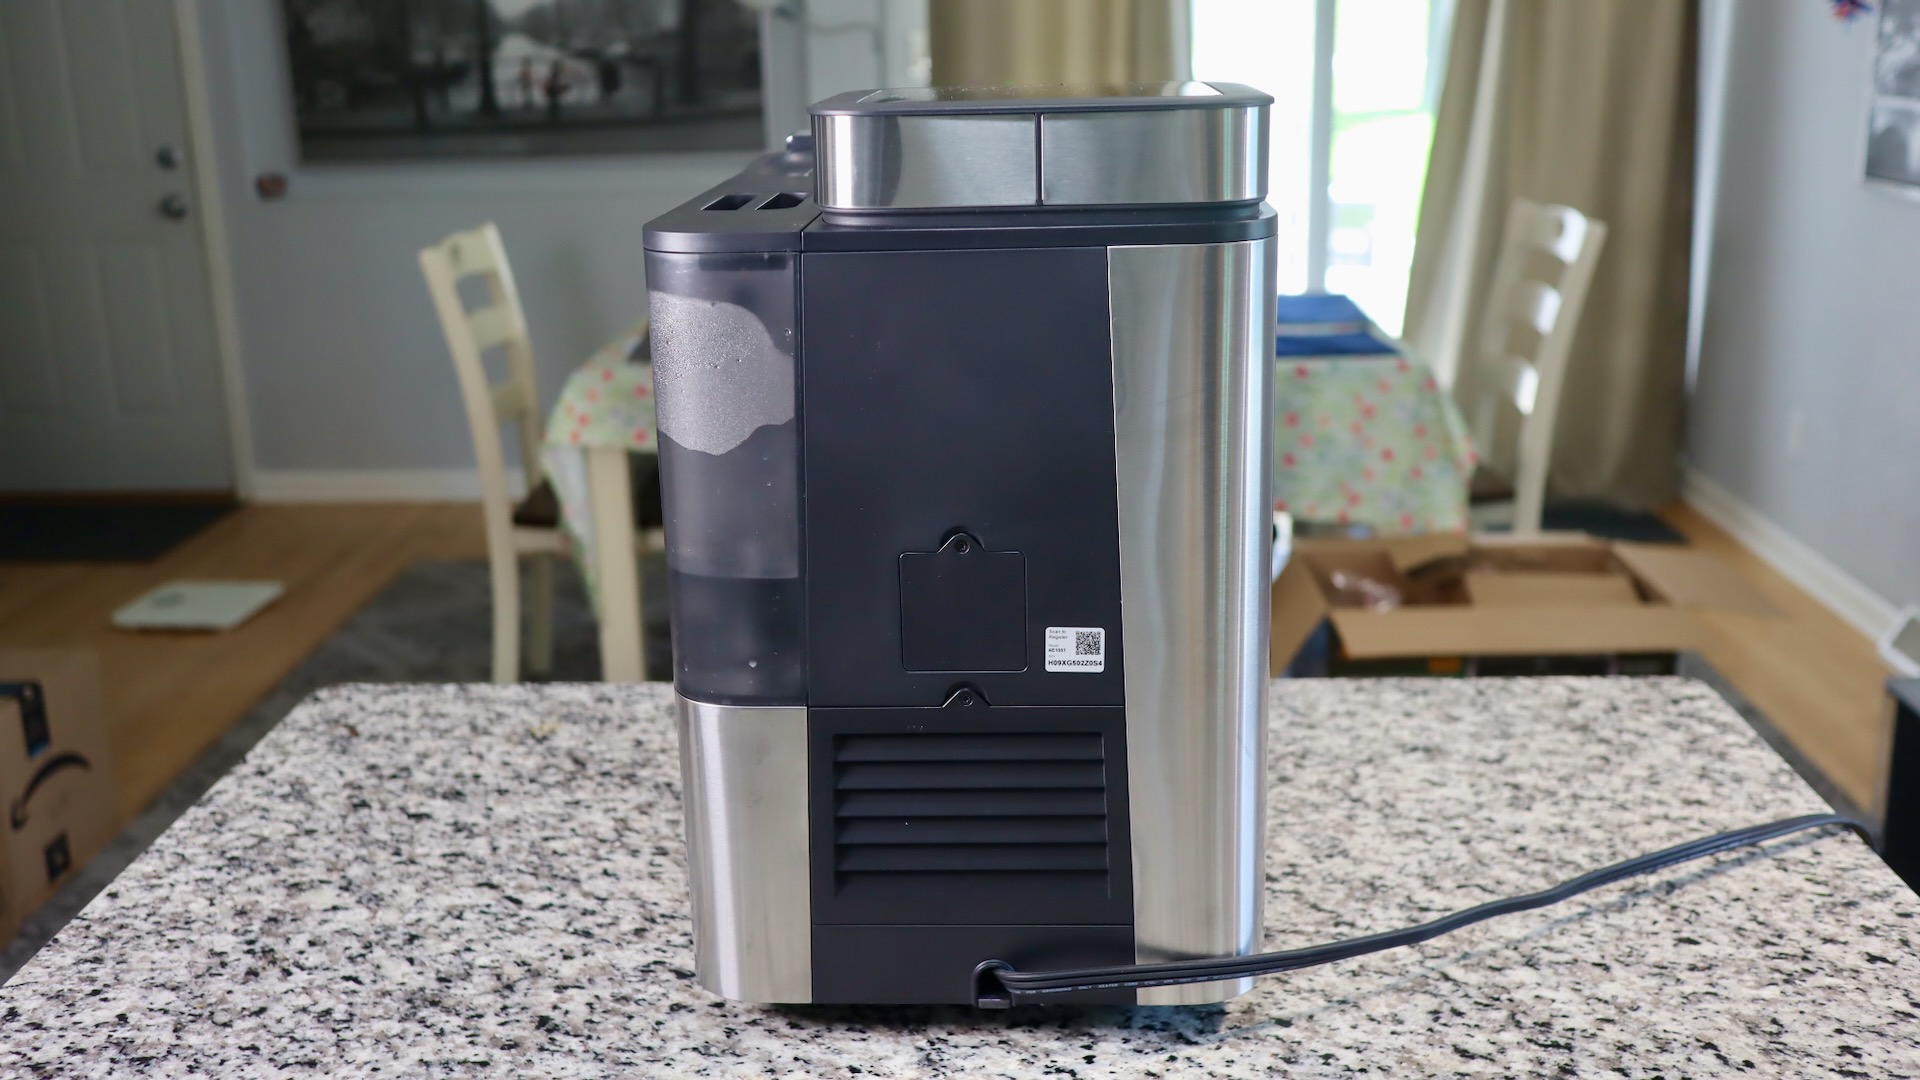
Ninja AutoBarista Pro – Back Side with Evacuation Fan
On the right side of the machine, you’ll see the large water tank. I enjoy Ninja water tanks because they have nice ergonomic grips on them, and they also have a water sensor (so your drink doesn’t run out of water), and a nice filter, to combat too many minerals in your water. I’d still recommend descaling on a regular basis, though.
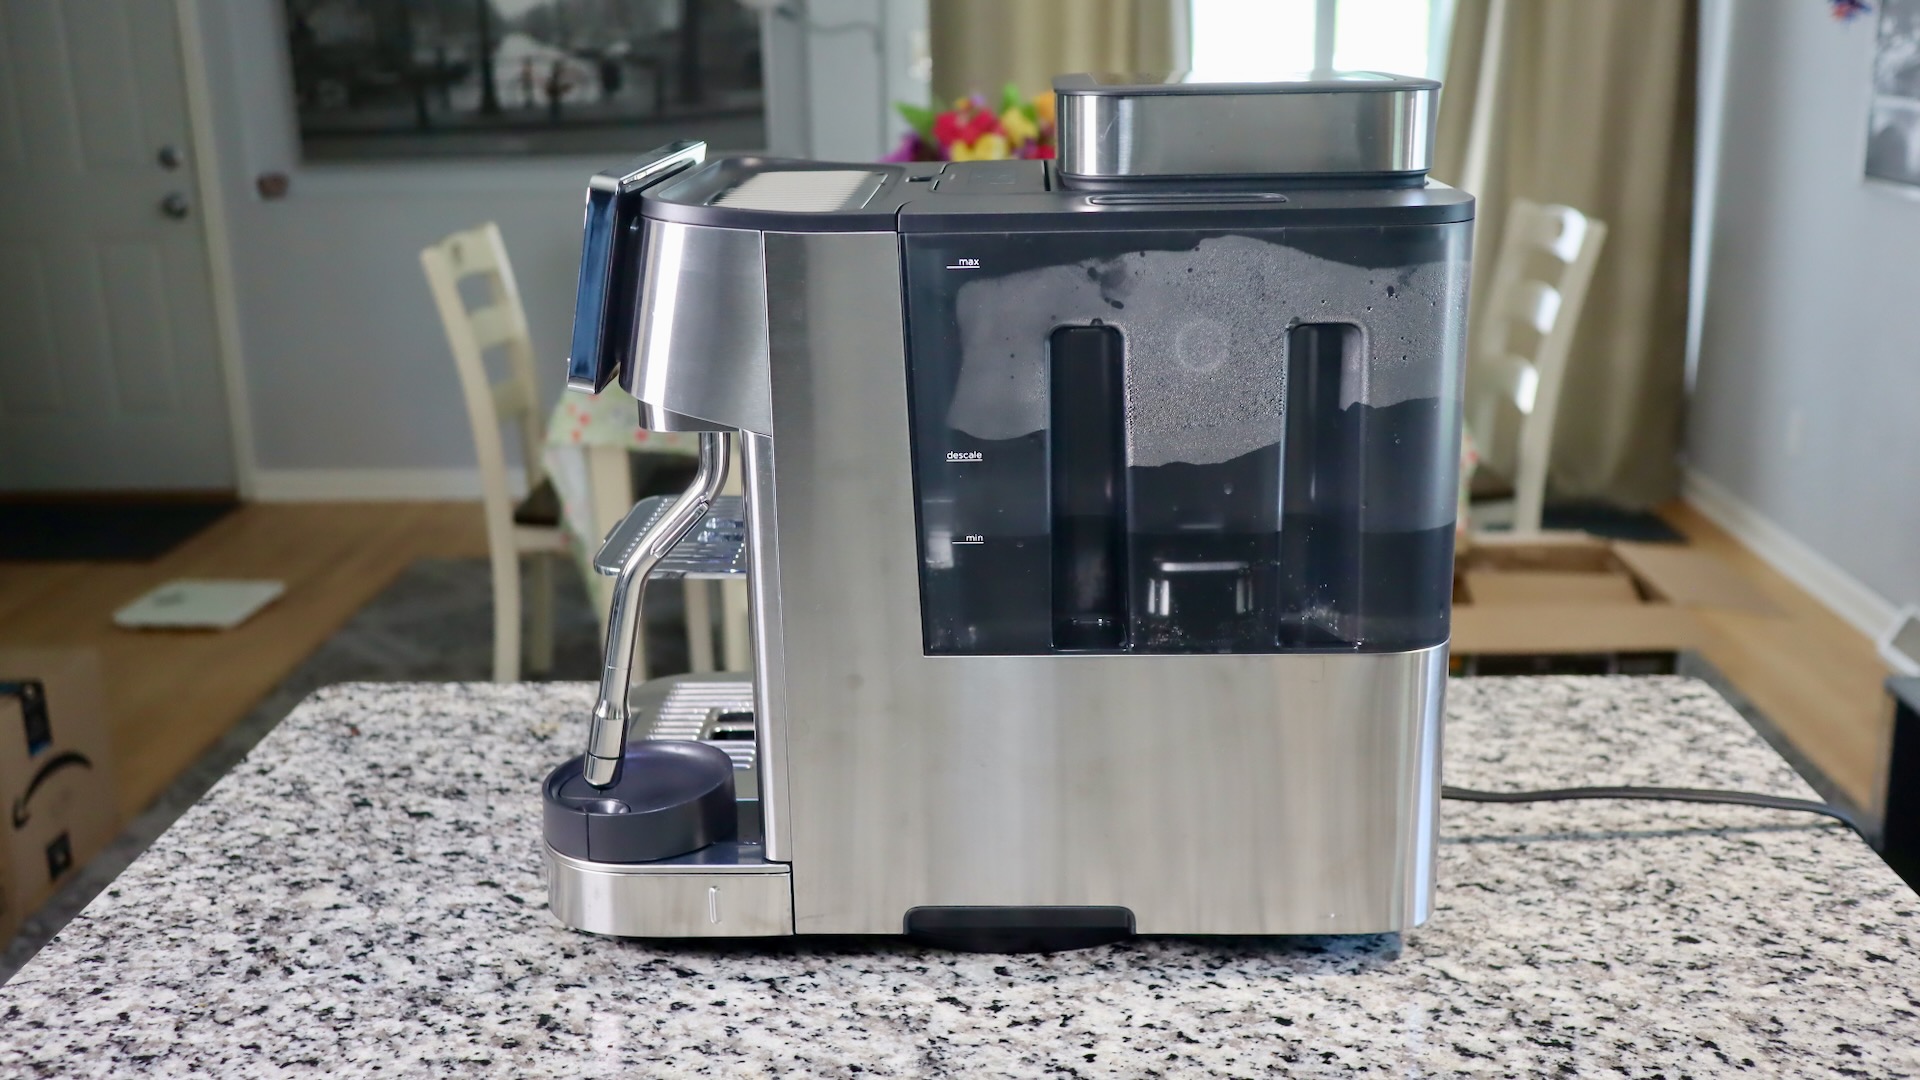
Ninja AutoBarista Pro – Right Side and Water Tank
Of course the Ninja also allows for large tumblers, as you can see that my 20 ounce Yeti tumbler fits, even with a scale underneath it. The Yeti may be a little pricey, but it’s a great tumber that I use all the time to keep my coffee hot.
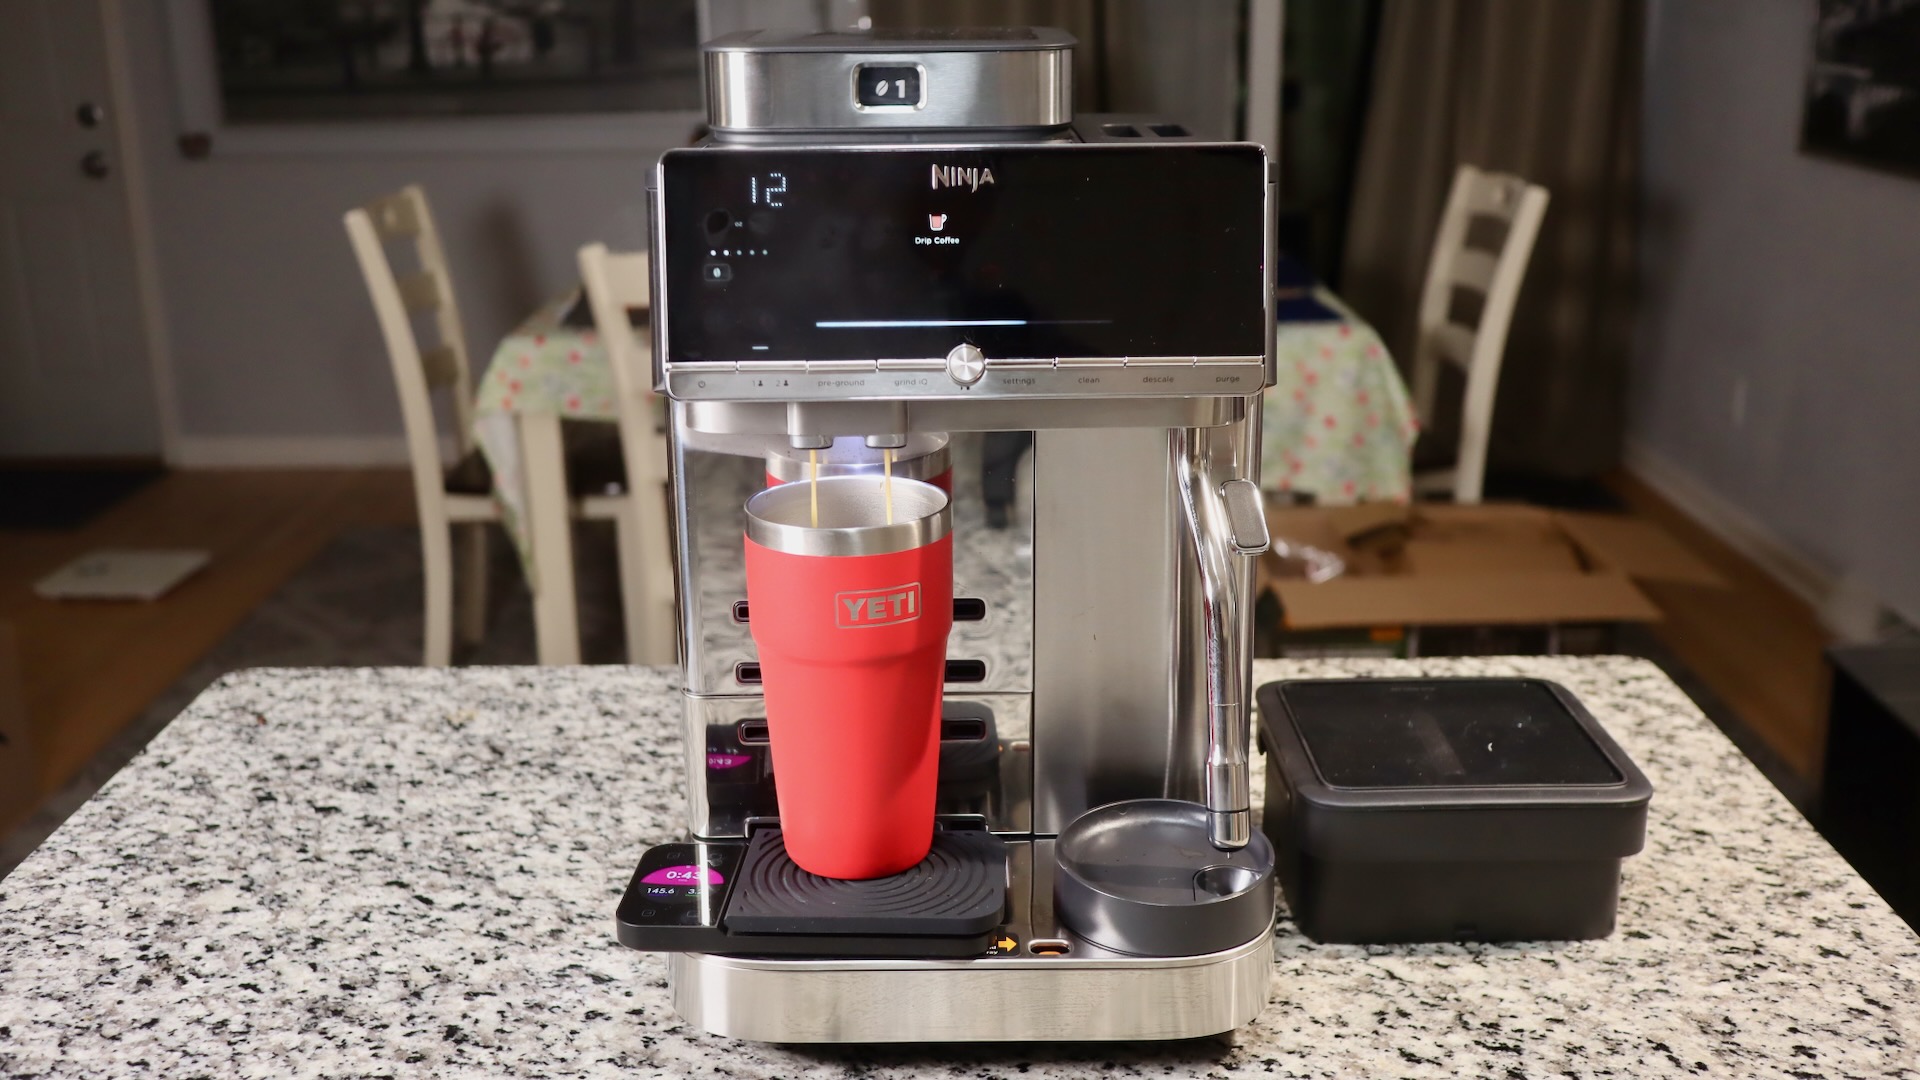
Ninja AutoBarista Pro – Yeti Tumbler Fits
AutoBarista Pro vs Delonghi vs Jura
So how does the AutoBarista Pro fair against the main competitors of Delonghi and Jura? Well, up until now, the Magnifica Plus was my go to recommendation for superautomatics. It’s a great machine with a nice display that can make up to 15 gram pucks, and pretty good milk foam. It will also foam right into your cup, while with the Ninja, you have to pour the milk into your cup yourself. Compared to the Magnifica Plus, the Ninja might not look quite as cool, but it offers EVEN larger pucks, swappable hoppers, filter coffee, cold drinks, the exhaust fan, and a self-calibrating grinder. Therefore, the Ninja usurps the Delonghi as the best recommendation now.
How about Jura? Well, Jura makes nice machines that also make tasty drinks. But, Jura is overpriced. And, you cannot remove the brew group for cleaning. So, recommending Jura is really hard for me at this point.
What about Philips? I’d only recommend buying a Philips if you want to save money and if you like weak coffee. Philips only makes up to 8 gram pucks, so the espresso and coffee are really weak, at least to me. If you want a decent cheap machine that can at least make 12 gram pucks, look at the Magnifica Evo.
Pros and Cons of the AutoBarista Pro?
There’s so much good to say about the Ninja. Swappable hoppers. Self-calibrating grinder. Espresso and coffee drinks, plus cold drinks. Proper steam wand, and more. But, it’s looks will not be for everyone, and the display is not as fancy as others like Delonghi or Philips. Also, it’s water hungry, and you will likely need to refill the water tank and dump the drip tray every 5 drinks or so.
As for the price, I think it’s introductory price of $949 is great. It offers more features and better drink quality than its competitors that cost more. The Magnifica Plus generally costs $1300, and the Juras are even higher in price than that.
Pros:
- Huge double and triple pucks
- Swappable hoppers!
- Self-calibrating GrindIQ grinder
- Espresso, Drip Coffee, and Cold drinks
- Proper steam wand
- Large capacity milk carafe
- Very good cup clearance
- Hot water and milk froth options
- Exhaust fan to reduce moisture in the machine
Cons
- Display is functional, but not fancy
- Expensive for Ninja (people expect Ninja to be super duper cheap)
- Milk carafe needs a better spout for latte art
- Water hog (need to dump drip tray every 5 drinks)
Find your AutoBarista and AutoBaritsa Pro here:
Specifications of the AutoBarista:
– Dimensions: 17.81 in L x 10.68 in W x 15.82 in H
– Weight: 40 pounds
– 1650 watt machine
– Build Materials: mixture of plastic and metal
– 80 ounce water tank
– 340 gram dual hoppers
– Country of Origin: China
Settings of the AutoBarista:
The settings are a little goofy on this machine, as there is a small scrolling display on the upper left of the display. Since it’s hard to read, I will put the settings below:
| Setting | Choices | |
|---|---|---|
| 1 | Beeps | On/Off |
| 2 | Eco Mode | On/Off |
| 3 | Reset unit | |
| 4 | Froth Temp | Low/Med/High |
| 5 | Clear Profile 1 | |
| 6 | Clear Profile 2 | |
| 7 | Manual Rinse | Rinse brew group |
| 8 | Reset Grinder | Reset GrinderIQ |
| 9 | Water Hardness | |
| 10 | Grinder Purge | |
| 11 | Grind Size Offset | +/- 2 steps |
| 12 | Hopper Select | If hopper is to be queried or not |
| 13 | Long standby | Have machine stay on longer |
More Resources:
You are currently viewing a placeholder content from YouTube. To access the actual content, click the button below. Please note that doing so will share data with third-party providers.
More Information