Gaggia Classic Up 2026 Review

Introducing the Gaggia Classic Up!
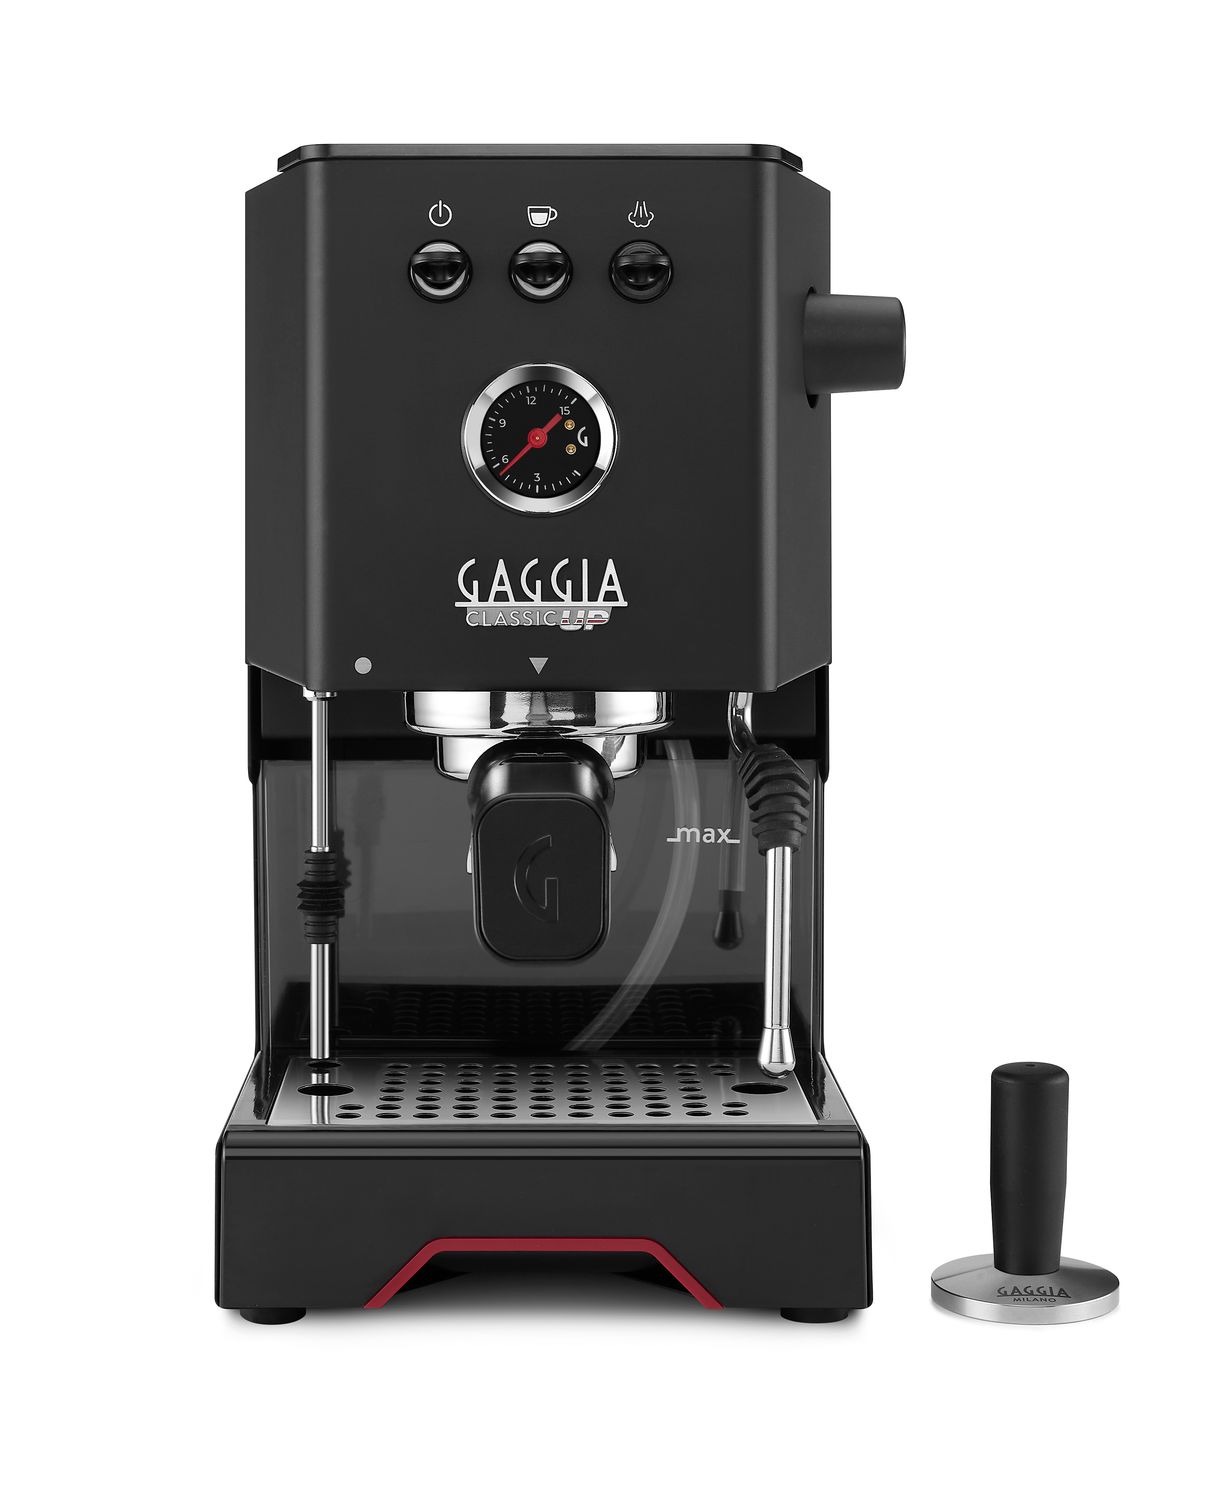
I have to admit, I am really excited to review the new for 2026 Gaggia Classic Up! What makes this machine exciting? Well, it comes with a bunch of features that people have been adding themselves over the years, but directly from the manufacturer. That means that they are a much cleaner design, and also backed by the manufacturer’s warranty.
So what are these new features from Gaggia? Well let’s see…
– New PID controller, with two thermoprobes (more on that later)
– 2 inch screen with 4 capacitive buttons
– New rocker switches, which are backlit
– Manometer with black dial
– Newly designed 58mm portafilter handle
– Articulating steam wand, for a larger range of motion!
– Lowered and classic drip trays
– Timed shots, and pre-infusion with 3 modes
– Lead-free brass boiler
Whew, that’s a lot of new features! But, is it worth the higher price tag? Let’s dive into that in this article.
Design and feautures of the Gaggia Classic Up
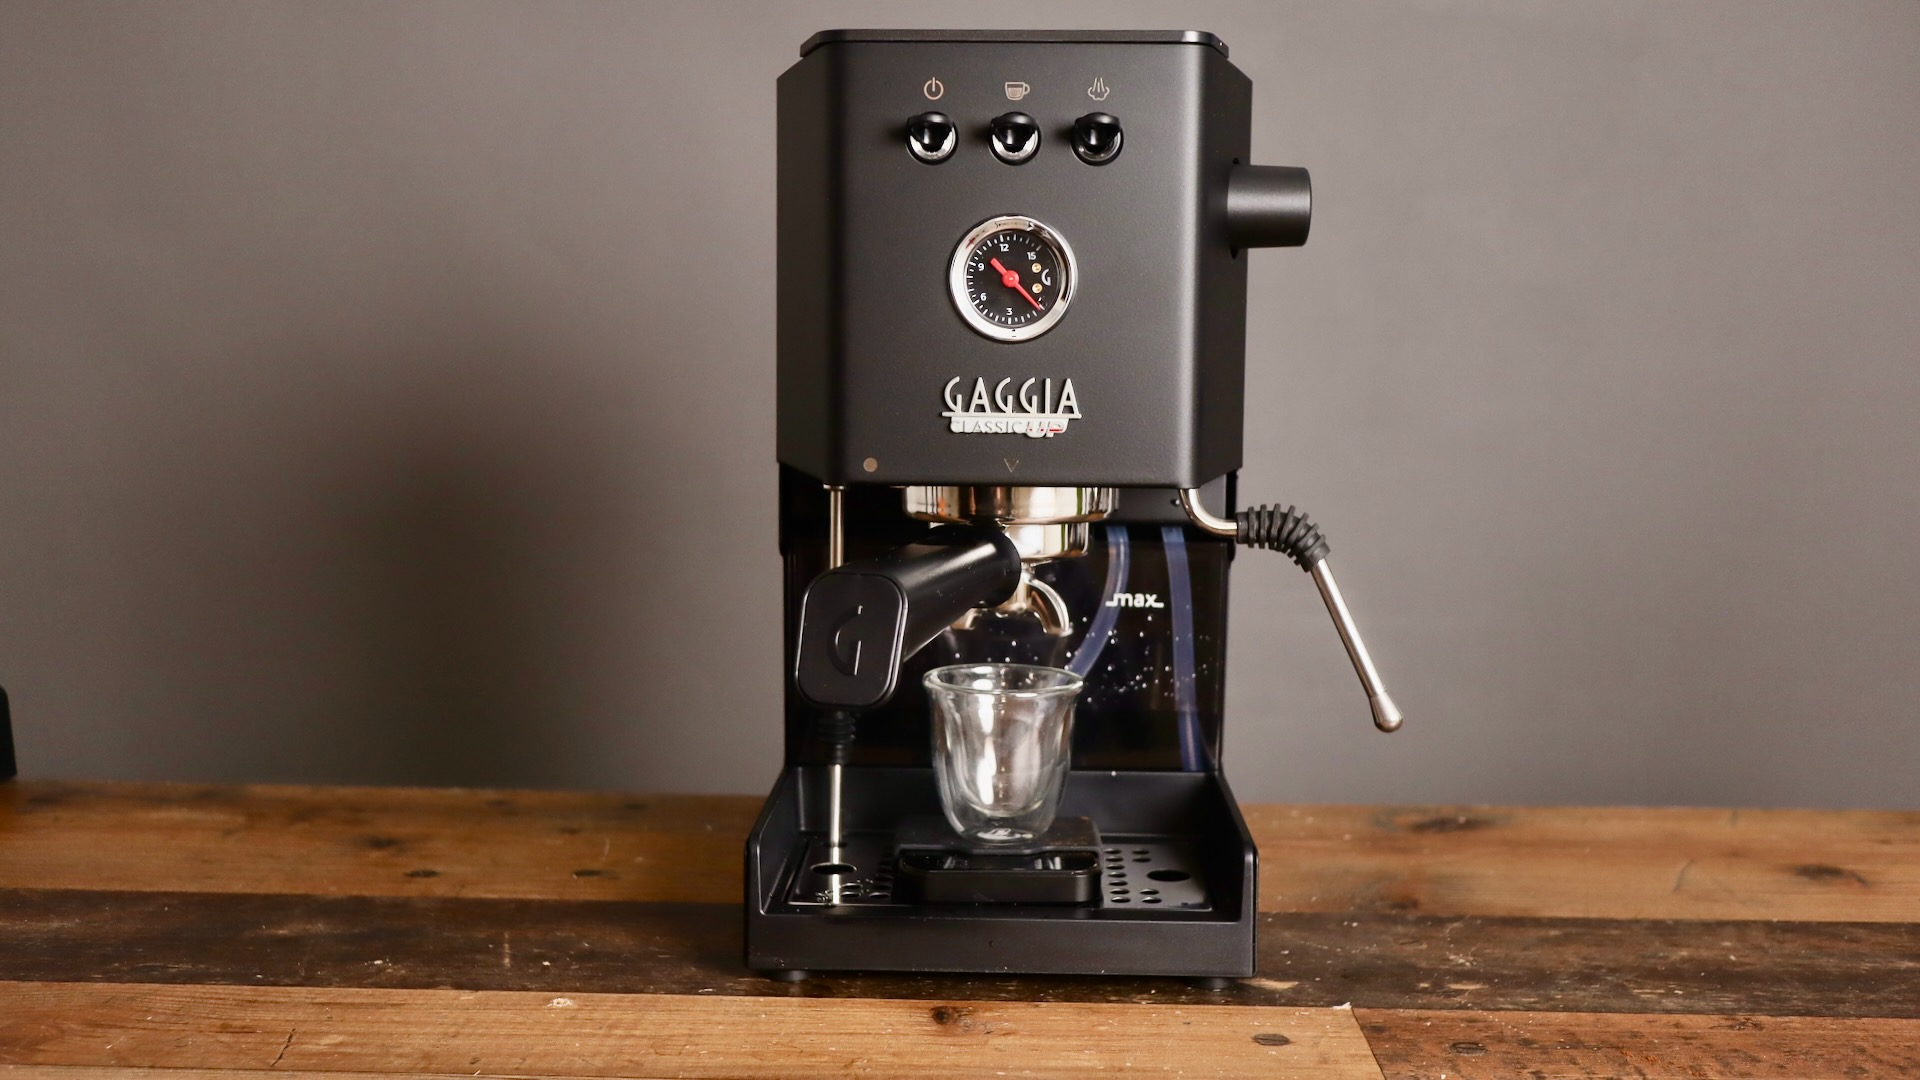
I am sure that most people are curious about the screen and PID functionality of the Gaggia Classic Up. What I like most about it, is its sleek profile. It’s barely noticeable when you look the machine straight on, but from above, you see the buttons and the screen.
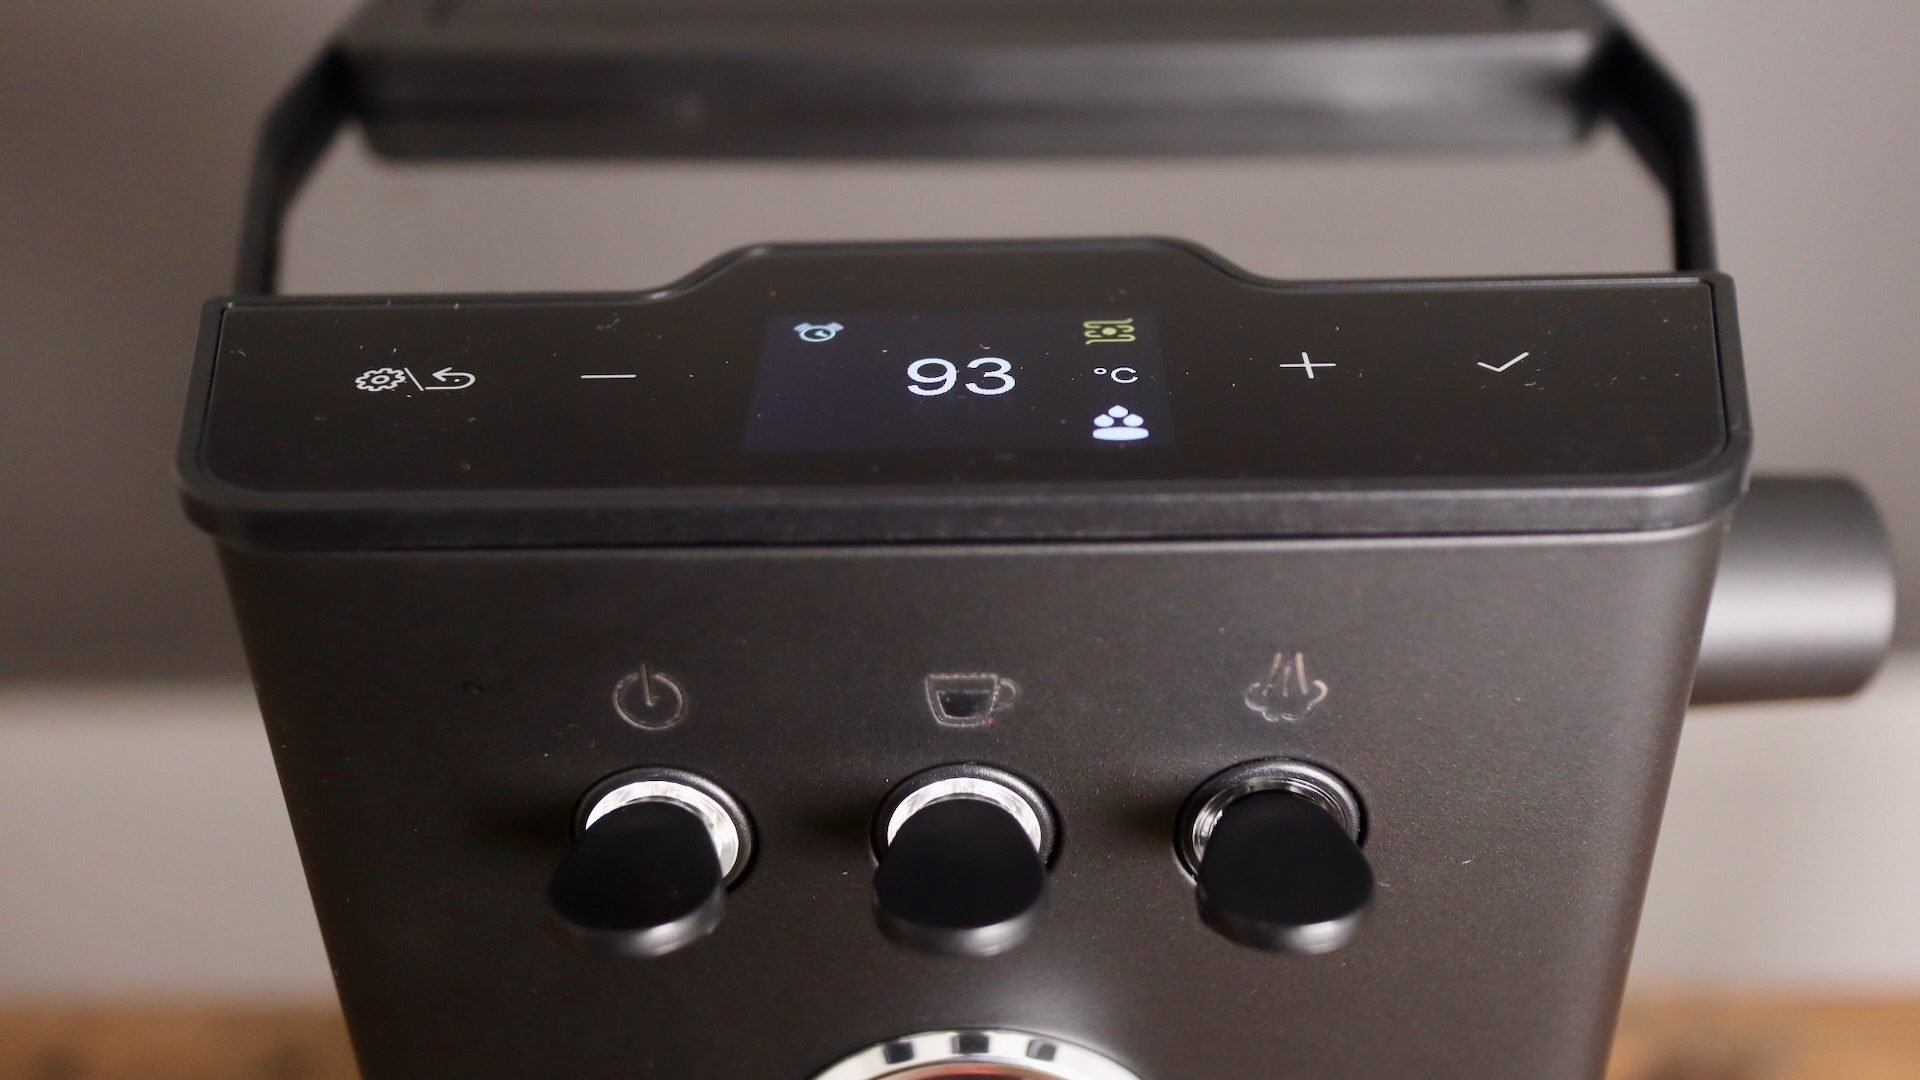
Gaggia Classic Up – PID and Switches
While the screen isn’t large at two inches, it’s large enough to be legible, as Gaggia has used mostly icons, and little text, to populate the screen. There are also 4 capacitive buttons on the panel:
– Settings/back button
– Minus button
– Plus button
– Enter button
Gaggia Classic Up – Main Screen
These buttons are more or less intuitive to use, and they are also described in the user manual, which is nice. I’ll go further into the functionality of the panel later. Just know for now that you can adjust the temperature easily, just by hitting the minus and plus buttons.
Moving down from the PID panel, you can see the rocker switches. These were a point of contention for me, as I really preferred the robust toggle switches on the Gaggia Classic Pro. These new rocker switches are ok, but they don’t provide that same satisfying click or haptic feel.
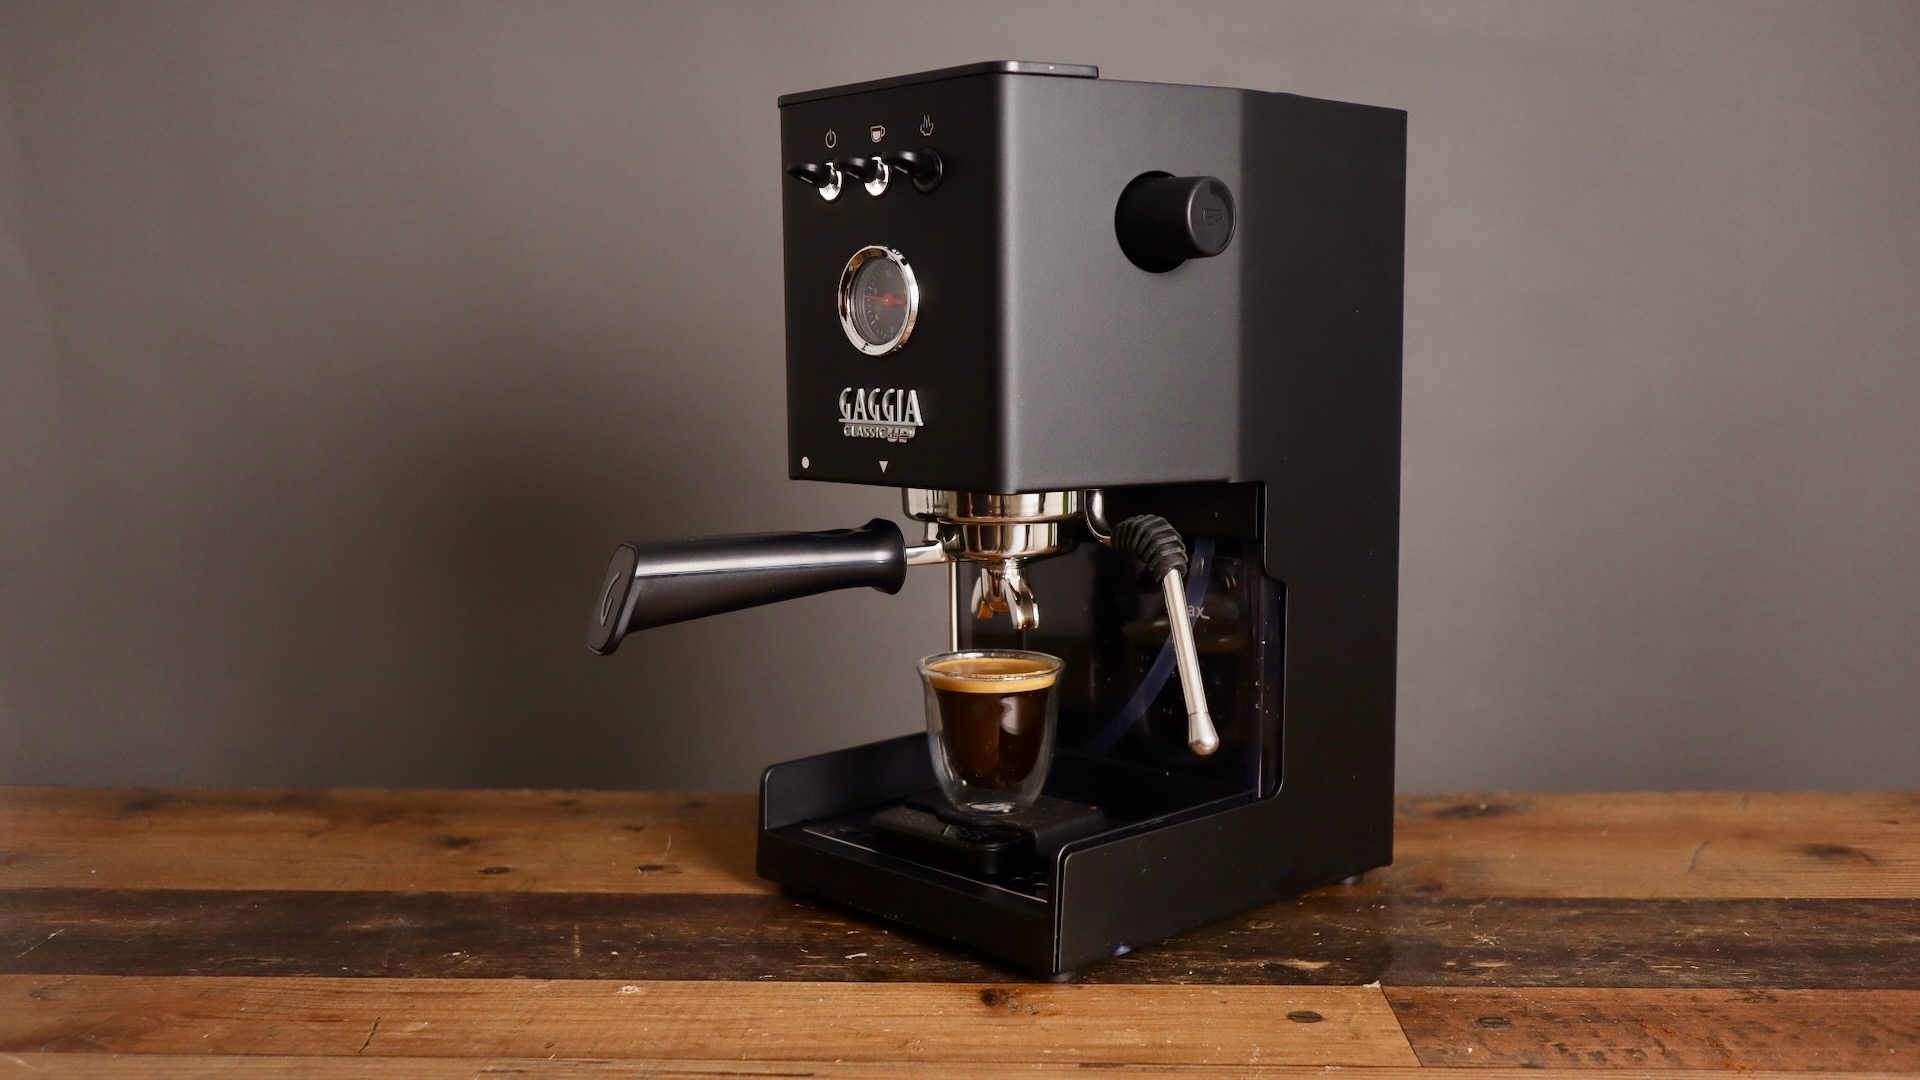
Gaggia Classic Up – Manometer and Switches
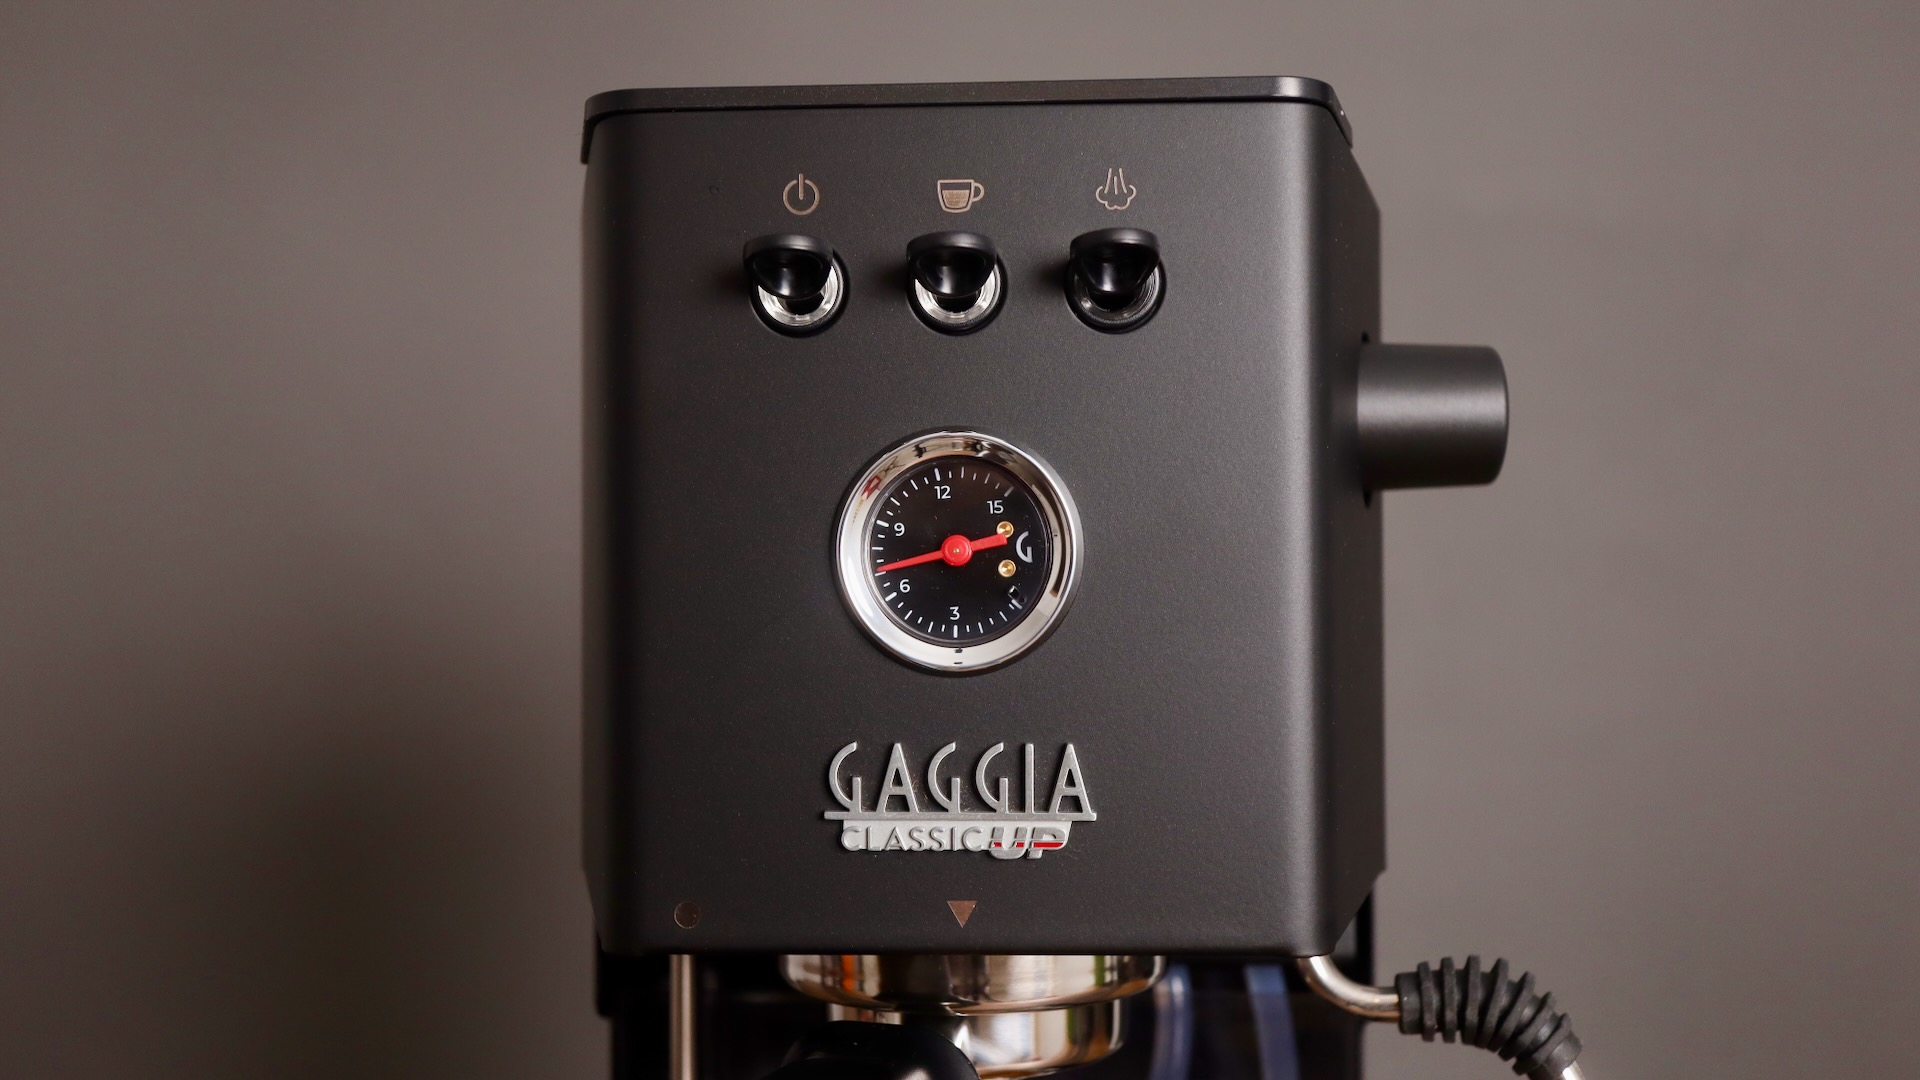
What I do like very much though, is the addition of the manometer. This is great, to be able to finally see what pressure you’re extracting at, and it’s a nice clean implementation. The dial of the manometer is black faced, with white tick marks, and a red plastic needle. I would have preferred a metal needle here.
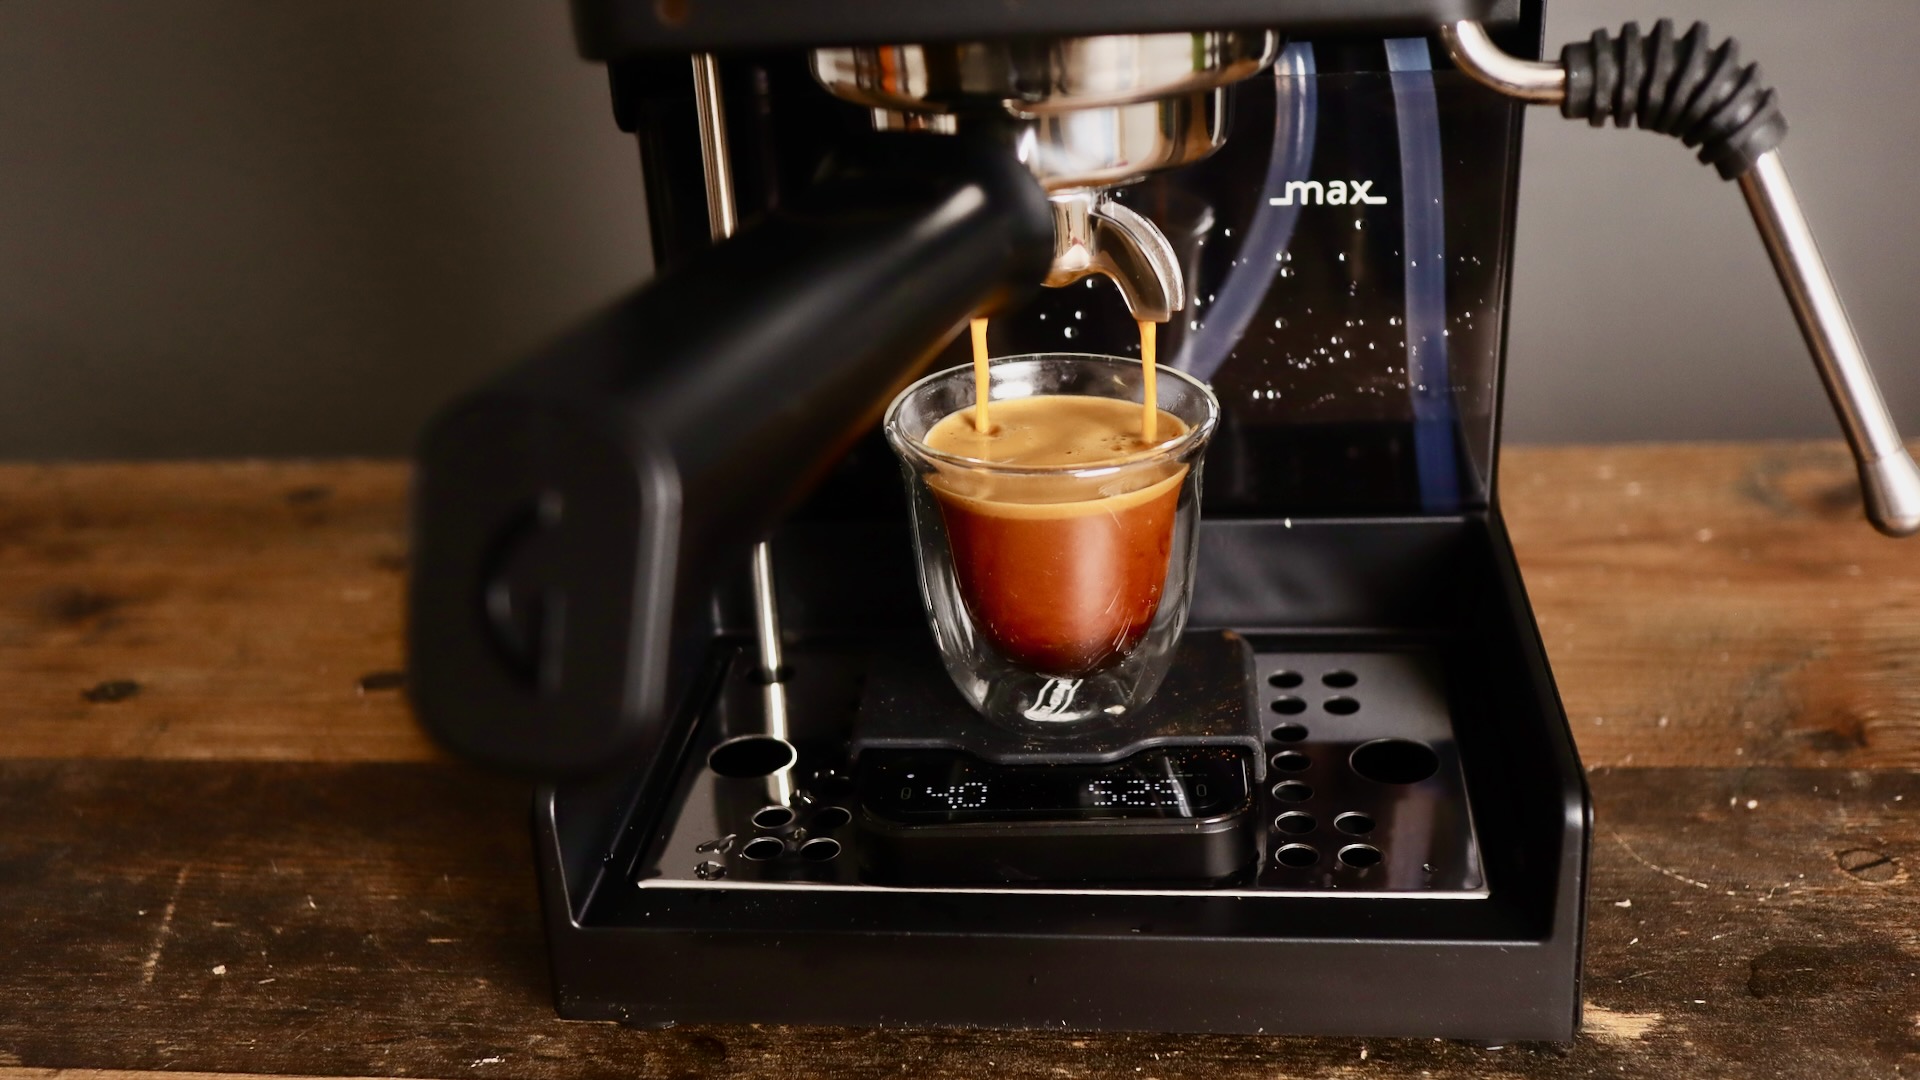
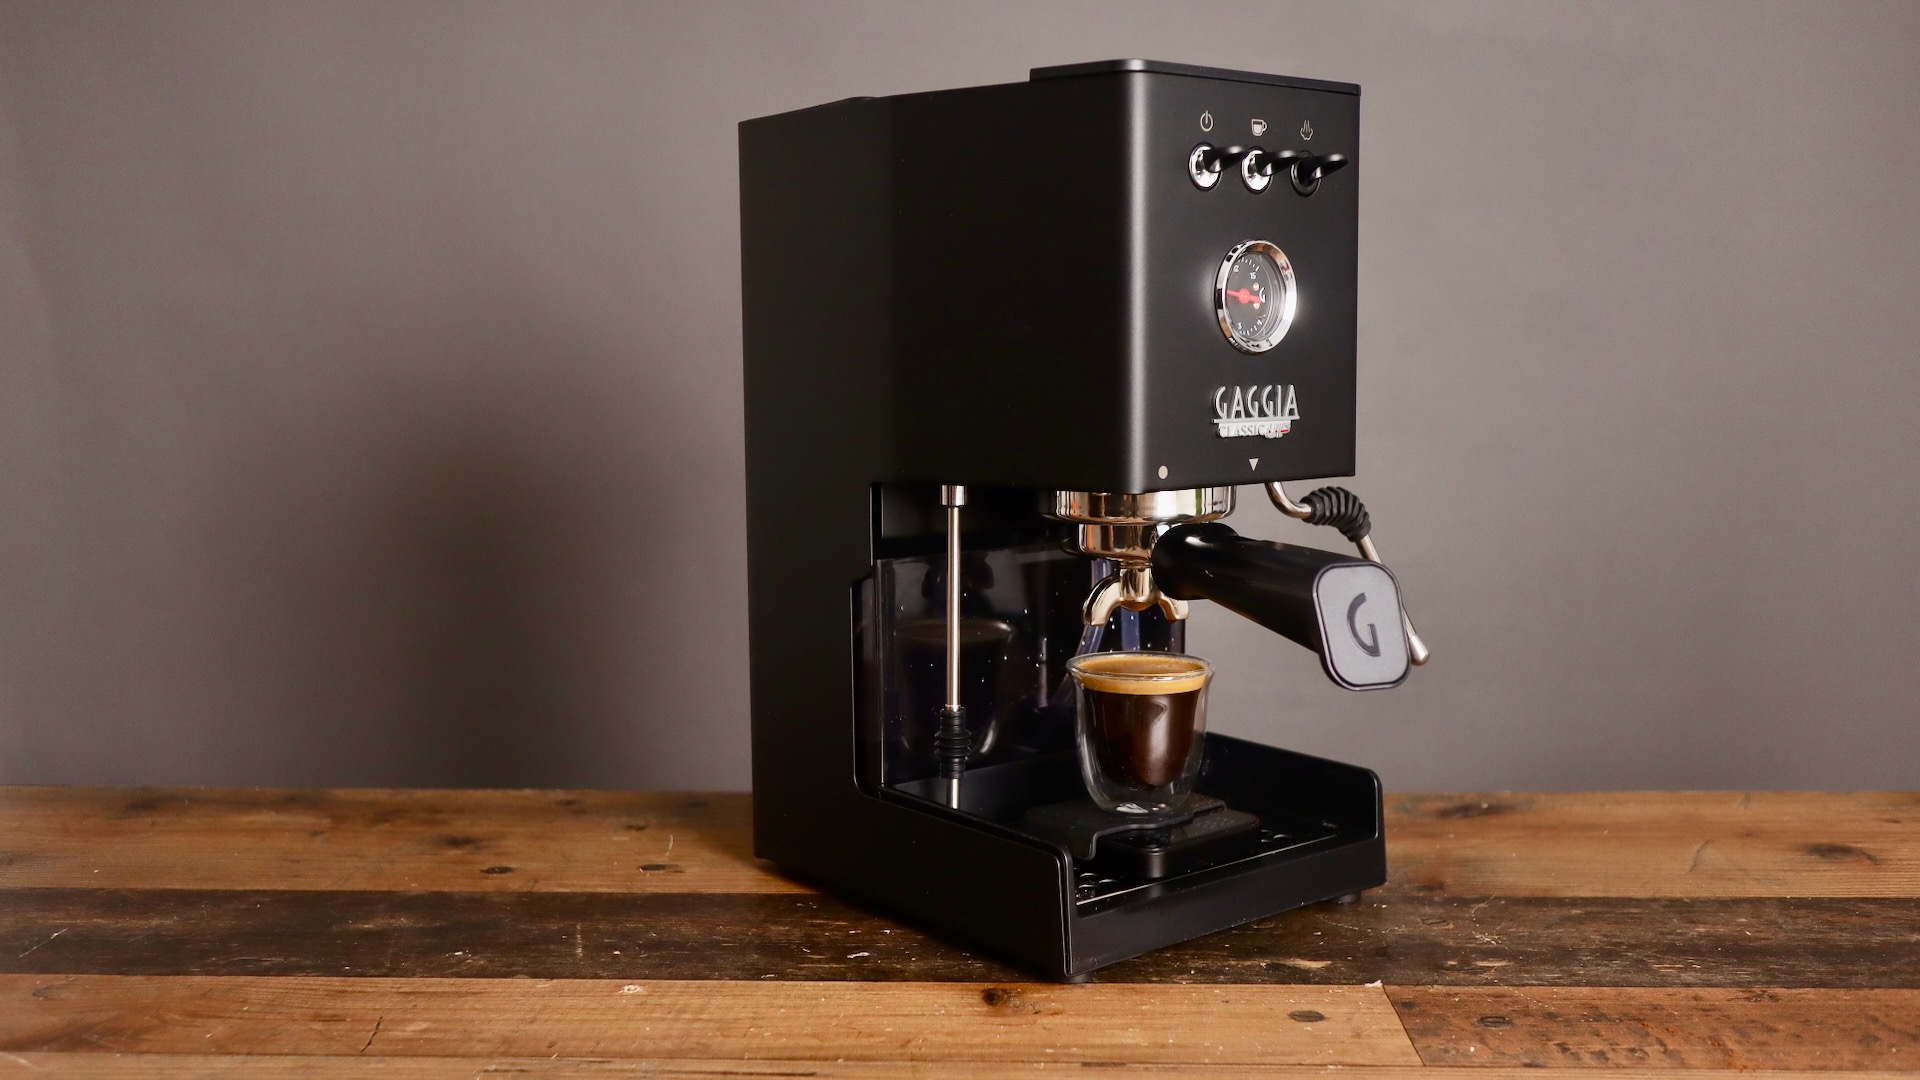
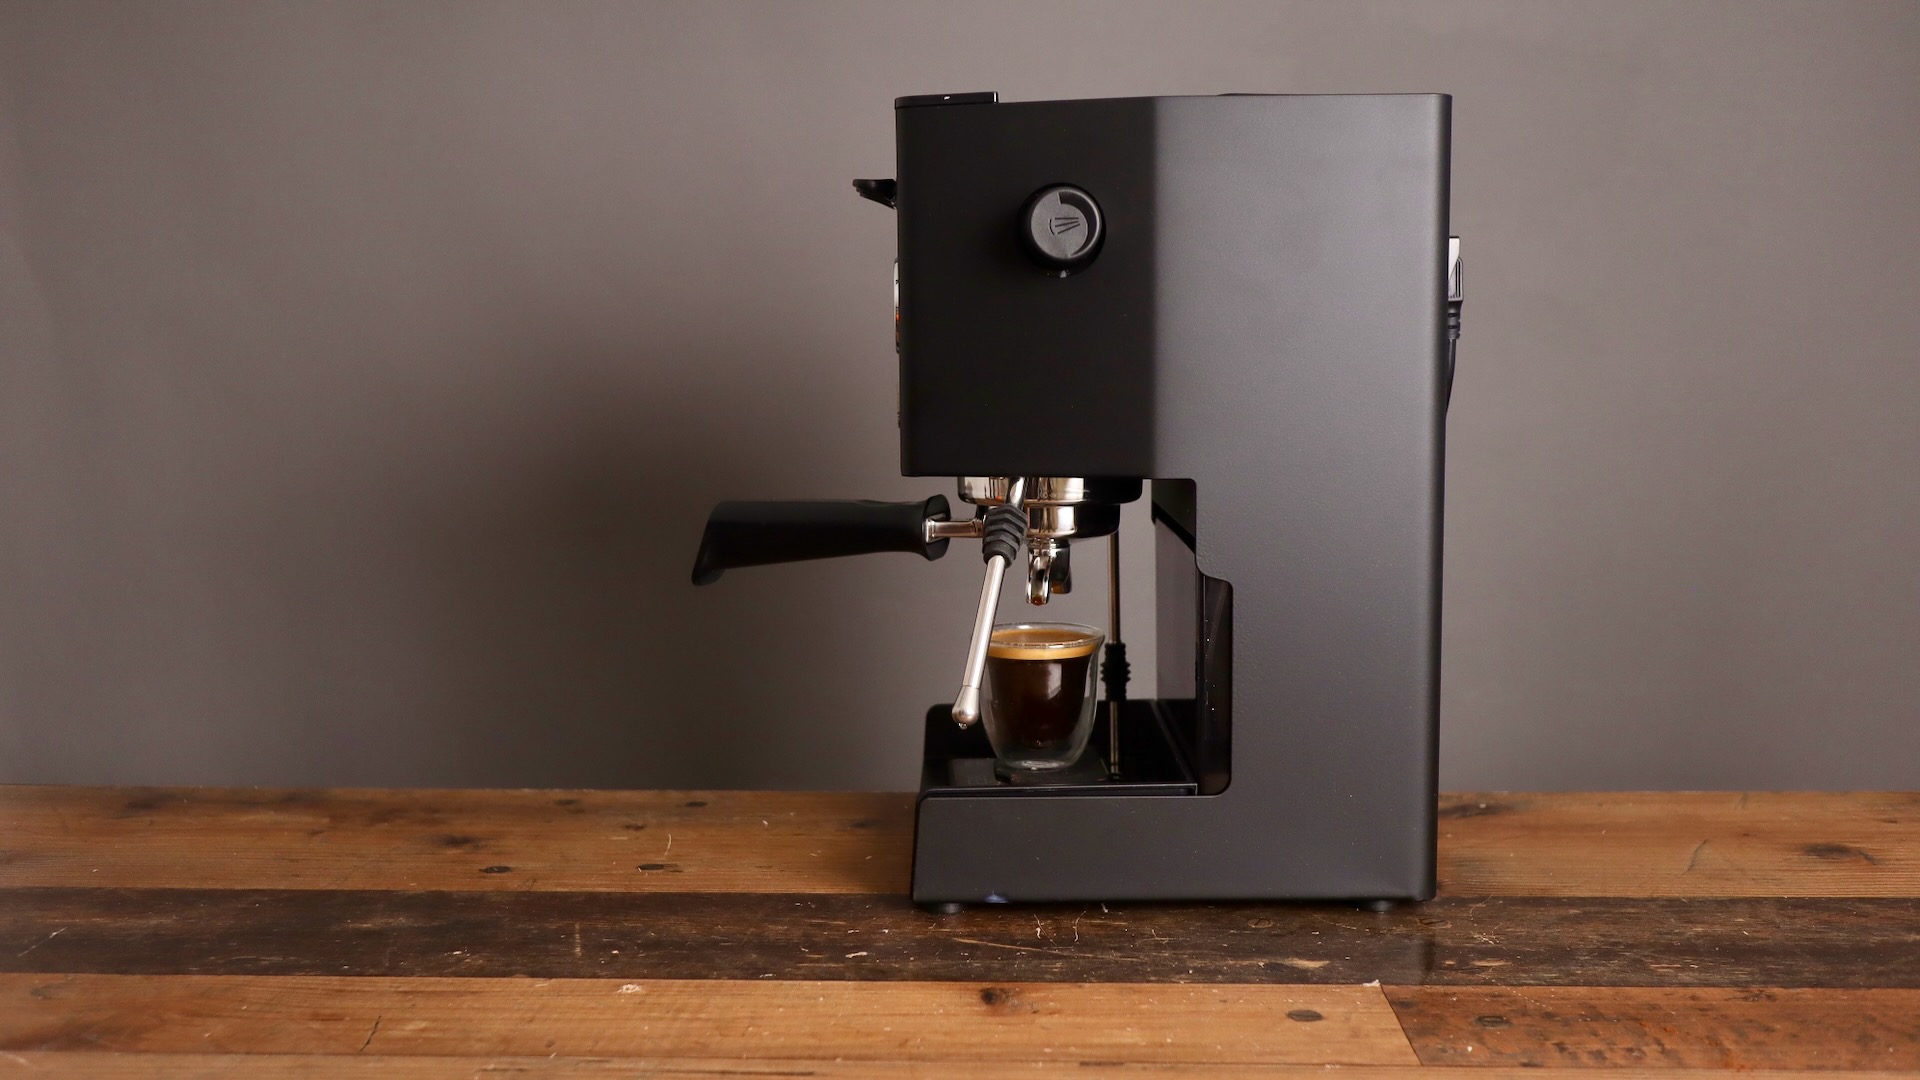
Gaggia Classic Up – Espresso
Looking at the photo above, you will notice that I’m using the lowered drip tray and BooKoo scale. This is a really nice advantage of the new Gaggia Classic Up over the Pro – a Gaggia-made lowered drip tray. This allows for larger cups, or for scales. I find the Gaggia-made drip tray nicer than the 3D printed ones, or cheap plastic moulded ones you can buy on Amazon.
If however, you want to use the classic drip tray, you can do so – it’s also included. It also comes with a nice red trim on it, lending a sporty look to the machine.
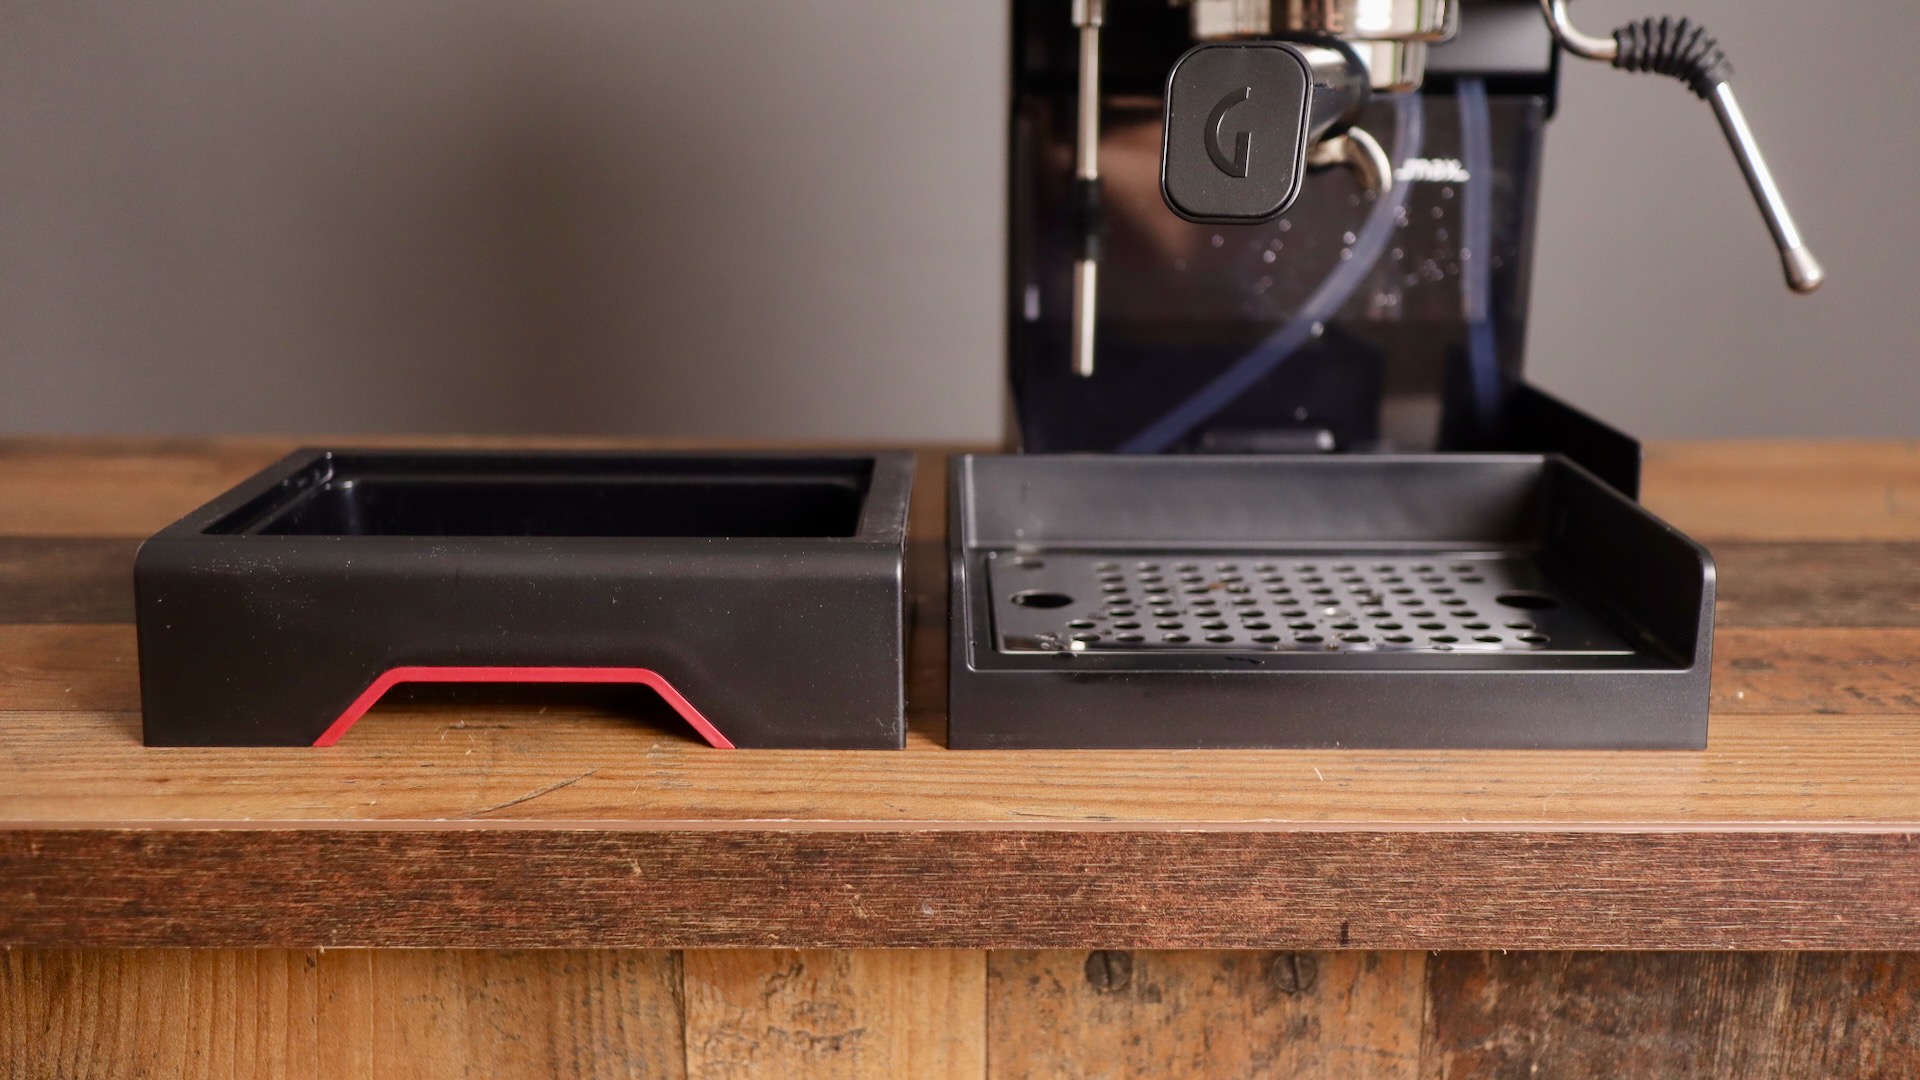
Gaggia Classic Up – Classic and Lowered Driptrays
But how does it work with the drain pipe, anyway? Well, now the Gaggia Classic Up comes with a telescoping drain pipe! It might sound like a simple thing, but it’s pretty slick.
One huge upgrade over the old model is that Gaggia has finally included an articulating steam wand! This new steam wand doesn’t just swivel around, but can be pulled away from the machine, giving it a better range of motion, and making it easier to position the single holed steam wand in the milk jug, or over the drip tray.
Gaggia Classic Up – Front
Unfortunately though, this new steam wand still drips, as most Gaggia Classic Pro machines drip. This is due to the steam valve, which is often leaky. My machine drips even though it’s brand new, which is unfortunate, but not a big deal. It’s just a few drips of water each time you close the valve.
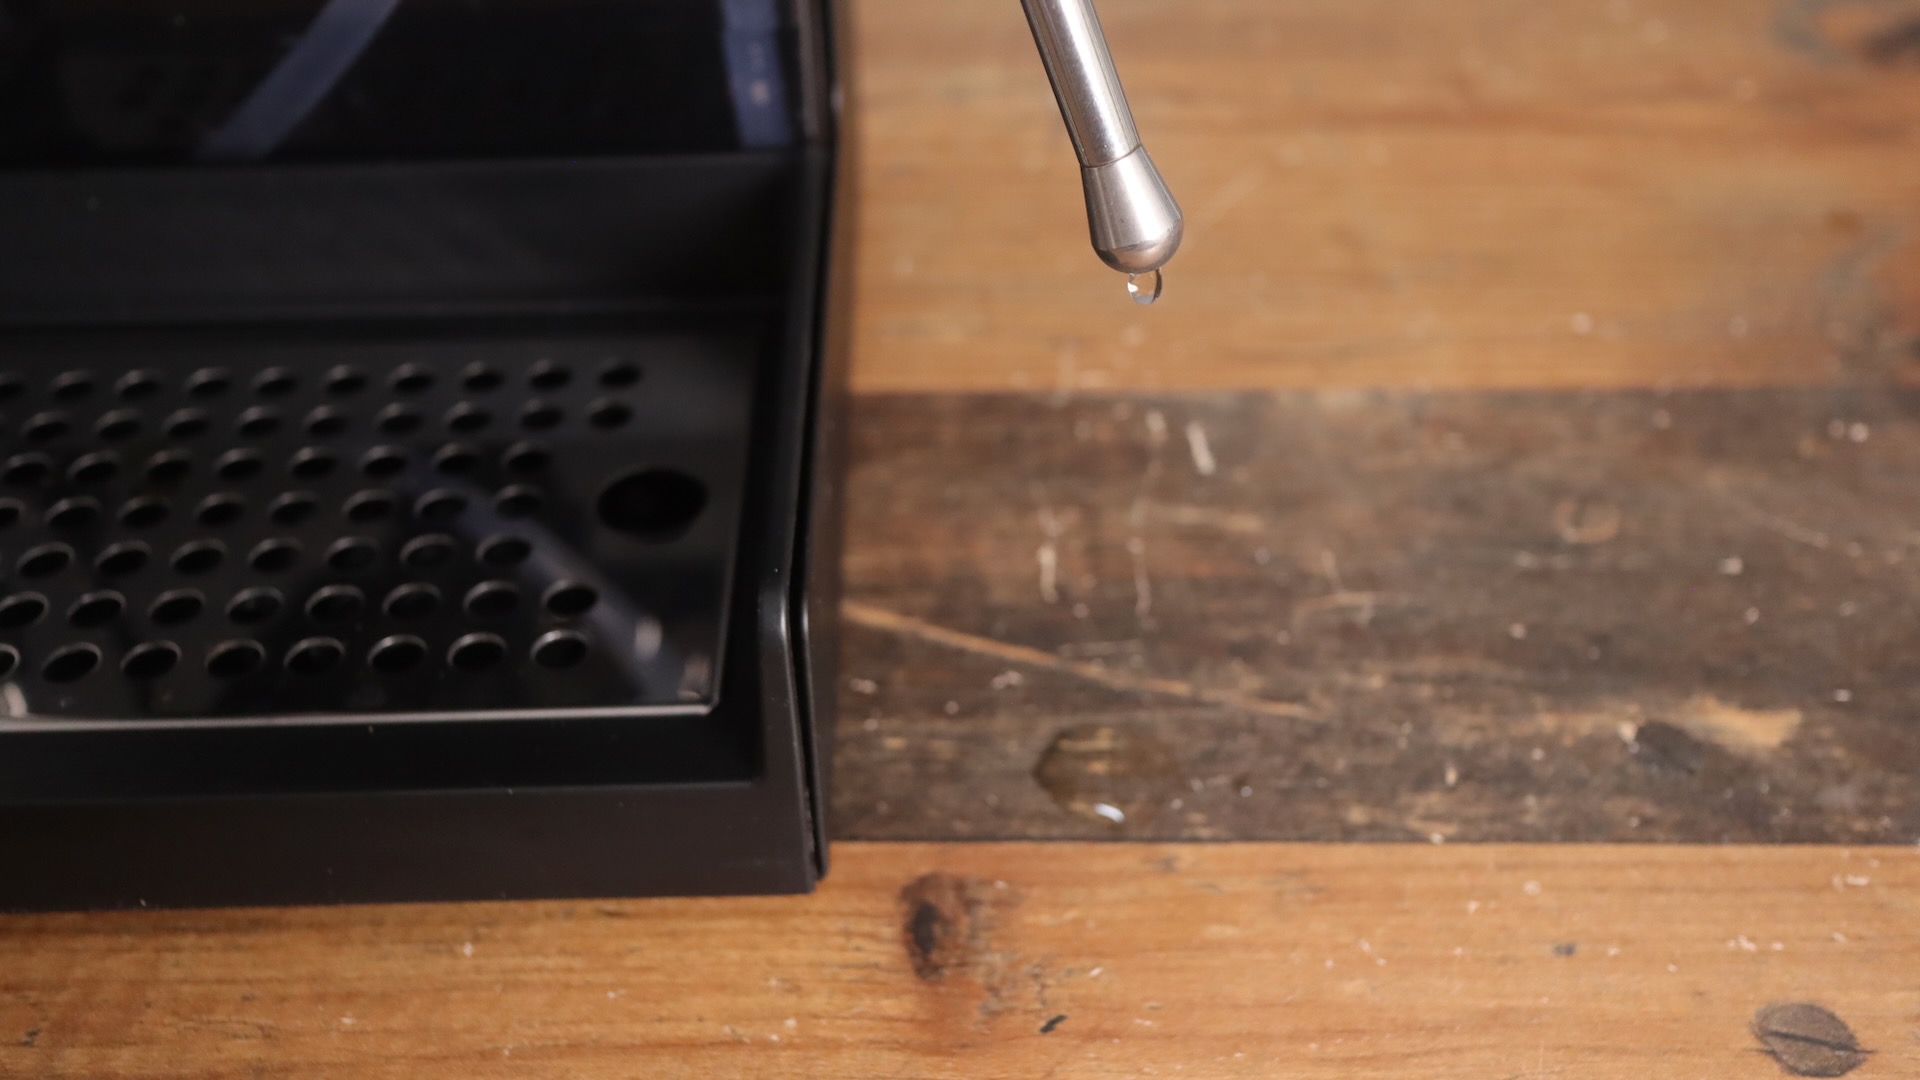
Gaggia Classic Up – Steam wand drip
Gaggia Classic Up vs Gaggia Classic Pro E24
Compared to the previous version of the Gaggia Classic Pro E24, the Gaggia Classic Up has some nice upgrades. The most obvious upgrade of course is the PID control and screen. But I also really appreciate the manometer, and lowered drip tray. I also think the new portafilter is a little nicer, and the Up comes with a nicer metal-based tamper.
I will say though, that the E24’s toggle switches were nicer in my honest opinion. And, the E24 is way cheaper than the Gaggia Classic Up!
Gaggia Classic Up vs Gaggiamate or Gagguino
I am certain that many people are going to compare the new Gaggia Classic Up with the open-source coded Gagguino and Gaggiamate builds. Here the main difference is going to be flow profiling. The Classic Up cannot adjust its pump voltage, nor is there a needle valve to divert the water flow anywhere. Therefore, the Classic Up does not do any flow or pressure profiling.
Therefore, I think there’s still room for the modding community, to keep modding the E24 model, and the Classic Up will be a nice choice for those who don’t want to void their warranty, or who don’t feel confident in modding their machines.
The below pictures are provided courteously from the GaggiaMate team (8 March 2026). Thanks for sharing!

Gaggiamate Closeup

Gaggiamate Installed
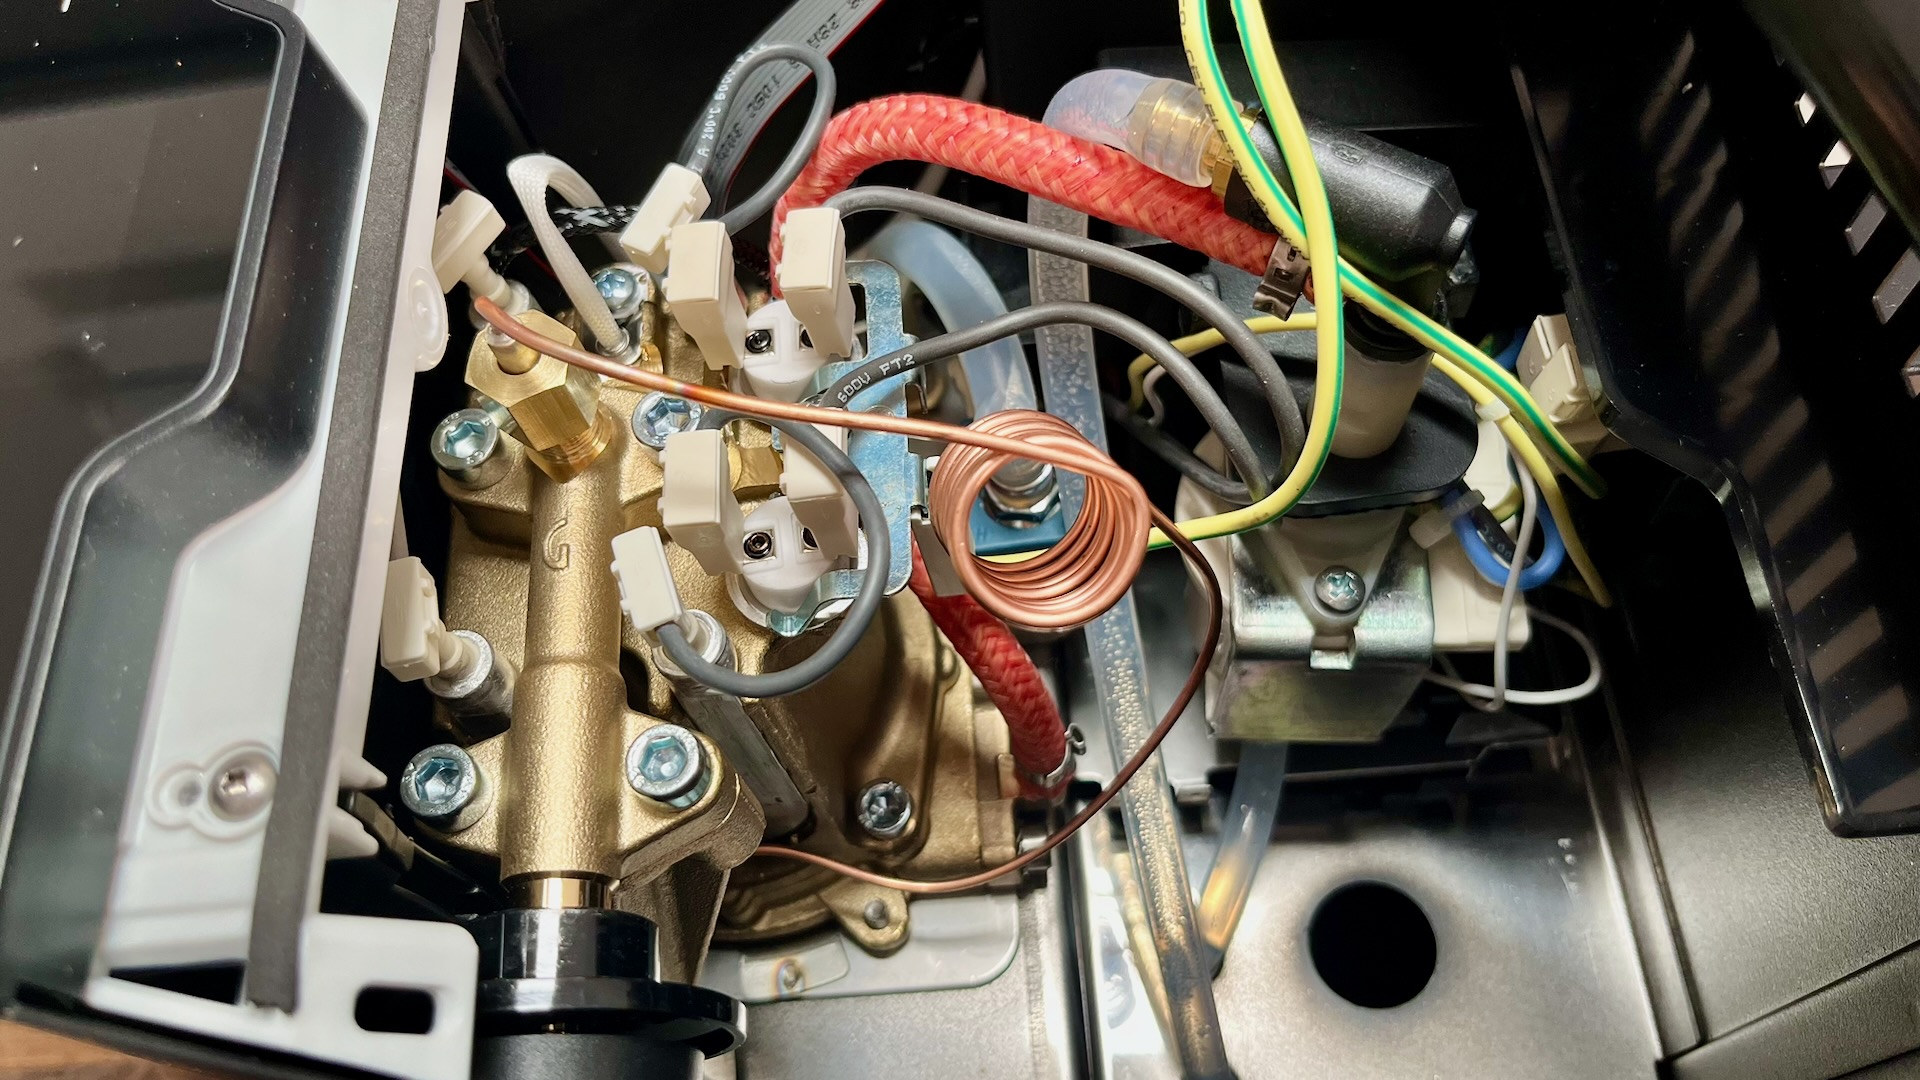
Brass Boiler
Still comparing the new Gaggia Classic Up to the E24 model, they both have brass boilers. These are claimed to be lead-free, which is great. They are certainly nicer than the aluminum boilers Gaggia used to employ, and WAY better than the teflon-lined ones they previously used in boiler-gate of the Gaggia Classic Pro Evo.
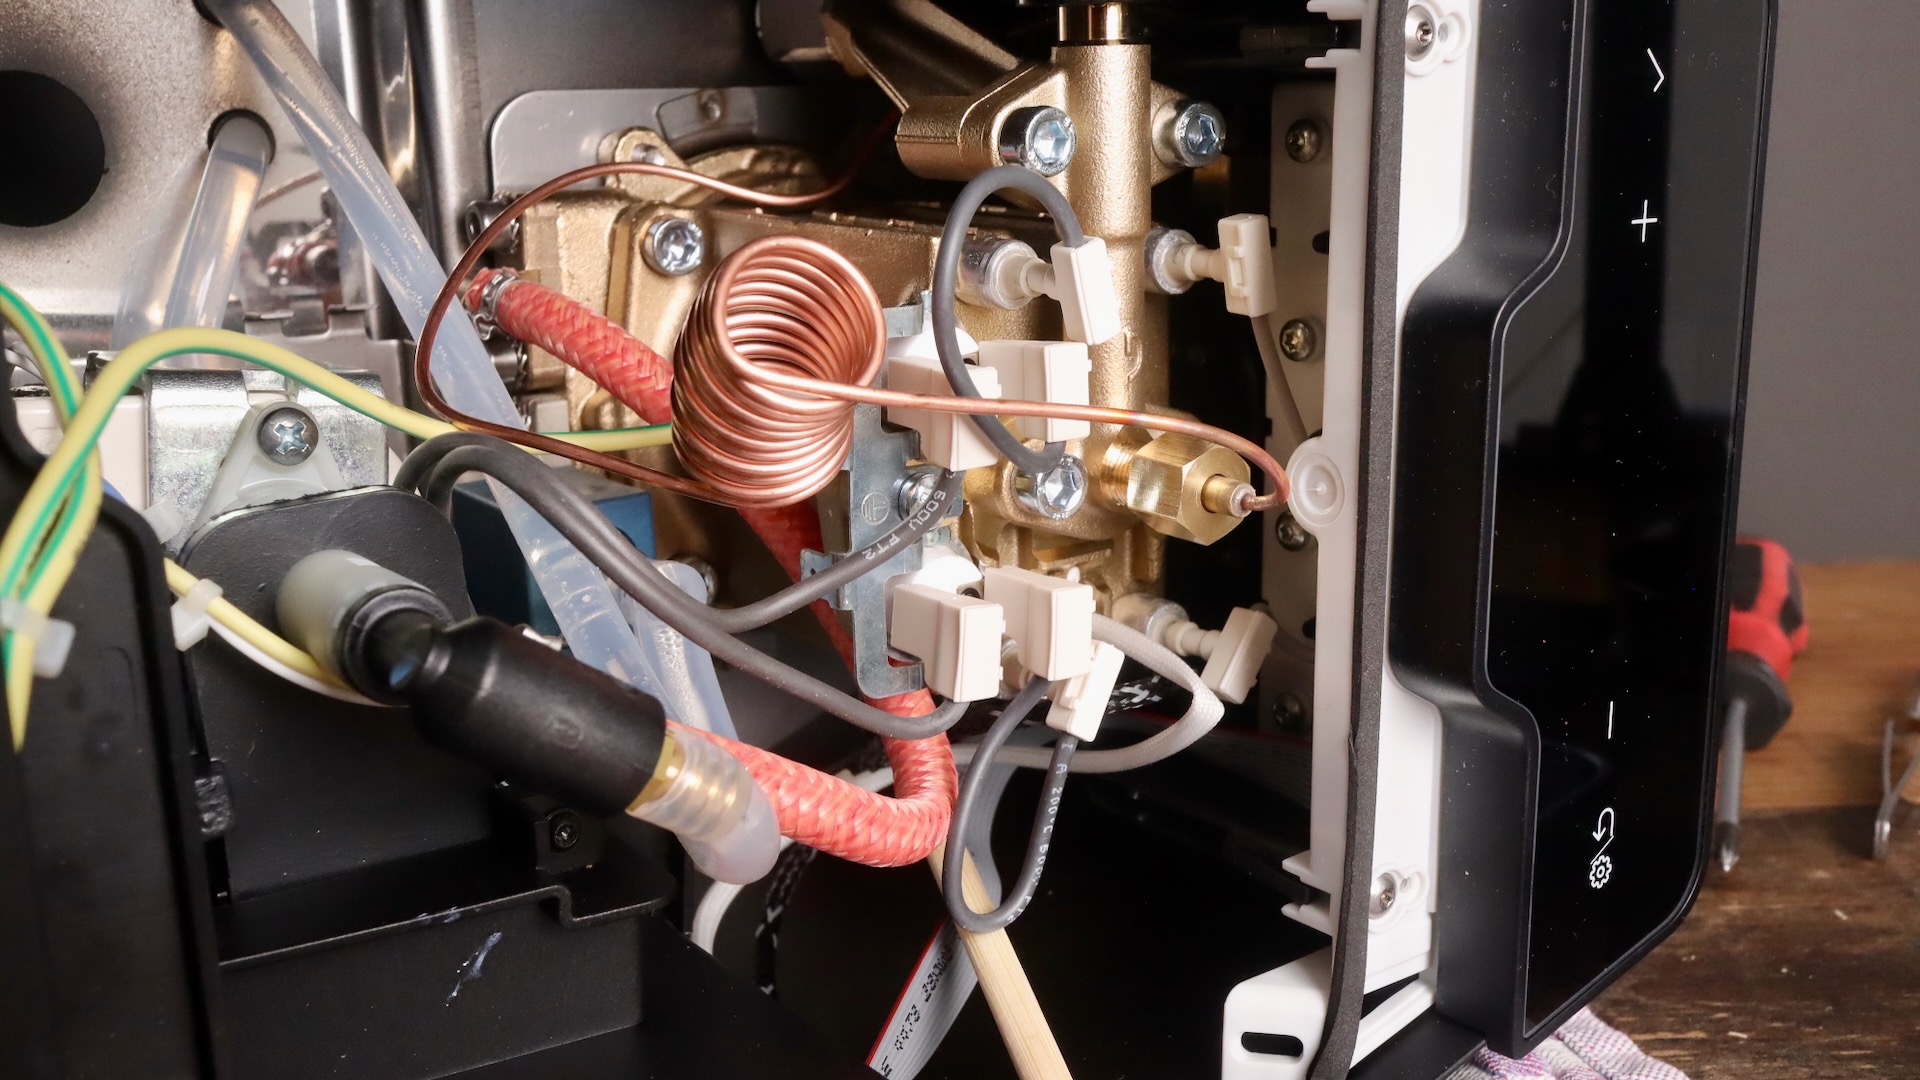
Gaggia Classic Up – Inside with Brass Boiler
In the photo above, you see the brass boiler on the right, a pretty golden color. The steam wand valve extends outwards from it, as they seem to be cast as one piece. You’ll also see the coiled copper line, reaching from the top of the boiler and going to the manometer.
PID with two thermoprobes?
The Gaggia Classic Up also comes with two thermoprobes. Their website is a little confusing, as they mention “two PIDs“, but they seem to mean two thermoprobes – one to measure the brew temperature, lower on the boiler, and one to measure the steam temperature, at the top of the boiler.
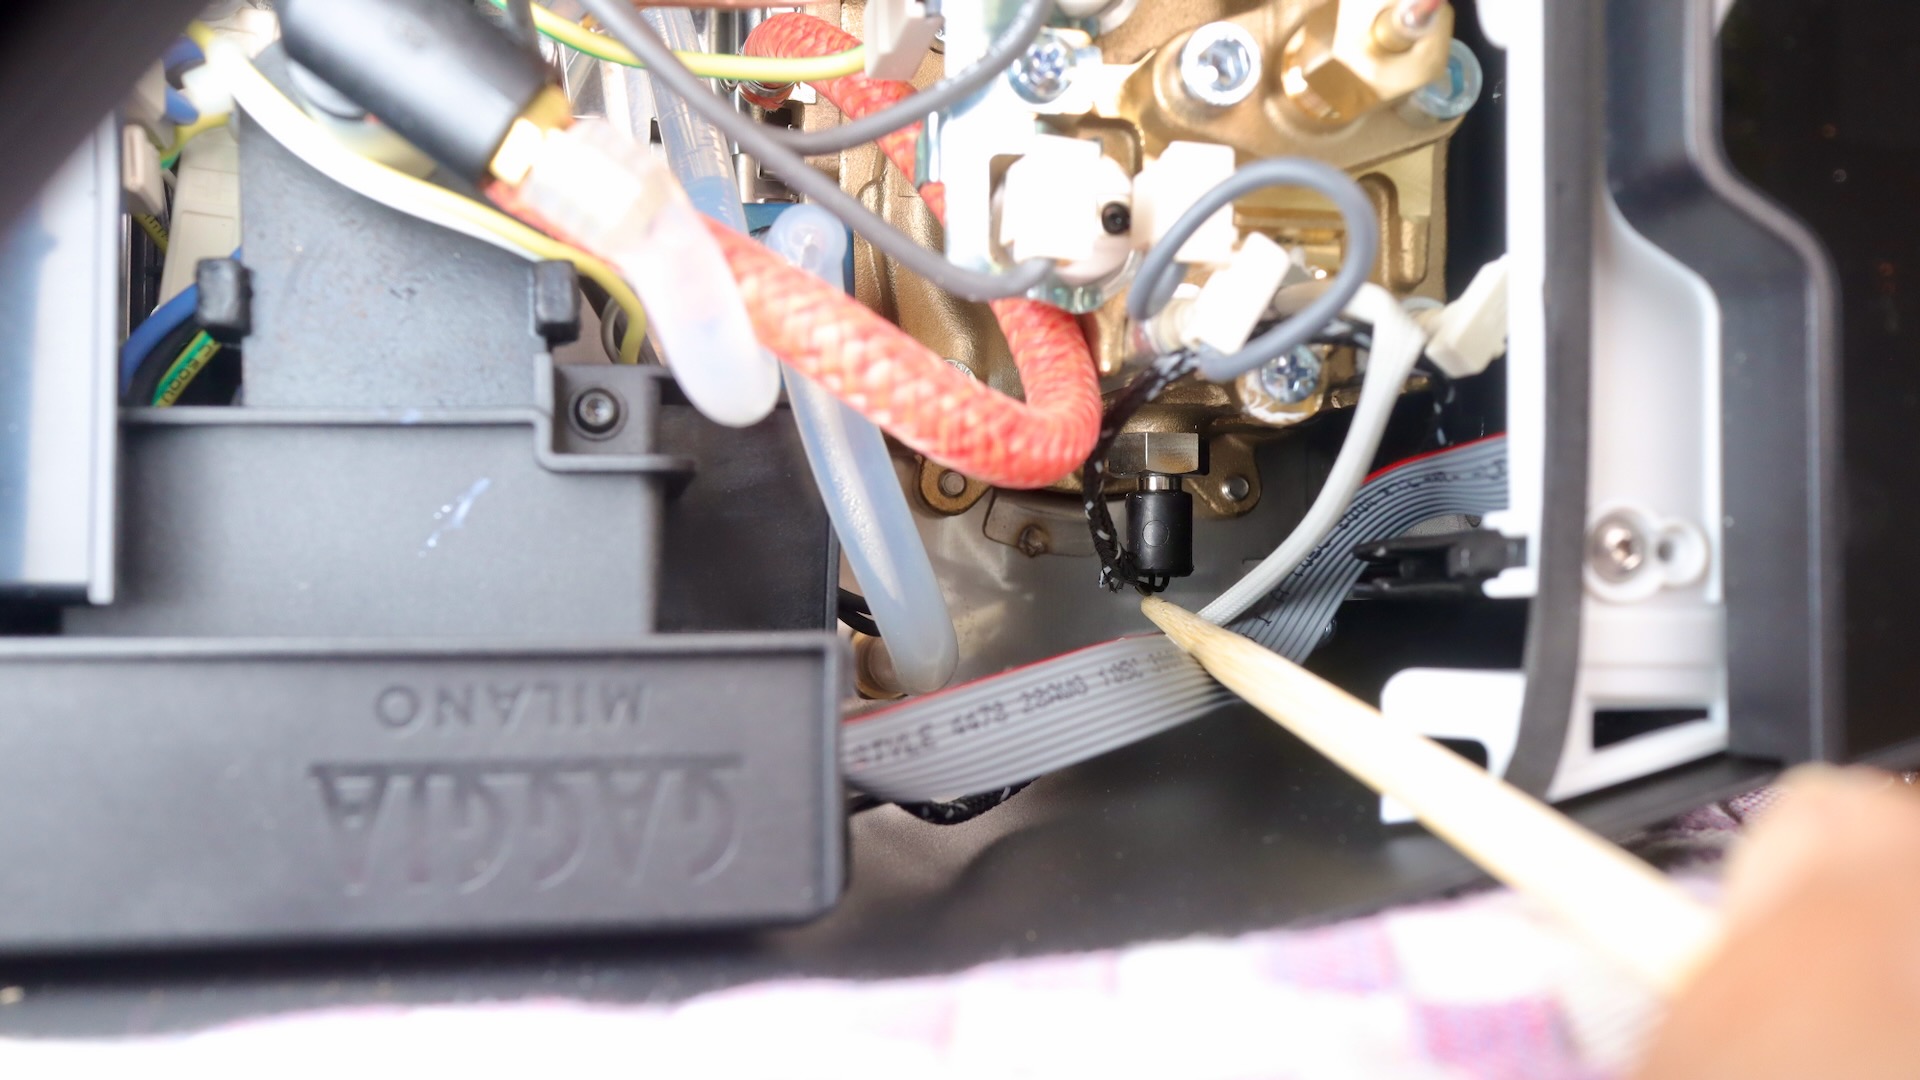
Gaggia Classic Up – Brew PID Probe
As you can see above, the brew thermoprobe is attached with a two-wire cable to the bottom of the brass boiler. The cable is shielded with a black and white mesh cover.
Below, you will see the steam thermoprobe, attached to the top of the boiler, shielded by a white cover. These two different thermoprobes offer the controller better feedback as to the current setpoint, since heat rises. This way, you don’t need to use a compromise with just one spot to pull the temperature – you get the brew temperature where it’s most accurate, and the steam temperature at the top of the boiler, where the steam is at.

Gaggia Classic Up – Steam PID Probe
Pre-infusion and timed shots?
Yes, you heard right – now that the Gaggia Classic Up has a controller, it also has a timer and can do pre-infusion! It has 3 modes, basically adding between 20 and 30 ml of water, and pausing either shortly or a bit longer. This is quite a welcome feature, as I love shot timers!
What’s maybe too bad is that there are still no volumetric shots available. So, since shot times are going to vary based on bean freshness, grind size, dose, tamping, and atmospheric variables, the timed shot feature might not be very useful to people.
What I WISH they had included, would have been a bluetooth module, to for example do gravimetric shots, like with the BooKoo scale. That would have been awesome!
How is the Control Panel to work with?
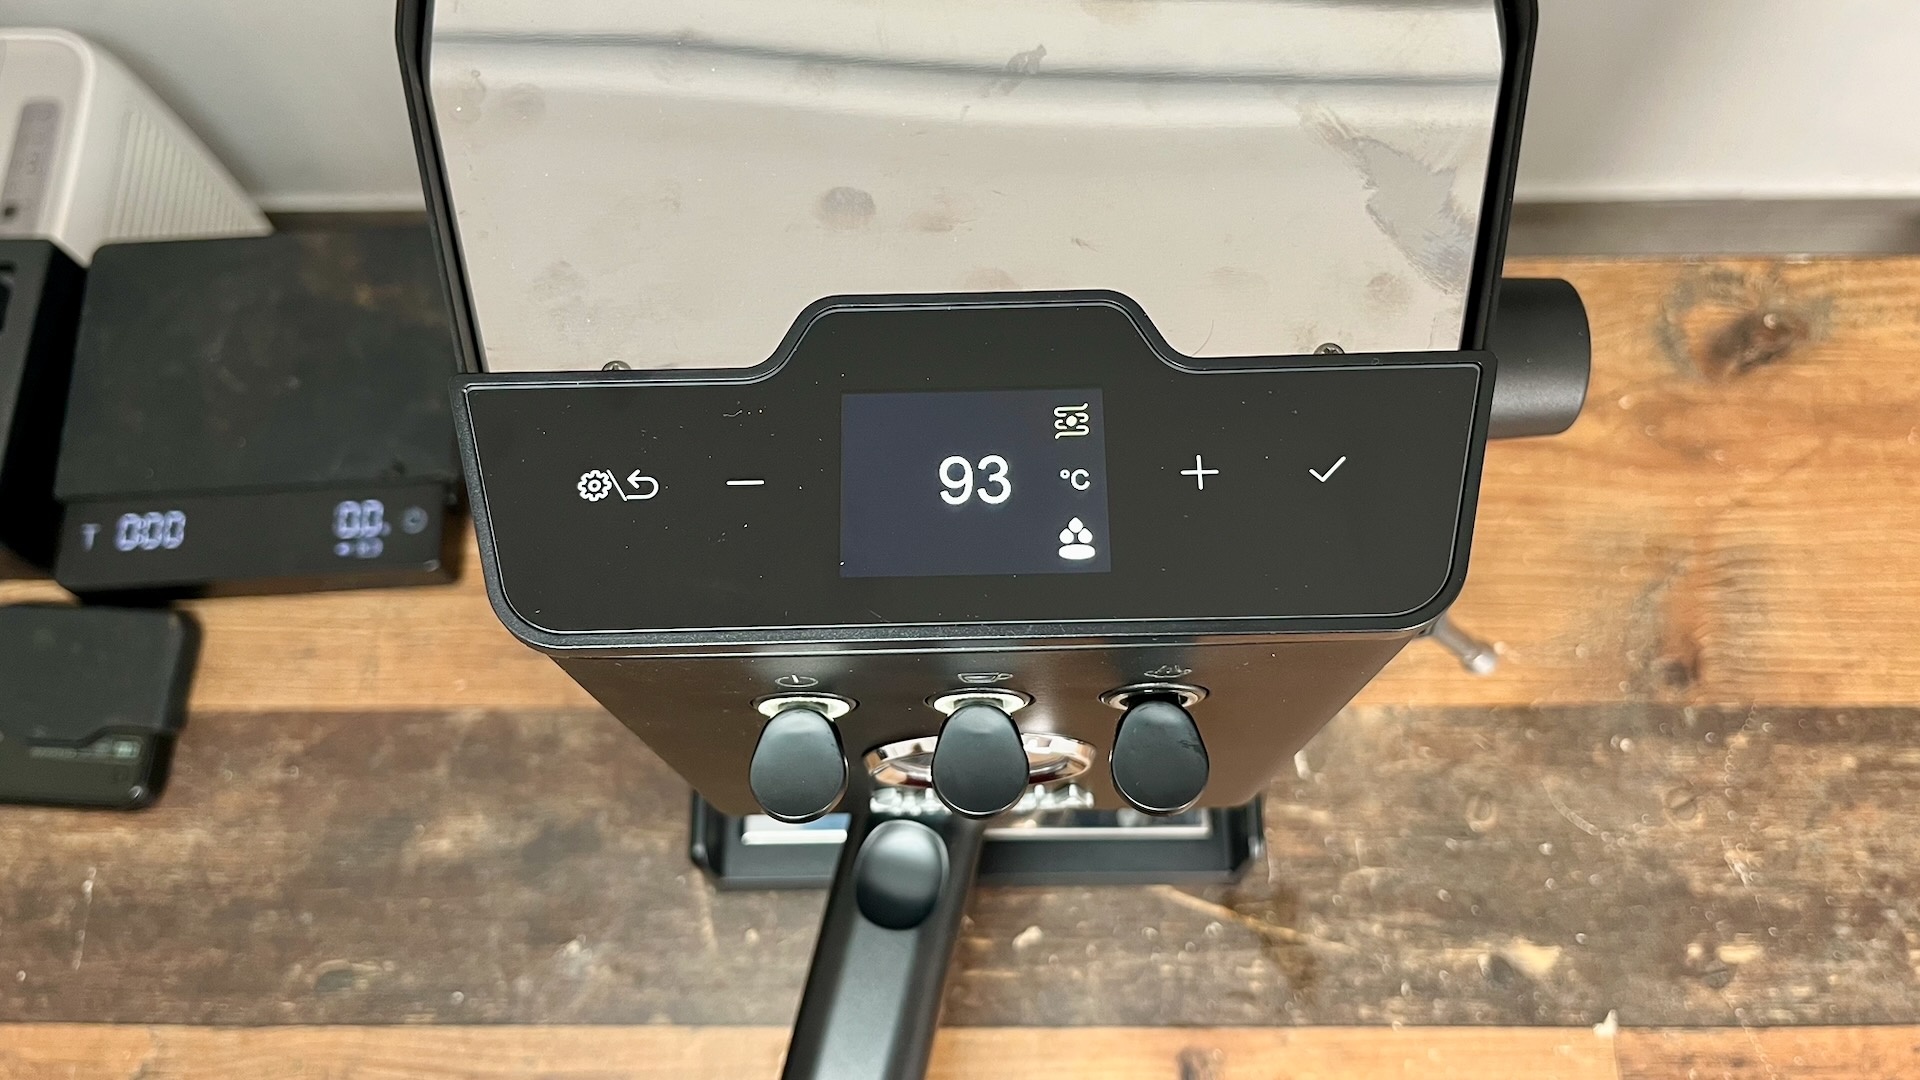
I am actually enjoying the panel so far. Setting the temperature from the main screen is super easy – just hit the minus or plus buttons to adjust the temperature setpoint. The main screen also shows the current temperature of the boiler, the pre-infusion mode (mode 3 shown below), and whether or not a preset timer is being use
Gaggia Classic Up – Main Screen
Navigating through the menu is pretty easy, too. Just hit the gear icon, to enter the settings menu. From there, you can adjust the following settings:
- Pre-infusion mode
- Wake timer in the morning (15 minute intervals)
- Auto-standby times (15, 30, 60 minutes up to 480 minutes!)
- Beeping (on or off)
- Temperature unit (F and C)
- Preset timer for timed extractions (in full seconds)

Gaggia Classic Up – Pre-infusion, Auto off, Timed wakeup
Looking below, you can see that I have the maximum pre-infusion setting selected. This pumps about 30ml of water in the pre-infusion phase, and waits before extracting. The low and medium settings use slightly less water, and a shorter pause. Of course, you can also go completely without pre-infusion, if you prefer.

Gaggia Classic Up – Pre-infusion
What’s the heat up time on the Gaggia Classic Up?
Similar to the Gaggia Classic Pro E24, the heat up time of the small boiler is about 5 minutes. I tested this, going from an ambient temperature of 19 °C, to the target temperature of 93 °C.
Even so, the brew group and portafilter still need warming up, so I’d give those an additional 5 minutes. You can also pull an “empty shot” like the directions recommend, pulling 150ml of hot water through the empty portafilter.

Gaggia Classic Up – 5 minutes to heat up from a cold start
What’s the portafilter size on the Gaggia Classic Pro and Up?
Just as before with the Gaggia Classic Pro, the portafilter has a claimed diameter of 58mm. It’s actually slightly larger than that, at about 58.5mm. Thankfully, Gaggia now also provides a decent metal based tamper that is also 58.5mm, which helps to fully compact the puck better than 58.0mm tampers.
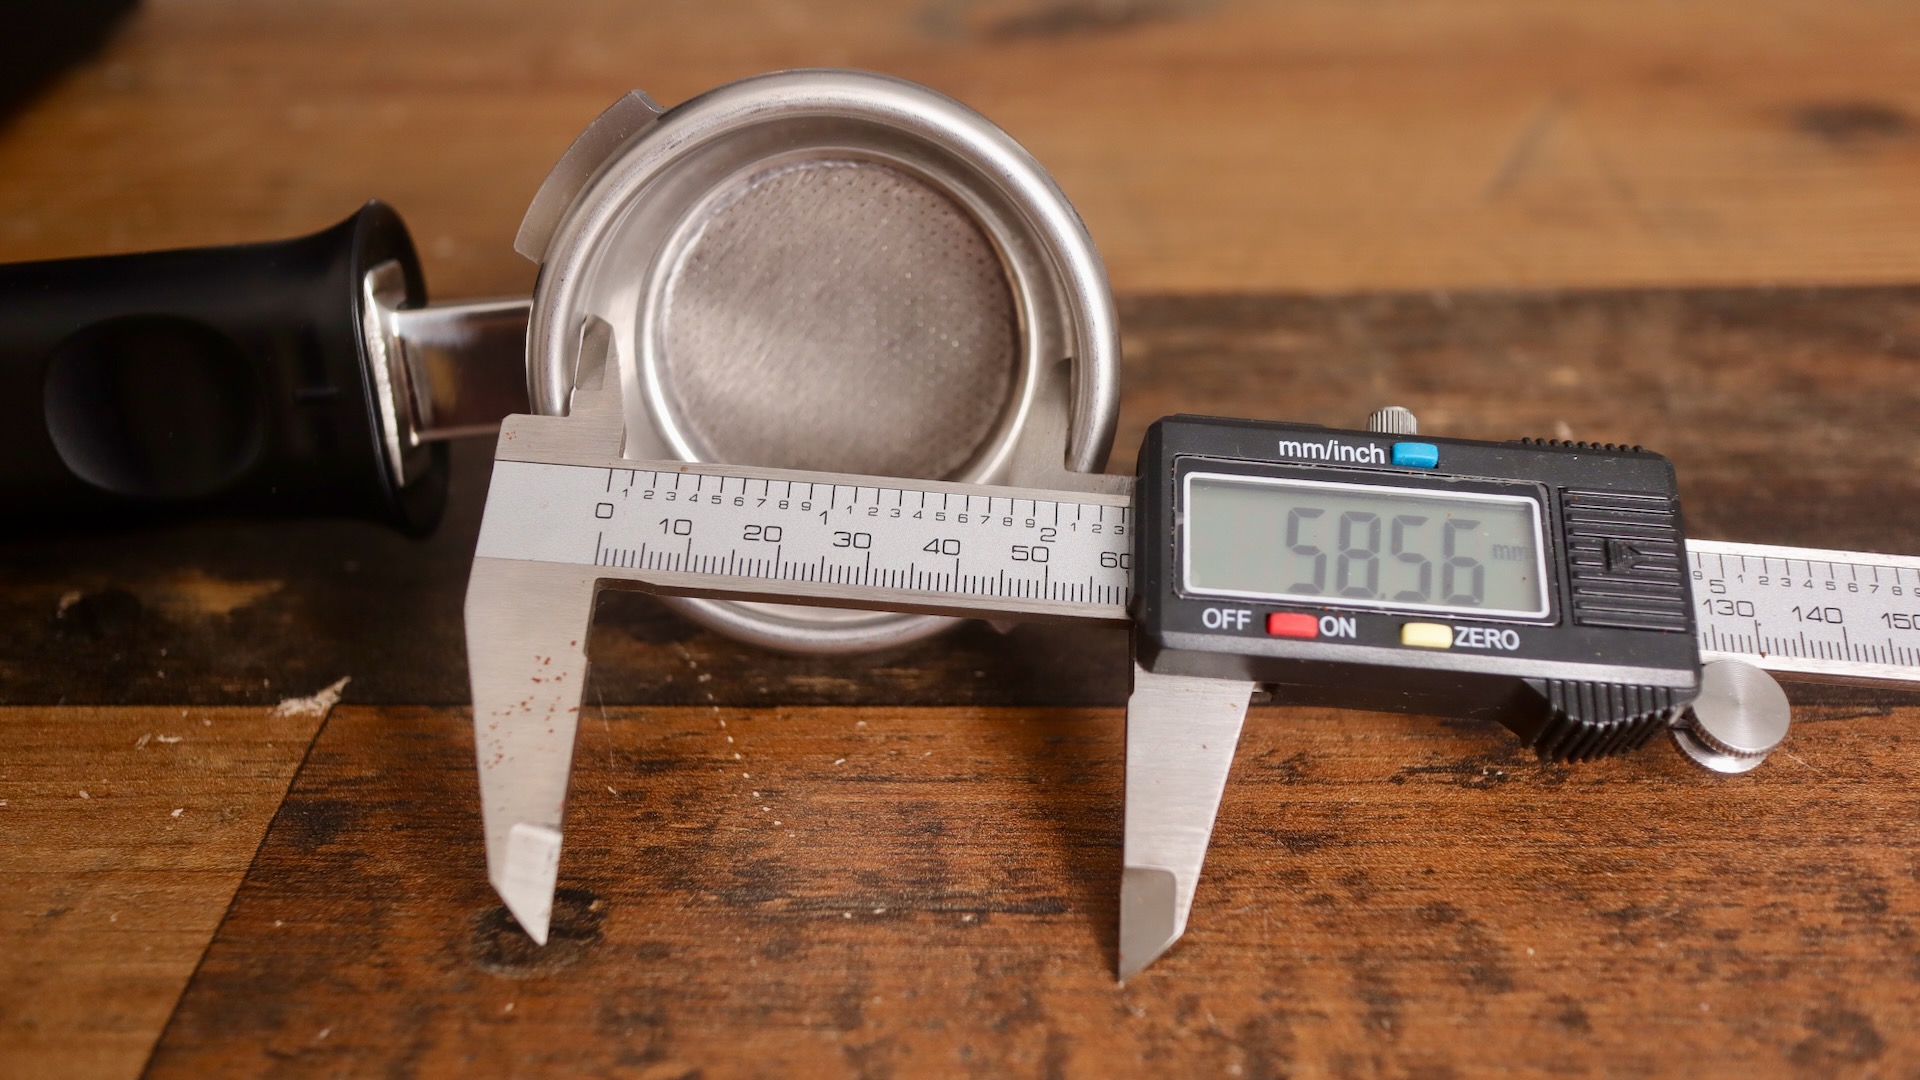
Gaggia Classic Up – 58.5 mm basket
The Gaggia portafilter is pretty hefty, at about 450 grams, without a basket installed.
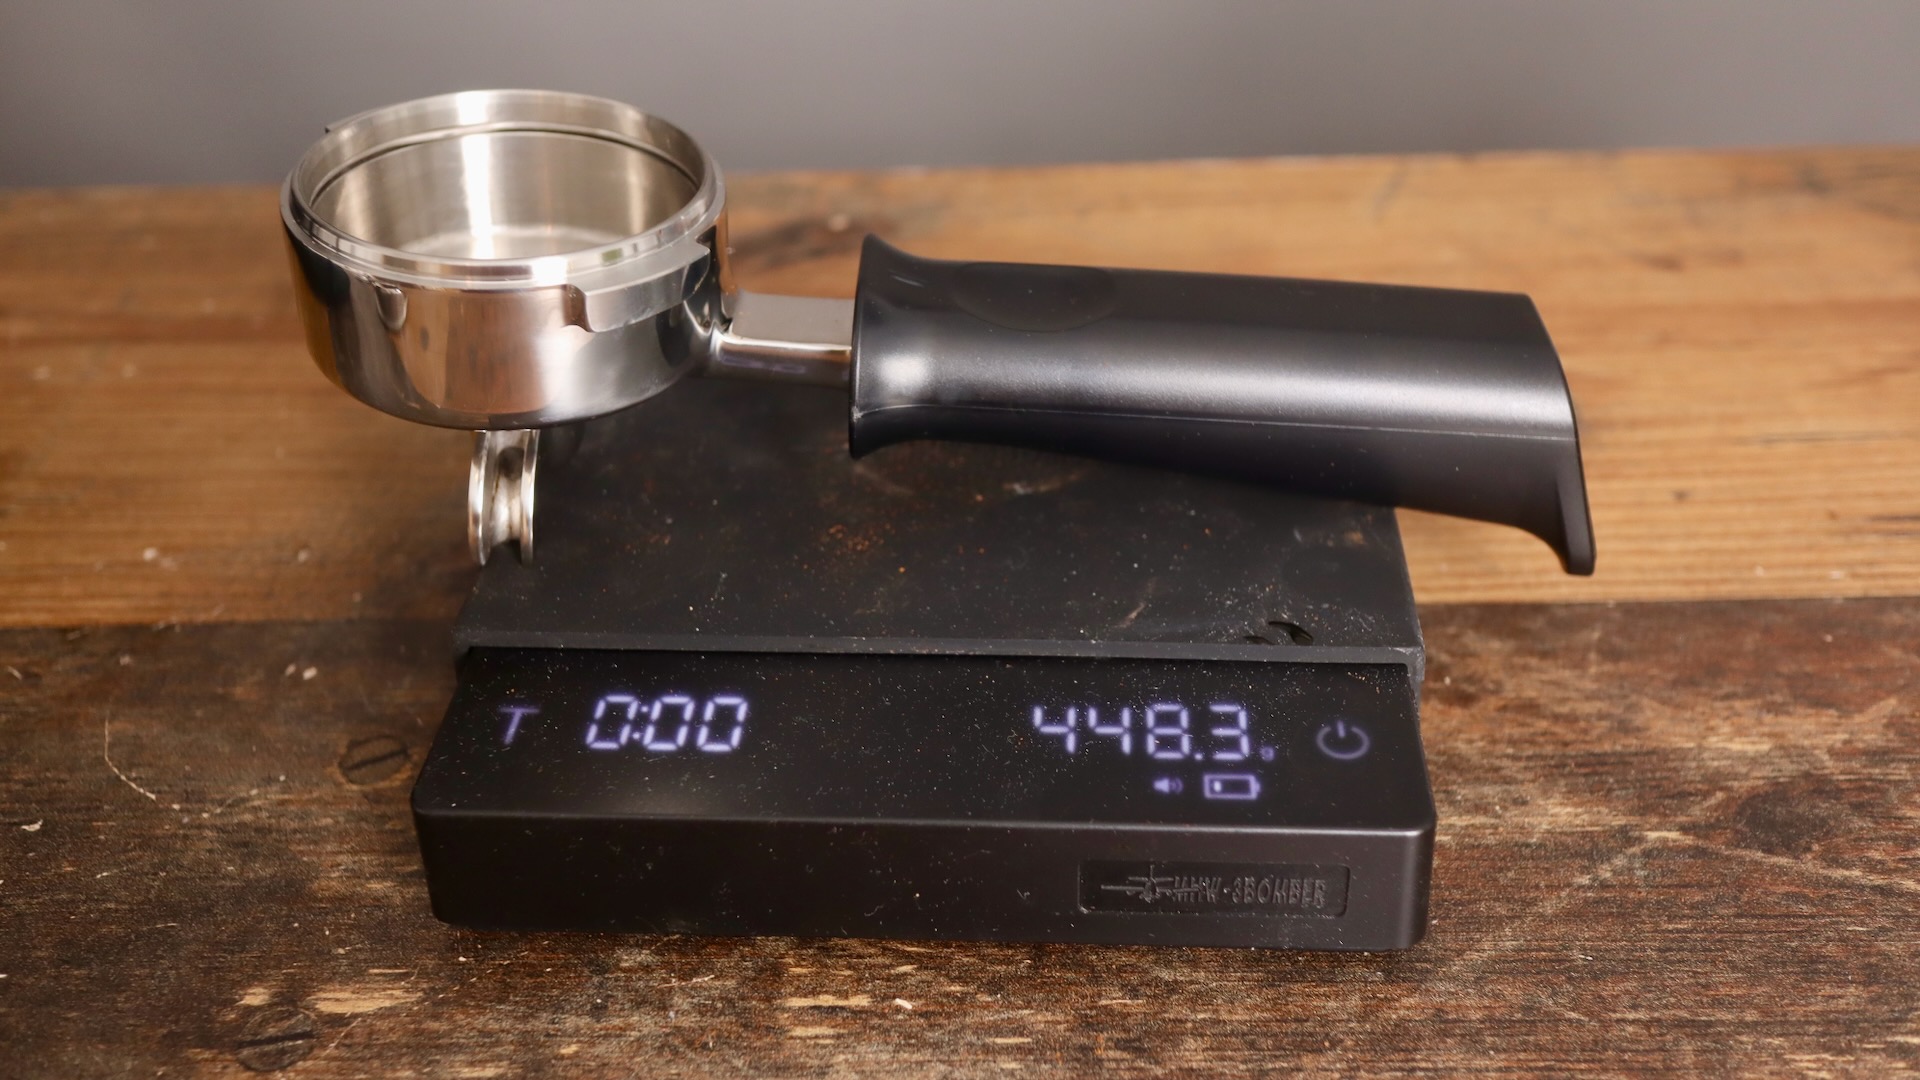
Gaggia Classic Up – Portafilter
The Gaggia comes with the aforementioned metal-based tamper, a single basket, double basket, and blind basket.
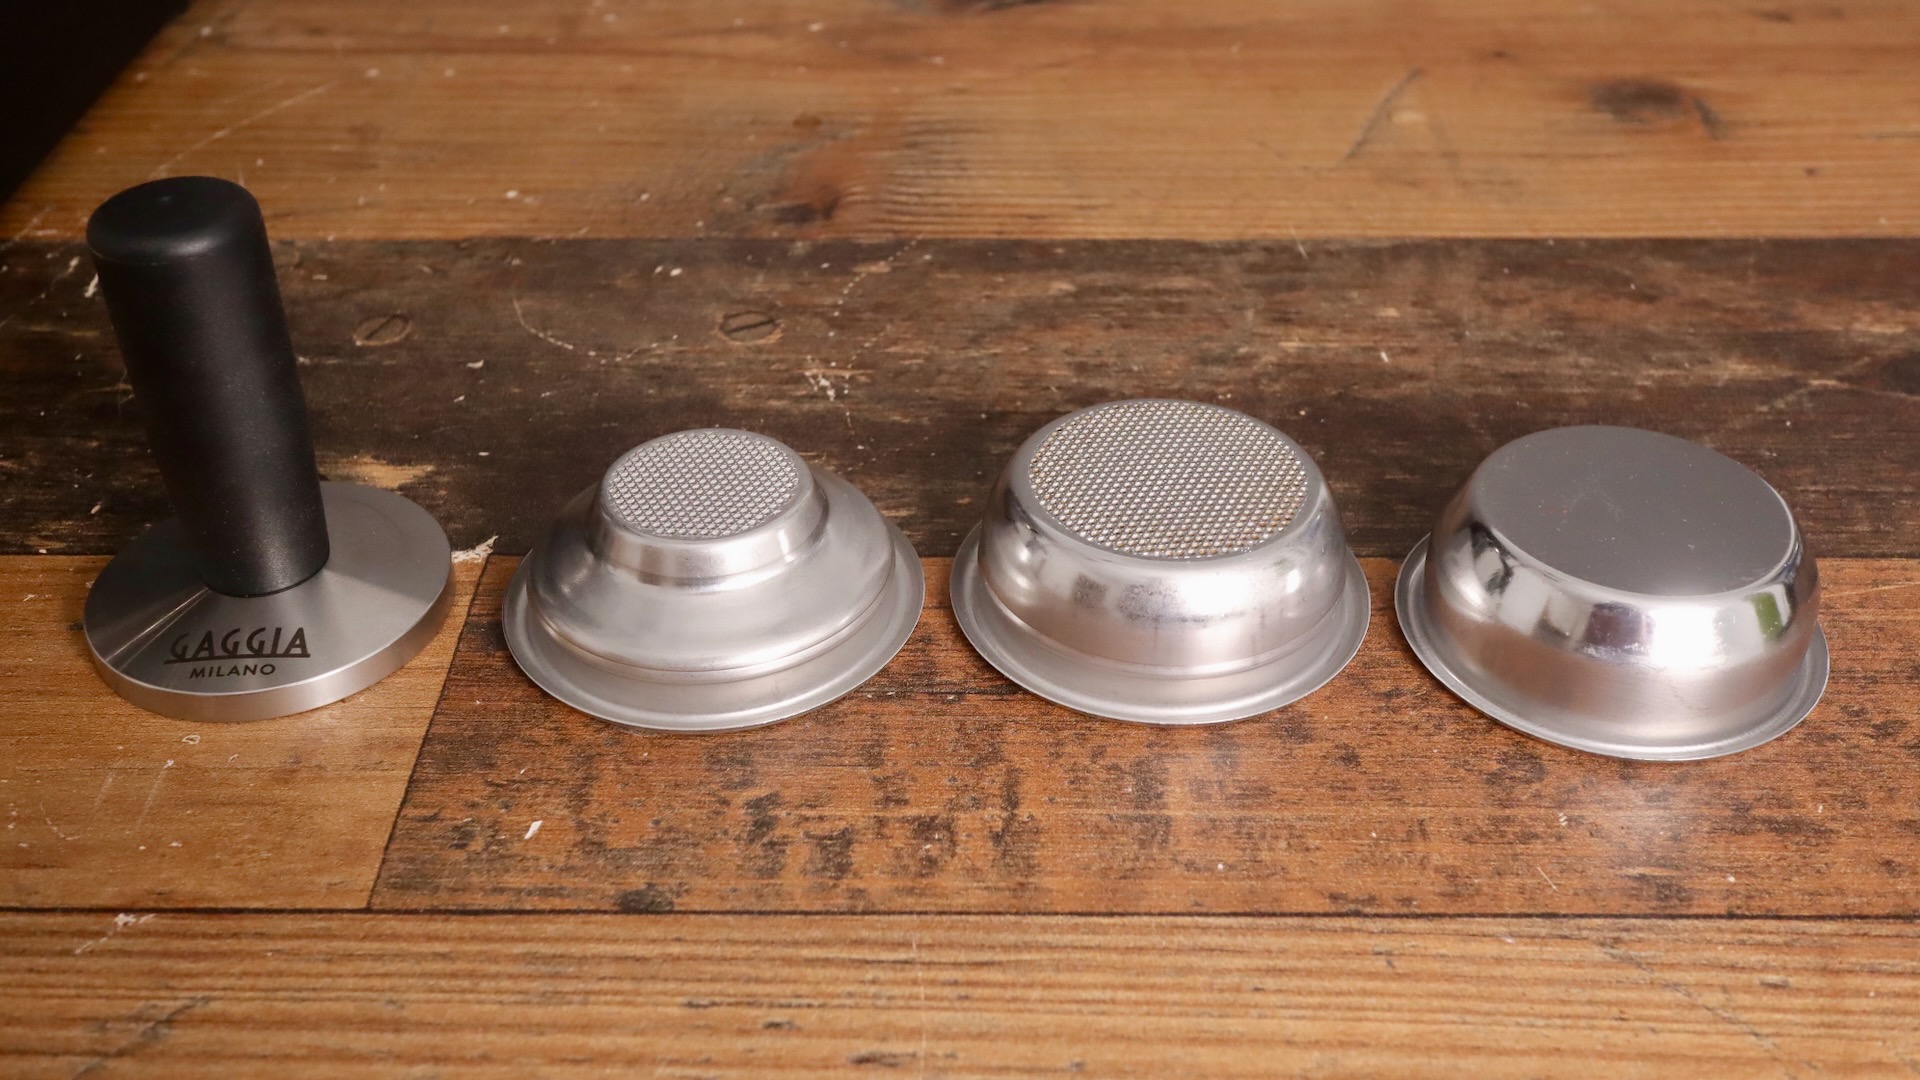
Gaggia Classic Up – Accessories
The accessories the Gaggia comes with are pretty nice, but a bottomless portafilter and a self-levelling tamper are always welcome additions.
Materials
My most popular blog article has to do with plastic free espresso machines. It seems these days, that people want to avoid plastic and aluminum as much as they can, especially in the hot water paths.
Well, the Gaggia Classic Up uses mainly metal and silicone in its brew path, and uses a brass boiler. Looking below, you can see that the Ulka pump on the right sucks up the water using a silicone hose. At the exit of the pump, there is a plastic OPV (over pressure valve) with stainless steel spring inside, set to 9 bar. If the water is over 9 bar, it exits out of the brass nipple, down the silicone hose, and back down into the water tank. If the water is within the threshold of 9 bar, it will exit via the orange braided silicone hose, and enter into the brass boiler. From there, it’s heated and exits out of the bottom of the boiler, after passing through a solenoid valve.
Therefore, the water only touches metal in its hot water path, but does touch silicone and some plastic in the cold water path.
Gaggia Classic Up – Brew Path
How is the Gaggia Classic Up for Espresso and Milk Foam?
So far, I’ve really been enjoying the Gaggia Classic Up for espresso. I do believe that especially for medium and lighter roasts that require higher heat to extract, that the included PID on the Classic Up does a great job to balance the flavors.
While I often get sour shots on thermoblock machines that cannot bring the heat for medium and lighter roasts, the Classic Up so far has given me flavorful and balanced shots, that while presenting the acidity in a pleasant way, are not overwhelming. The shots have been very enjoyable.
As for milk foam, the new articulating steam wand is helpful, and the PID for the steam temperature will help keep the steam pressure up. Even so, I am still practicing with this, and need more time to make a verdict on it.
Gaggia Classic Up – Espresso
Specifications
The Gaggia Classic Up retains its relatively small size and weight.
- 20 cm wide x 24 cm deep, 36 cm tall
- 9.3 kg, or 20.5 lbs
- 1250 watts
- Made in Italy
Pros and Cons of the Gaggia Classic Up
The Gaggia Classic Up offers some great upgrades over its predecessor, the Gaggia Classic Pro E24. But of course, there are still cons, too.
Pros:
- PID control, with pre-infusion
- Timer for shots, and alarm clock for wake-up
- Manometer for pressure feedback!
- Brass boiler (no aluminum)
- No plastic in hot water path
- Good heat up time of 5 minutes
- Telescoping drain pipe and lowered drip tray
- 58mm portafilter and baskets
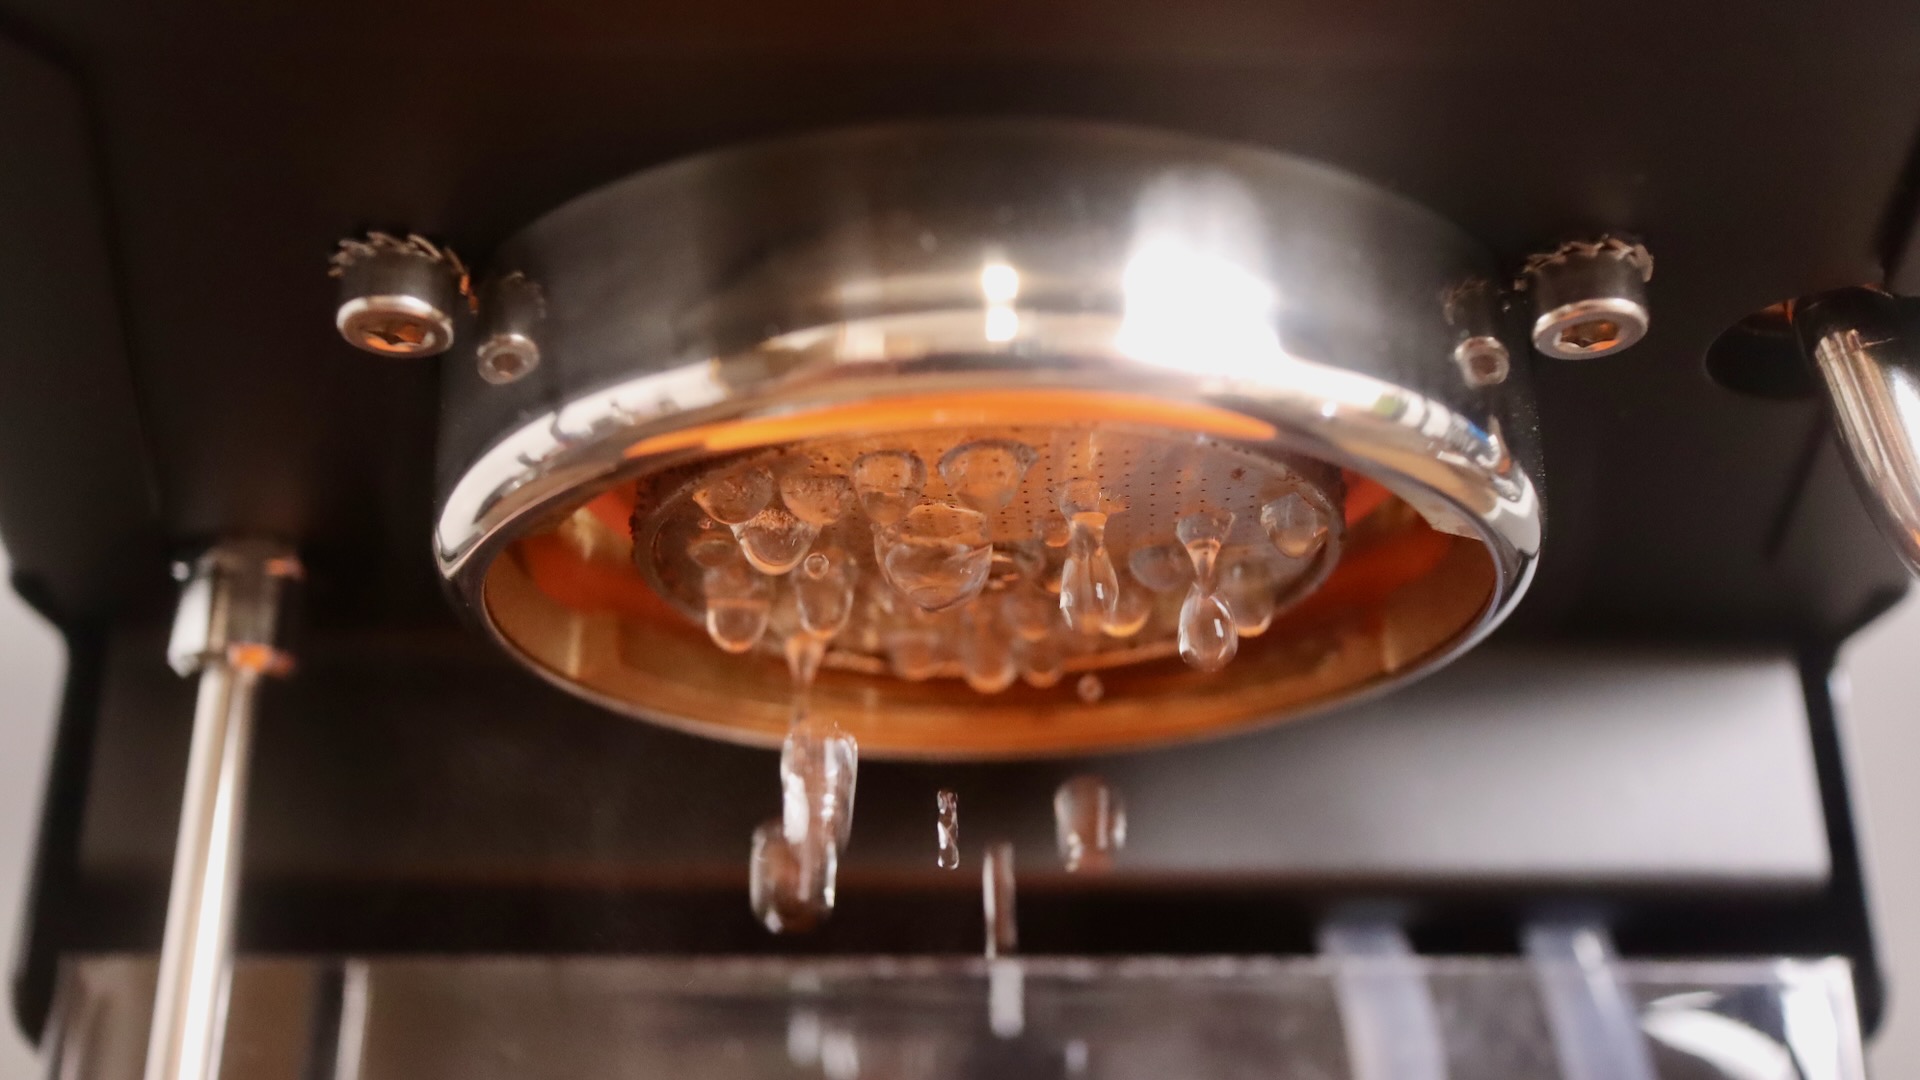
- Pretty good water distribution – see photos below.
- Adjustable standby time, up to 8 hours!
Cons
- Expensive price
- Steam wand still leaks
- No volumetric dosing
- Still no LED for water level
Verdict
Being that Gaggia is so well established with their Gaggia Classic Pro line, I do believe this is going to be a hit. People have loooong been waiting for a proper PID and manometer from the company. Finally, they are here, and they look nice – much nicer than the ones from Shades of Coffee, for example. Plus, you no longer have to void your warranty.
Even so, the machine is expensive for what it is, and I wish they would have included an LED light for seeing the water level in the tank better.
If Gaggia is able to sell this machine for let’s say $699 in the future on sale, it would sell like hot cakes. At its introductory price though, I think some people will wait.
I’d give this machine an A-for features, and a C for value.
Videos:
You are currently viewing a placeholder content from YouTube. To access the actual content, click the button below. Please note that doing so will share data with third-party providers.
More InformationMore Photos:
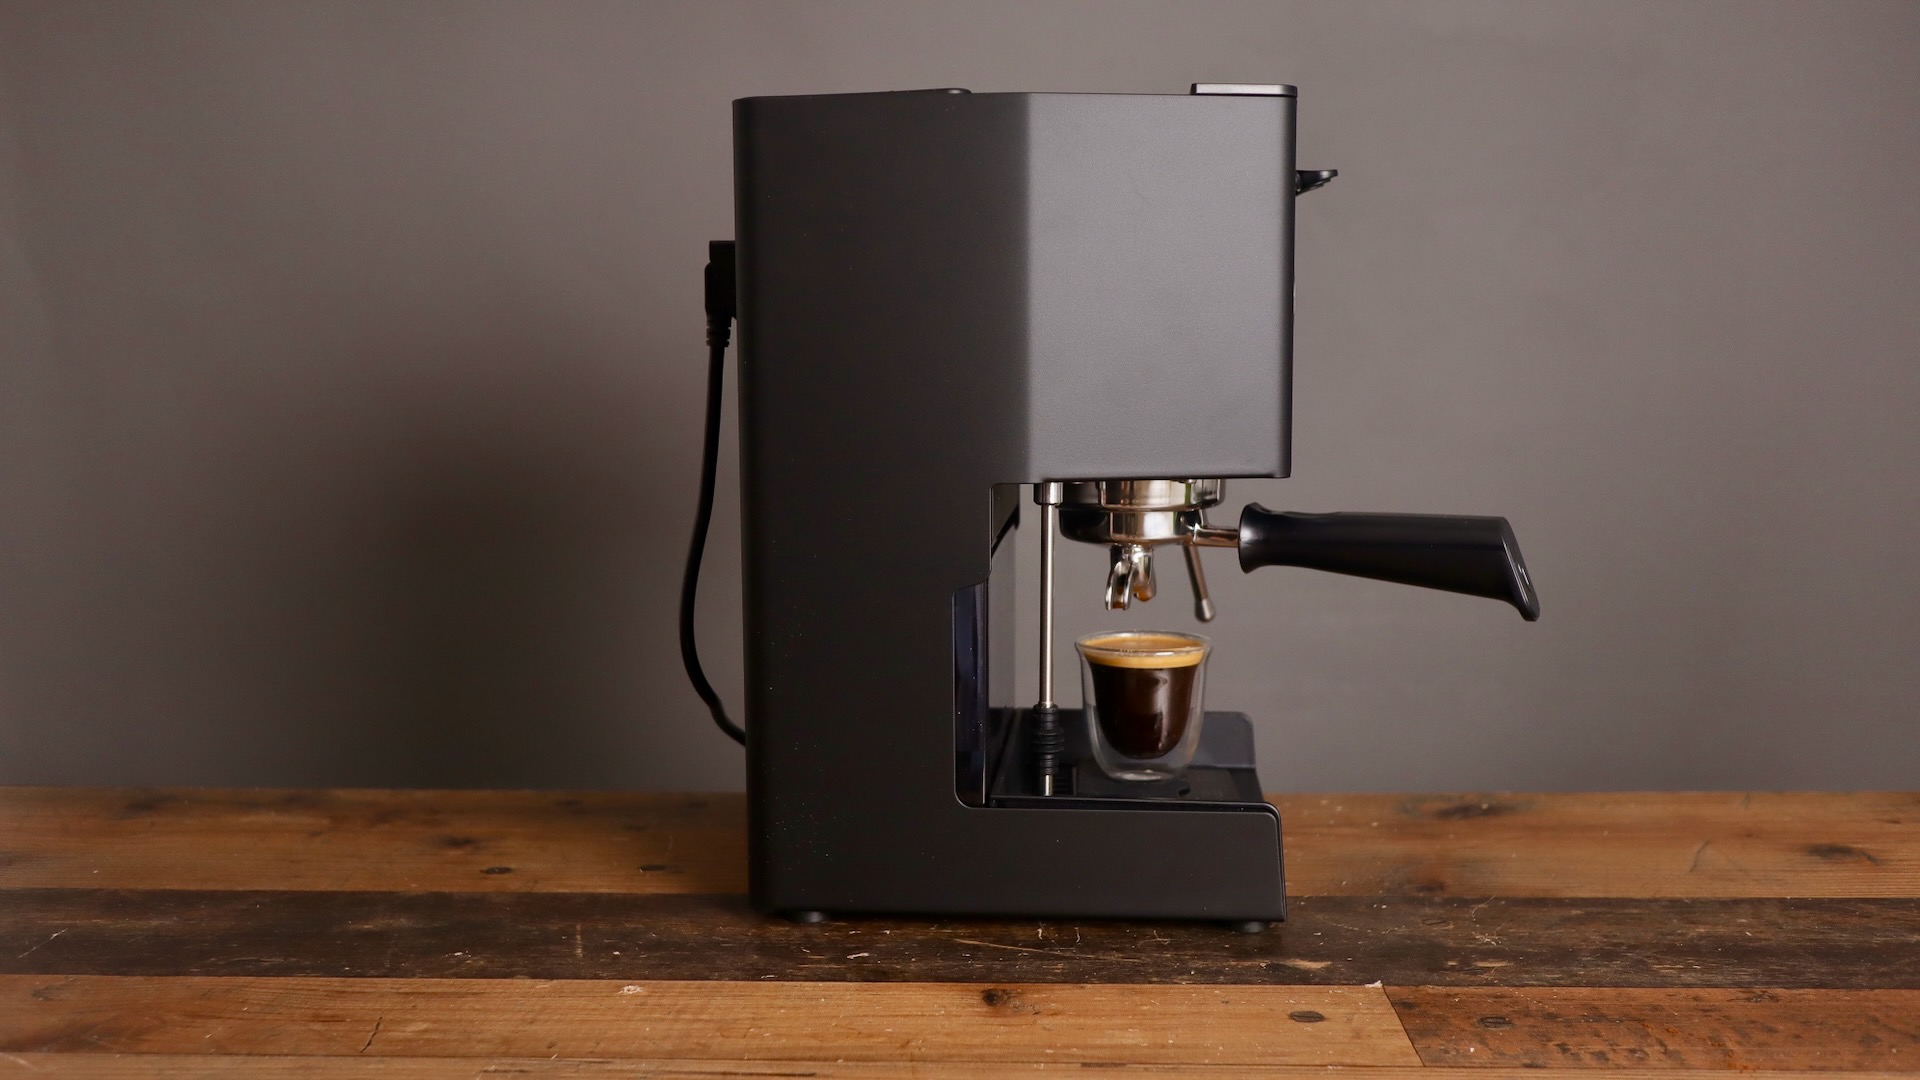
Gaggia Classic Up – Left side
Gaggia Classic Up – Front isometric
Gaggia Classic Up – Front with Espresso
Gaggia Classic Up – Right isometric
Gaggia Classic Up – Right side